SpringBoot,由Pivotal提供的框架,其设计目的是用来 简化工程配置和依赖管理等 。
入门案例
创建新模块
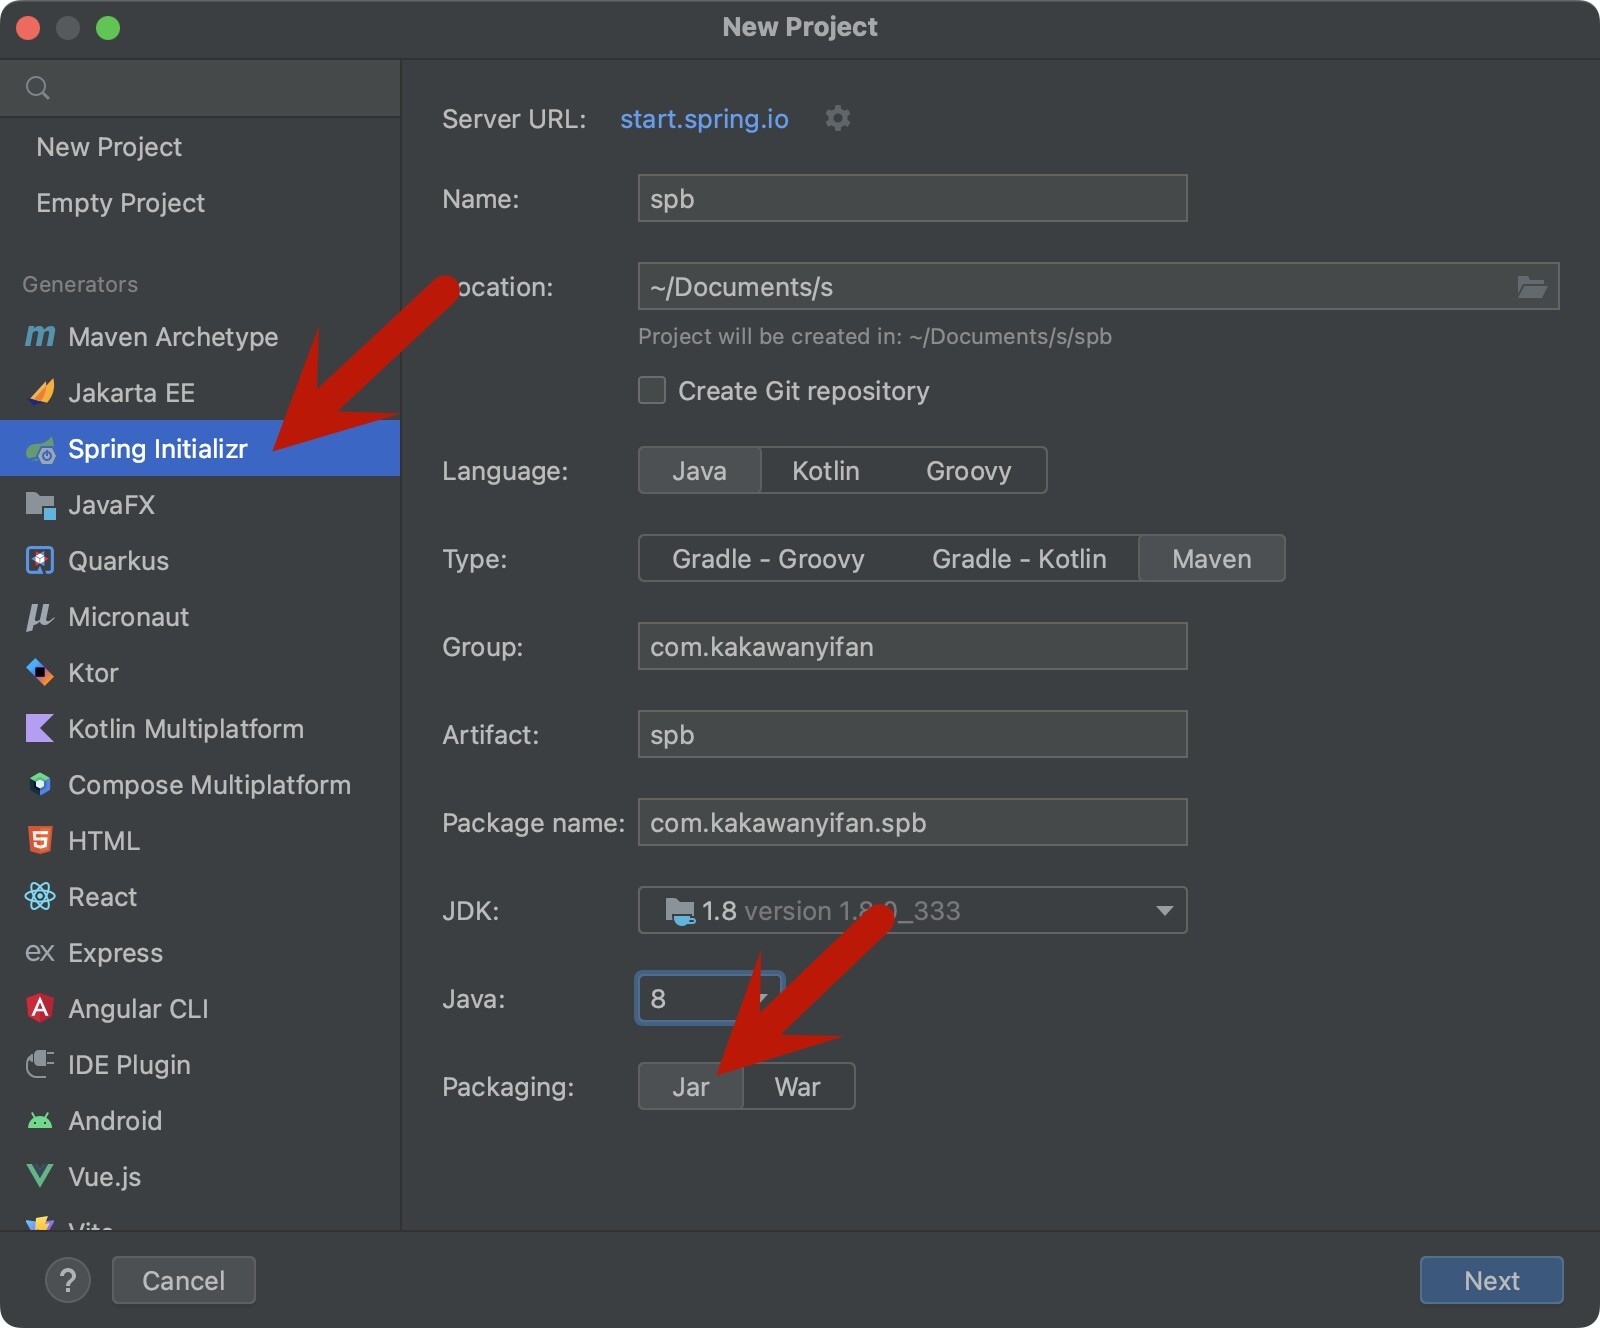
Spring Initializr
如图所示,我们选择Spring Initializr,打包方式设置为Jar。
JDK选择8,Java选择8。Server URL的start.spring.io,修改为https://start.aliyun.com/
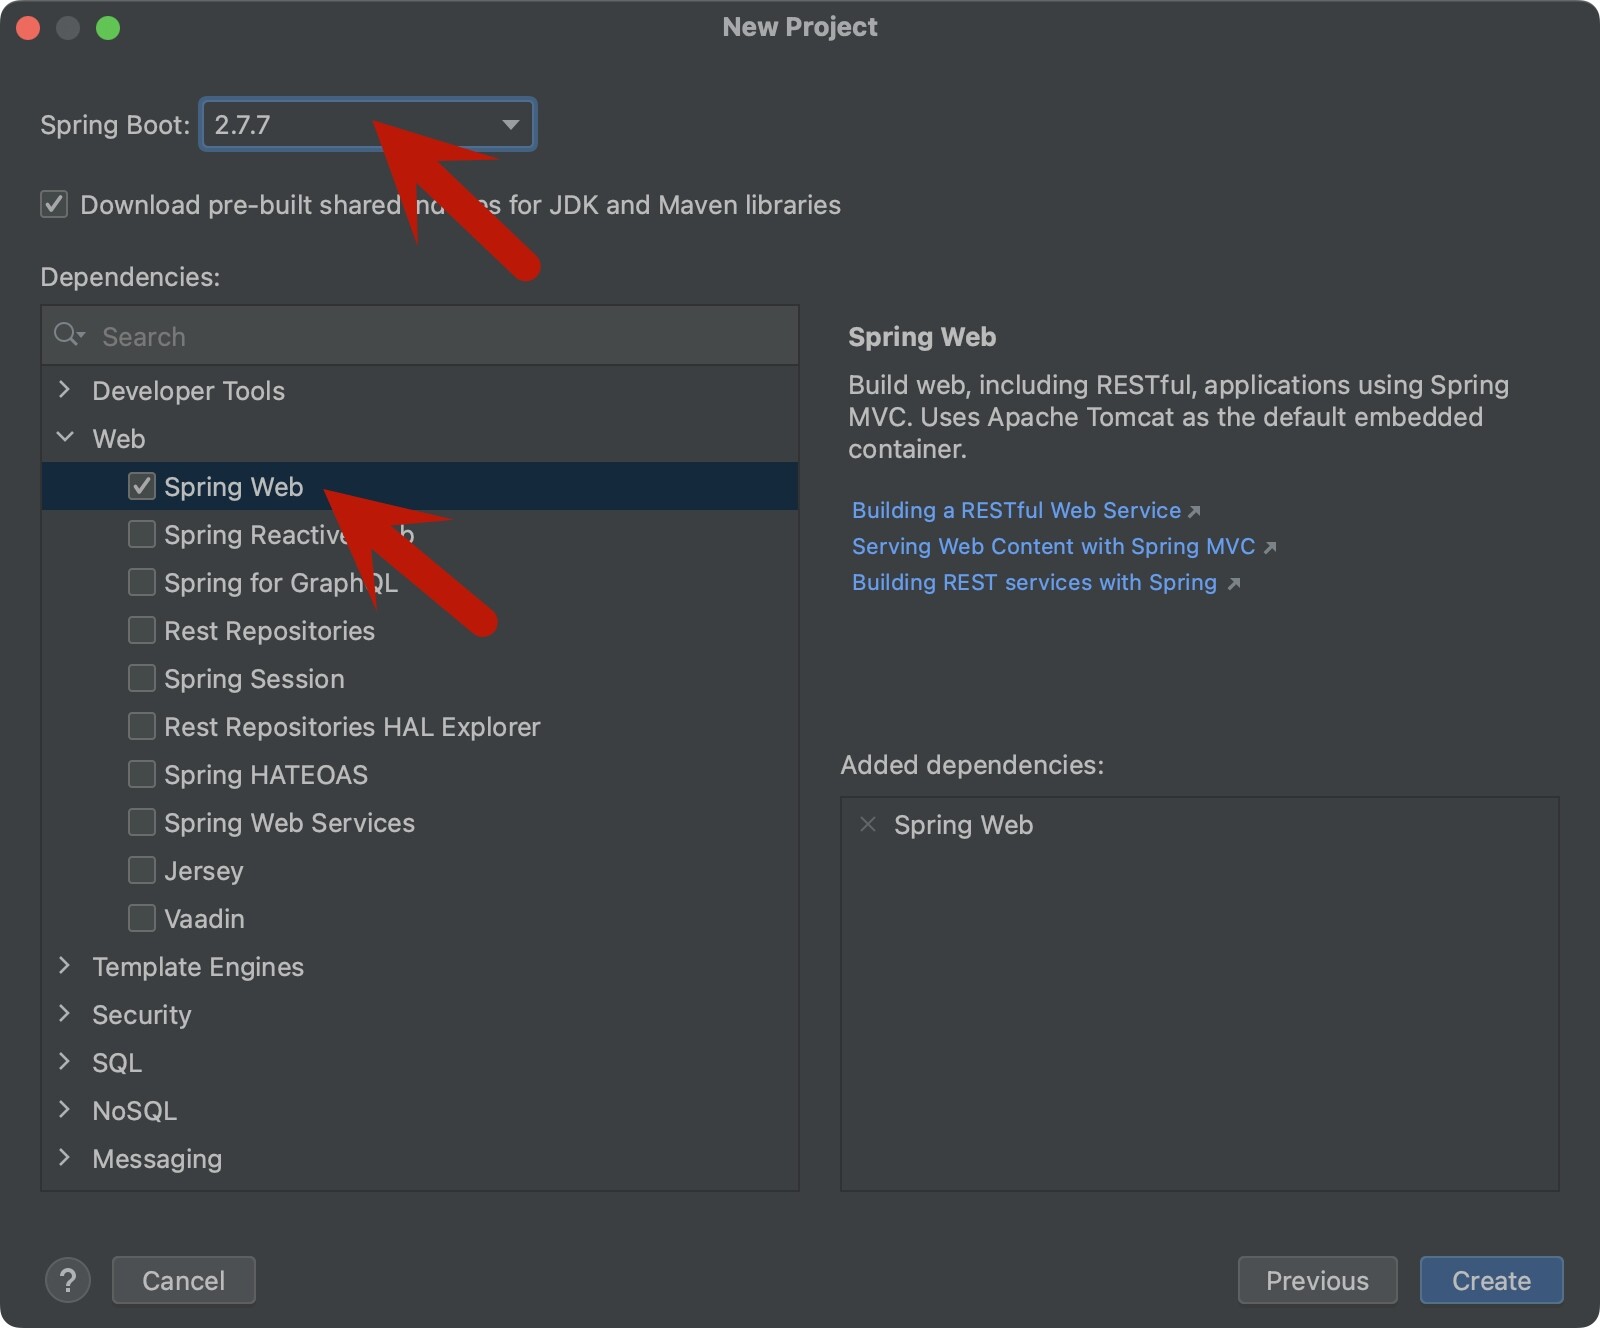
版本和依赖
选择Spring Boot的版本,勾选Spring Web依赖。
注意:
Spring Boot的版本不能选3版本的,因为我们是基于JDK8开发的,而3版本要求JDK版本是8以上的。Spring Boot的版本也可以在项目创建完成之后进行修改,位于pom.xml的<parent>的<version>标签。
模块创建完成
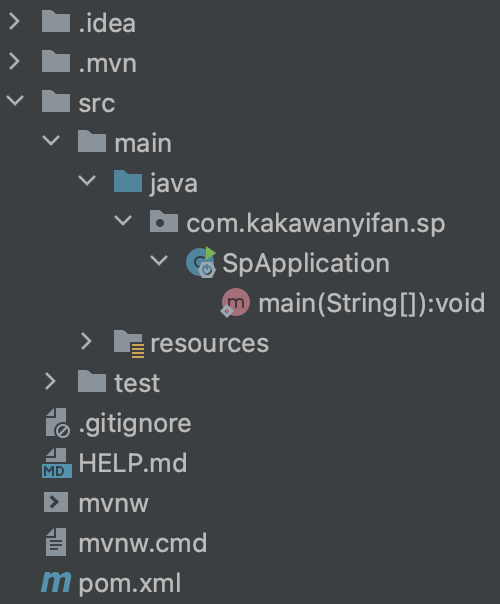
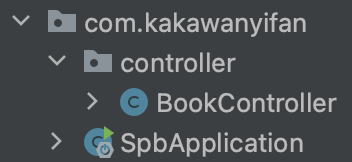
经过上述步骤,即创建完成,内容如下:
有一个"Application"类,而该类会在启动服务器时会用到。
最好将该类移动到com.kakawanyifan目录下,因为需要和包com.kakawanyifan.controller平级。
还有一些目录和文件,暂时对我们来说没有任何作用,所以可以将这些文件删除。可以删除的目录和文件如下:
.mvn.gitignoreHELP.mdmvnwmvnw.cmd
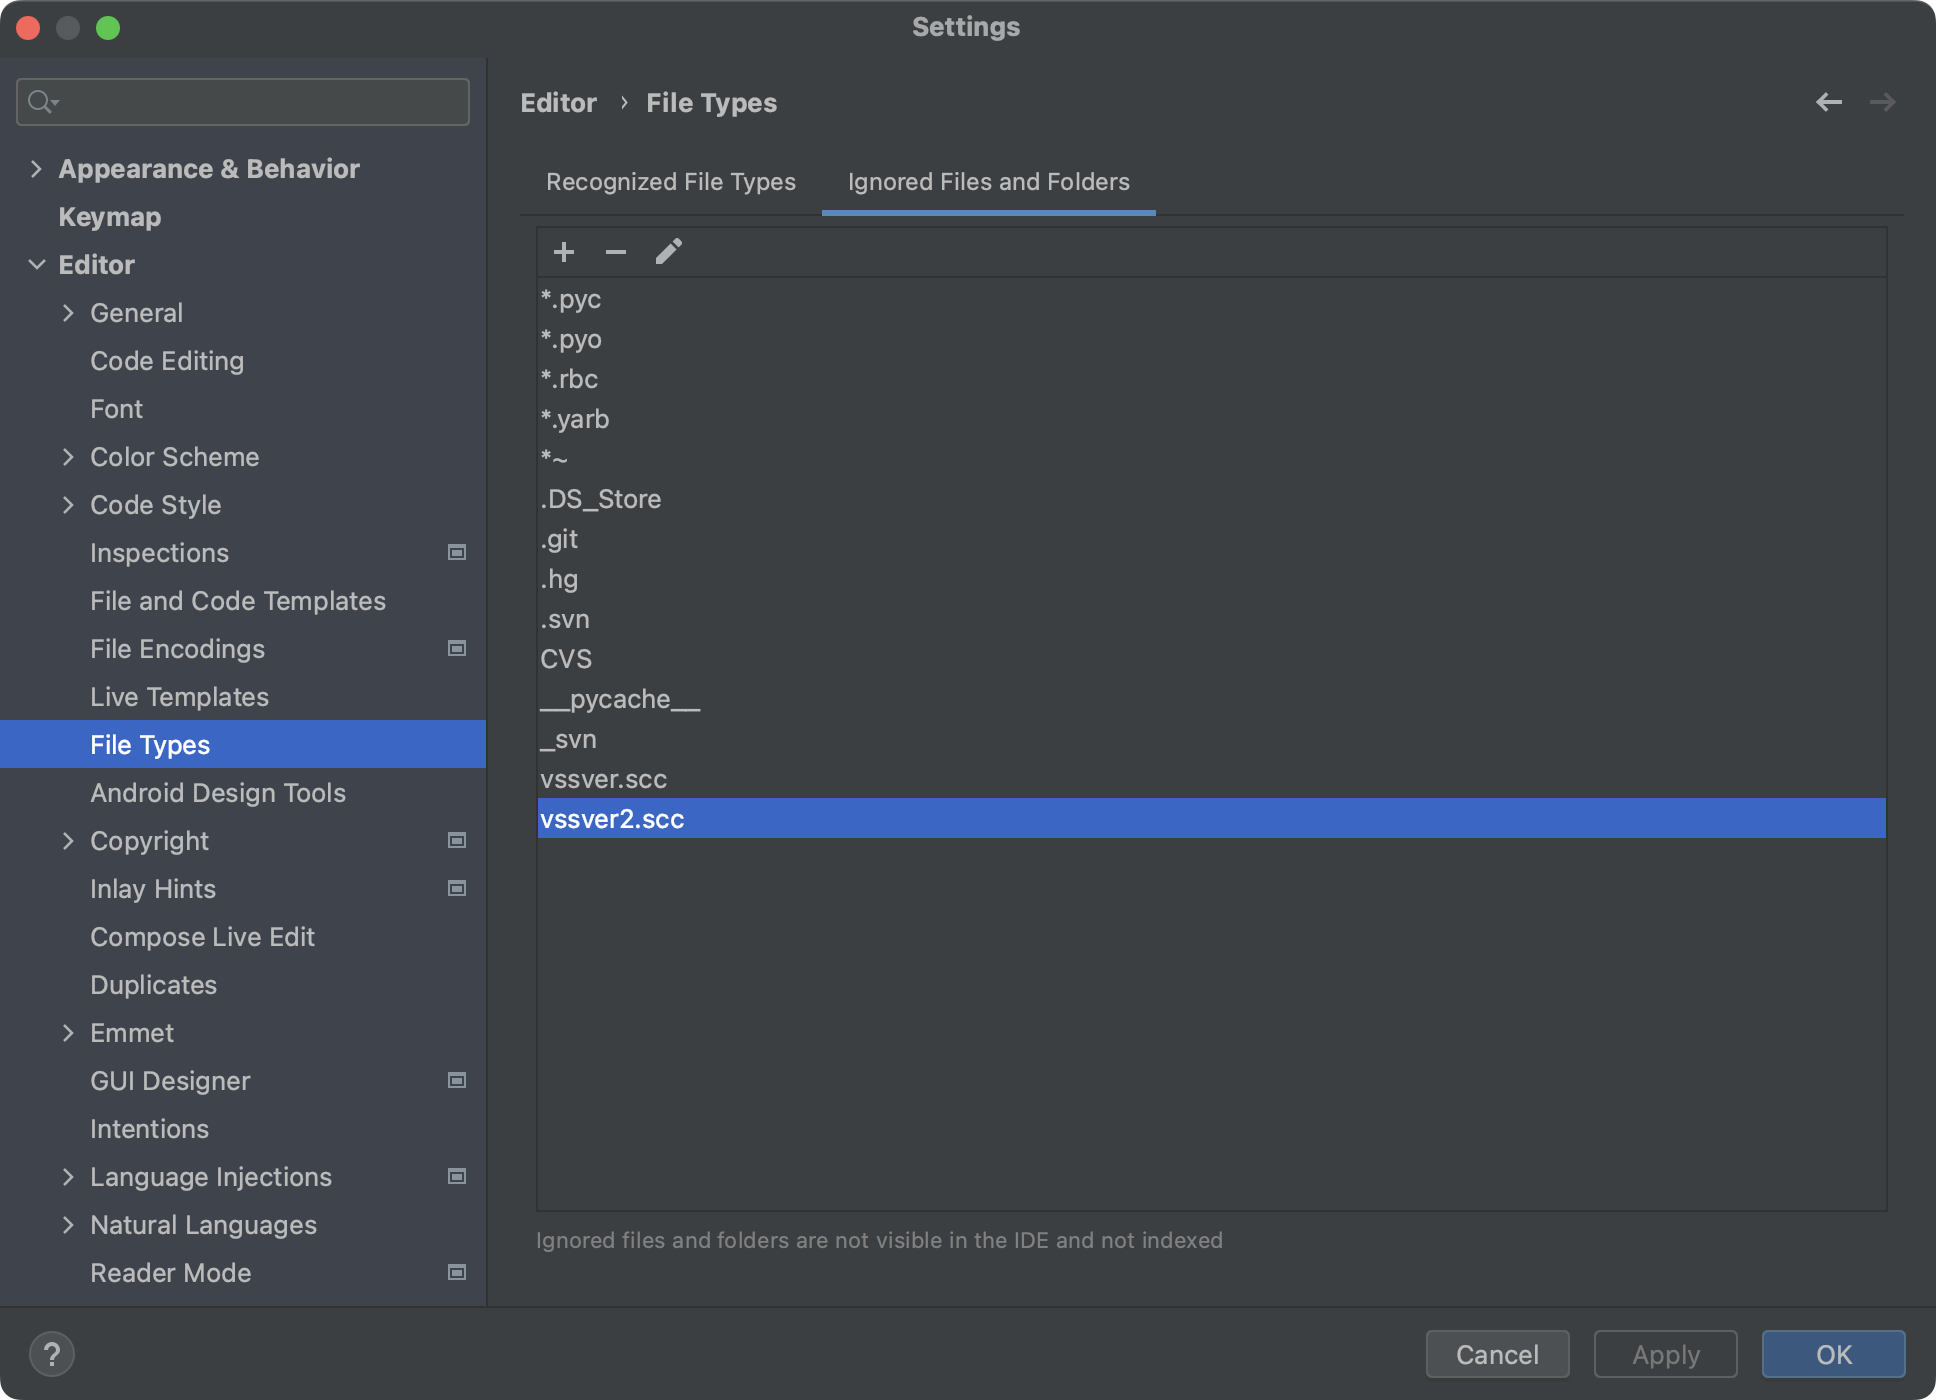
有些资料会建议我们隐藏这些文件和目录,方法如下:
Editor -> File Types -> Ignored Files and Folders
这绝对不是一个好办法,会给以后留坑。你以为这些文件都没了,因为通过IDEA都看不到了,但其实这些文件都还有。 尤其是把.gitignore隐藏。
(关于.gitignore的作用,我们在《未分类【计算机】:版本控制系统Git入门》 有过讨论)
创建Controller
在com.kakawanyifan.controller包下创建BookController:
1
2
3
4
5
6
7
8
9
10
11
12
13
14
15
16
package com.kakawanyifan.controller;import org.springframework.web.bind.annotation.GetMapping;import org.springframework.web.bind.annotation.PathVariable;import org.springframework.web.bind.annotation.RequestMapping;import org.springframework.web.bind.annotation.RestController;@RestController @RequestMapping ("/books" )public class BookController @GetMapping ("/{id}" ) public String getById (@PathVariable Integer id) System.out.println("id : " + id); return "hello , spring boot!" ; } }
启动服务
直接运行项目com.kakawantyifan包下的"Application"类(引导类),并初始化Spring容器。
运行结果:
1
2
3
4
5
6
7
8
9
10
11
12
13
14
15
16
17
. ____ _ __ _ _ /\\ / ___'_ __ _ _(_)_ __ __ _ \ \ \ \ ( ( )\___ | '_ | '_| | '_ \/ _` | \ \ \ \ \\/ ___)| |_)| | | | | || (_| | ) ) ) ) ' |____| .__|_| |_|_| |_\__, | / / / / =========|_|==============|___/=/_/_/_/ :: Spring Boot :: (v2.7.7) 2022-12-30 10:57:40.393 INFO 79564 --- [ main] com.kakawanyifan.SpbApplication : Starting SpbApplication using Java 1.8.0_301 on WANYF with PID 79564 (C:\Users\wanyf\Desktop\s\spb\target\classes started by wanyf in C:\Users\wanyf\Desktop\s\spb) 2022-12-30 10:57:40.397 INFO 79564 --- [ main] com.kakawanyifan.SpbApplication : No active profile set, falling back to 1 default profile: "default" 2022-12-30 10:57:41.375 INFO 79564 --- [ main] o.s.b.w.embedded.tomcat.TomcatWebServer : Tomcat initialized with port(s): 8080 (http) 2022-12-30 10:57:41.386 INFO 79564 --- [ main] o.apache.catalina.core.StandardService : Starting service [Tomcat] 2022-12-30 10:57:41.387 INFO 79564 --- [ main] org.apache.catalina.core.StandardEngine : Starting Servlet engine: [Apache Tomcat/9.0.70] 2022-12-30 10:57:41.714 INFO 79564 --- [ main] o.a.c.c.C.[Tomcat].[localhost].[/] : Initializing Spring embedded WebApplicationContext 2022-12-30 10:57:41.715 INFO 79564 --- [ main] w.s.c.ServletWebServerApplicationContext : Root WebApplicationContext: initialization completed in 1265 ms 2022-12-30 10:57:42.039 INFO 79564 --- [ main] o.s.b.w.embedded.tomcat.TomcatWebServer : Tomcat started on port(s): 8080 (http) with context path '' 2022-12-30 10:57:42.048 INFO 79564 --- [ main] com.kakawanyifan.SpbApplication : Started SpbApplication in 2.214 seconds (JVM running for 3.291)
注意日志如下部分,SpringBoot内置了Tomcat。
1
2
3
o.s.b.w.embedded.tomcat.TomcatWebServer : Tomcat initialized with port(s): 8080 (http) o.apache.catalina.core.StandardService : Starting service [Tomcat] org.apache.catalina.core.StandardEngine : Starting Servlet engine: [Apache Tomcat/9.0.70]
我们可以测试一下我们的程序。
如果出现了如下的报错:
1
2
Whitelabel Error Page This application has no explicit mapping for /error, so you are seeing this as a fallback.
原因可能是我们Application类的位置不对,"Application"类需要与controller包同一级,即需要在controller类的上一层,如下:
关于原因,我们在《23.SpringBoot [3/3]》 讨论"AutoConfigurationPackages.Registrar"的部分,会进行讨论。
和Spring创建的比较
上文SpringBoot工程的创建,和我们之前Spring工程的创建,存在这些差异:
类/配置文件
Spring
SpringBoot
pom文件中的坐标
手工添加
勾选添加
web3.0配置类
手工制作
无
Spring/SpringMVC配置类
手工制作
无
起步依赖分析
依赖管理
注意看我们的pom.xml,继承了父工程spring-boot-starter-parent。
1 2 3 4 5 6 <parent > <groupId > org.springframework.boot</groupId > <artifactId > spring-boot-starter-parent</artifactId > <version > 2.7.7</version > <relativePath /> </parent >
按住command键,点进父工程,发现父工程中又指定了一个父工程:
1
2
3
4
5
6
7
8
9
10
11
12
13
14
15
<?xml version="1.0" encoding="UTF-8"?> <project xmlns ="http://maven.apache.org/POM/4.0.0" xsi:schemaLocation ="http://maven.apache.org/POM/4.0.0 https://maven.apache.org/xsd/maven-4.0.0.xsd" xmlns:xsi ="http://www.w3.org/2001/XMLSchema-instance" > <modelVersion > 4.0.0</modelVersion > <parent > <groupId > org.springframework.boot</groupId > <artifactId > spring-boot-dependencies</artifactId > <version > 2.7.7</version > </parent > <artifactId > spring-boot-starter-parent</artifactId > <packaging > pom</packaging > <name > spring-boot-starter-parent</name > 【部分代码略】 </project >
再点进spring-boot-dependencies:
1
2
3
4
5
6
7
8
9
10
11
12
13
14
15
16
17
18
19
20
21
22
23
24
25
26
27
28
29
30
31
32
33
34
35
36
37
38
39
40
41
42
43
44
45
46
47
48
49
50
51
52
53
54
55
56
57
58
59
60
61
62
63
64
65
66
67
68
69
70
71
72
<?xml version="1.0" encoding="UTF-8"?> <project xmlns ="http://maven.apache.org/POM/4.0.0" xsi:schemaLocation ="http://maven.apache.org/POM/4.0.0 https://maven.apache.org/xsd/maven-4.0.0.xsd" xmlns:xsi ="http://www.w3.org/2001/XMLSchema-instance" > <modelVersion > 4.0.0</modelVersion > <groupId > org.springframework.boot</groupId > <artifactId > spring-boot-dependencies</artifactId > <version > 2.7.7</version > <packaging > pom</packaging > <name > spring-boot-dependencies</name > 【部分代码略】 <properties > <activemq.version > 5.16.5</activemq.version > <antlr2.version > 2.7.7</antlr2.version > <appengine-sdk.version > 1.9.98</appengine-sdk.version > <artemis.version > 2.19.1</artemis.version > <aspectj.version > 1.9.7</aspectj.version > <assertj.version > 3.22.0</assertj.version > <atomikos.version > 4.0.6</atomikos.version > <awaitility.version > 4.2.0</awaitility.version > <build-helper-maven-plugin.version > 3.3.0</build-helper-maven-plugin.version > 【部分代码略】 </properties > <dependencyManagement > <dependencies > <dependency > <groupId > org.apache.activemq</groupId > <artifactId > activemq-amqp</artifactId > <version > ${activemq.version}</version > </dependency > <dependency > <groupId > org.apache.activemq</groupId > <artifactId > activemq-blueprint</artifactId > <version > ${activemq.version}</version > </dependency > <dependency > <groupId > org.apache.activemq</groupId > <artifactId > activemq-broker</artifactId > <version > ${activemq.version}</version > </dependency > <dependency > <groupId > org.apache.activemq</groupId > <artifactId > activemq-camel</artifactId > <version > ${activemq.version}</version > </dependency > <dependency > <groupId > org.apache.activemq</groupId > <artifactId > activemq-client</artifactId > <version > ${activemq.version}</version > </dependency > <dependency > <groupId > org.apache.activemq</groupId > <artifactId > activemq-console</artifactId > <version > ${activemq.version}</version > <exclusions > <exclusion > <groupId > commons-logging</groupId > <artifactId > commons-logging</artifactId > </exclusion > </exclusions > </dependency > 【部分代码略】 </dependencies > </dependencyManagement > 【部分代码略】 </project >
spring-boot-dependencies,配置了诸多的依赖的版本,以及依赖之间的关系。在我们在开发Spring的程序的时候,这种依赖的处理,是非常繁琐的一件事。现在相当于SpringBoot帮我们整理了一份依赖配置的最佳实践。
批量配置
在我们创建的工程中的pom.xml中配置了如下依赖
1 2 3 4 5 6 7 8 9 10 11 12 <dependencies > <dependency > <groupId > org.springframework.boot</groupId > <artifactId > spring-boot-starter-web</artifactId > </dependency > <dependency > <groupId > org.springframework.boot</groupId > <artifactId > spring-boot-starter-test</artifactId > <scope > test</scope > </dependency > </dependencies >
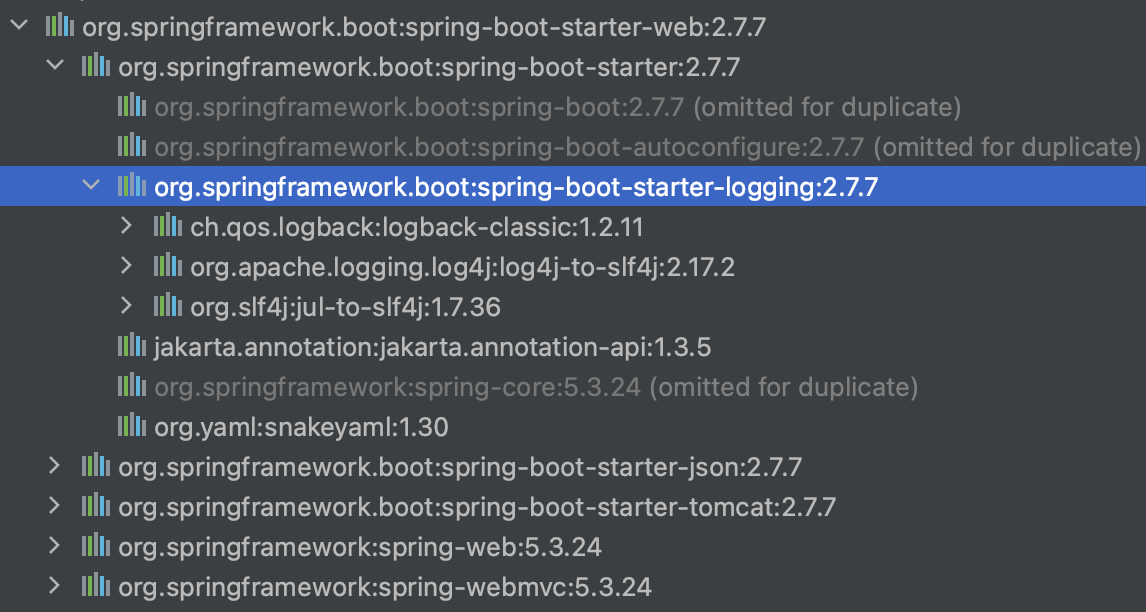
我们点进spring-boot-starter-web
1
2
3
4
5
6
7
8
9
10
11
12
13
14
15
16
17
18
19
20
21
22
23
24
25
26
27
28
29
30
31
32
33
34
35
36
37
38
39
40
41
42
43
44
45
46
47
48
49
<?xml version="1.0" encoding="UTF-8"?> <project xsi:schemaLocation ="http://maven.apache.org/POM/4.0.0 https://maven.apache.org/xsd/maven-4.0.0.xsd" xmlns ="http://maven.apache.org/POM/4.0.0" xmlns:xsi ="http://www.w3.org/2001/XMLSchema-instance" > <modelVersion > 4.0.0</modelVersion > <groupId > org.springframework.boot</groupId > <artifactId > spring-boot-starter-web</artifactId > <version > 2.7.7</version > <name > spring-boot-starter-web</name > 【部分代码略】 <dependencies > <dependency > <groupId > org.springframework.boot</groupId > <artifactId > spring-boot-starter</artifactId > <version > 2.7.7</version > <scope > compile</scope > </dependency > <dependency > <groupId > org.springframework.boot</groupId > <artifactId > spring-boot-starter-json</artifactId > <version > 2.7.7</version > <scope > compile</scope > </dependency > <dependency > <groupId > org.springframework.boot</groupId > <artifactId > spring-boot-starter-tomcat</artifactId > <version > 2.7.7</version > <scope > compile</scope > </dependency > <dependency > <groupId > org.springframework</groupId > <artifactId > spring-web</artifactId > <version > 5.3.24</version > <scope > compile</scope > </dependency > <dependency > <groupId > org.springframework</groupId > <artifactId > spring-webmvc</artifactId > <version > 5.3.24</version > <scope > compile</scope > </dependency > </dependencies > </project >
会看到spring-boot-starter-web帮我们批量的导入了许多依赖。
其中有spring-webmvc的依赖,这就是为什么我们的pom.xml没有依赖spring-webmvc,但还能正常使用springMVC的原因。
还有spring-boot-starter-tomcat,这也是一个起步依赖,从名字基本能依赖了tomcat,所以我们的工程能正常启动。
小结
开发SpringBoot程序要继承spring-boot-starter-parent。
spring-boot-starter-parent中定义了若干个依赖管理。继承parent可以避免依赖版本冲突,使用任意坐标时,仅书写GAV中的G和A,V由SpringBoot提供。除非SpringBoot未提供对应版本V;或者发生坐标错误,指定V。
切换Web服务器
上文,我们启动工程使用的是tomcat,那能不能不使用tomcat,而使用jetty呢?<exclusion>排除tomcat,再自行引入jetty。
排除tomcat:
1 2 3 4 5 6 7 8 9 10 <dependency > <groupId > org.springframework.boot</groupId > <artifactId > spring-boot-starter-web</artifactId > <exclusions > <exclusion > <artifactId > spring-boot-starter-tomcat</artifactId > <groupId > org.springframework.boot</groupId > </exclusion > </exclusions > </dependency >
如果这时候,我们运行引导类,我们会看到日志信息种没有任何关于tomcat的内容。
1
2
3
4
5
6
7
8
9
10
11
. ____ _ __ _ _ /\\ / ___'_ __ _ _(_)_ __ __ _ \ \ \ \ ( ( )\___ | '_ | '_| | '_ \/ _` | \ \ \ \ \\/ ___)| |_)| | | | | || (_| | ) ) ) ) ' |____| .__|_| |_|_| |_\__, | / / / / =========|_|==============|___/=/_/_/_/ :: Spring Boot :: (v2.7.7) 2022-12-31 23:56:34.617 INFO 2066 --- [ main] com.kakawanyifan.SpbApplication : Starting SpbApplication using Java 1.8.0_333 on 192.168.0.107 with PID 2066 (/Users/kaka/Documents/s/spb/target/classes started by kaka in /Users/kaka/Documents/s/spb) 2022-12-31 23:56:34.619 INFO 2066 --- [ main] com.kakawanyifan.SpbApplication : No active profile set, falling back to 1 default profile: "default" 2022-12-31 23:56:34.993 INFO 2066 --- [ main] com.kakawanyifan.SpbApplication : Started SpbApplication in 0.58 seconds (JVM running for 0.906)
引入jetty:
1 2 3 4 5 6 7 8 9 10 11 12 13 14 15 16 17 18 19 20 21 22 23 <dependencies > <dependency > <groupId > org.springframework.boot</groupId > <artifactId > spring-boot-starter-web</artifactId > <exclusions > <exclusion > <artifactId > spring-boot-starter-tomcat</artifactId > <groupId > org.springframework.boot</groupId > </exclusion > </exclusions > </dependency > <dependency > <groupId > org.springframework.boot</groupId > <artifactId > spring-boot-starter-jetty</artifactId > </dependency > <dependency > <groupId > org.springframework.boot</groupId > <artifactId > spring-boot-starter-test</artifactId > <scope > test</scope > </dependency > </dependencies >
接下来再次运行引导类,有jetty了。
1
2
3
4
5
6
7
8
9
10
11
12
13
14
15
16
17
18
19
20
21
22
23
24
25
26
. ____ _ __ _ _ /\\ / ___'_ __ _ _(_)_ __ __ _ \ \ \ \ ( ( )\___ | '_ | '_| | '_ \/ _` | \ \ \ \ \\/ ___)| |_)| | | | | || (_| | ) ) ) ) ' |____| .__|_| |_|_| |_\__, | / / / / =========|_|==============|___/=/_/_/_/ :: Spring Boot :: (v2.7.7) 2022-12-31 23:59:17.677 INFO 2138 --- [ main] com.kakawanyifan.SpbApplication : Starting SpbApplication using Java 1.8.0_333 on 192.168.0.107 with PID 2138 (/Users/kaka/Documents/s/spb/target/classes started by kaka in /Users/kaka/Documents/s/spb) 2022-12-31 23:59:17.679 INFO 2138 --- [ main] com.kakawanyifan.SpbApplication : No active profile set, falling back to 1 default profile: "default" 2022-12-31 23:59:18.114 INFO 2138 --- [ main] org.eclipse.jetty.util.log : Logging initialized @1016ms to org.eclipse.jetty.util.log.Slf4jLog 2022-12-31 23:59:18.186 INFO 2138 --- [ main] o.s.b.w.e.j.JettyServletWebServerFactory : Server initialized with port: 8080 2022-12-31 23:59:18.187 INFO 2138 --- [ main] org.eclipse.jetty.server.Server : jetty-9.4.50.v20221201; built: 2022-12-01T22:07:03.915Z; git: da9a0b30691a45daf90a9f17b5defa2f1434f882; jvm 1.8.0_333-b02 2022-12-31 23:59:18.207 INFO 2138 --- [ main] o.e.j.s.h.ContextHandler.application : Initializing Spring embedded WebApplicationContext 2022-12-31 23:59:18.207 INFO 2138 --- [ main] w.s.c.ServletWebServerApplicationContext : Root WebApplicationContext: initialization completed in 502 ms 2022-12-31 23:59:18.248 INFO 2138 --- [ main] org.eclipse.jetty.server.session : DefaultSessionIdManager workerName=node0 2022-12-31 23:59:18.249 INFO 2138 --- [ main] org.eclipse.jetty.server.session : No SessionScavenger set, using defaults 2022-12-31 23:59:18.249 INFO 2138 --- [ main] org.eclipse.jetty.server.session : node0 Scavenging every 600000ms 2022-12-31 23:59:18.254 INFO 2138 --- [ main] o.e.jetty.server.handler.ContextHandler : Started o.s.b.w.e.j.JettyEmbeddedWebAppContext@182b435b{application,/,[file:///private/var/folders/qb/0xj3_9gs6fb7mqd5qtkyf2vh0000gn/T/jetty-docbase.8080.1733051428969071568/],AVAILABLE} 2022-12-31 23:59:18.254 INFO 2138 --- [ main] org.eclipse.jetty.server.Server : Started @1158ms 2022-12-31 23:59:18.441 INFO 2138 --- [ main] o.e.j.s.h.ContextHandler.application : Initializing Spring DispatcherServlet 'dispatcherServlet' 2022-12-31 23:59:18.441 INFO 2138 --- [ main] o.s.web.servlet.DispatcherServlet : Initializing Servlet 'dispatcherServlet' 2022-12-31 23:59:18.441 INFO 2138 --- [ main] o.s.web.servlet.DispatcherServlet : Completed initialization in 0 ms 2022-12-31 23:59:18.457 INFO 2138 --- [ main] o.e.jetty.server.AbstractConnector : Started ServerConnector@593e824f{HTTP/1.1, (http/1.1)}{0.0.0.0:8080} 2022-12-31 23:59:18.458 INFO 2138 --- [ main] o.s.b.web.embedded.jetty.JettyWebServer : Jetty started on port(s) 8080 (http/1.1) with context path '/' 2022-12-31 23:59:18.465 INFO 2138 --- [ main] com.kakawanyifan.SpbApplication : Started SpbApplication in 1.021 seconds (JVM running for 1.369)
在实际工作中,还是建议Tomcat,群众基础广。
headless
现象
现在,我们来做这么一件事情,收到请求后,截图。
示例代码:
1
2
3
4
5
6
7
8
9
10
11
12
13
14
15
16
17
18
19
20
21
22
23
24
25
26
27
28
29
package com.kakawanyifan.controller;import org.springframework.web.bind.annotation.GetMapping;import org.springframework.web.bind.annotation.PathVariable;import org.springframework.web.bind.annotation.RequestMapping;import org.springframework.web.bind.annotation.RestController;import javax.imageio.ImageIO;import java.awt.*;import java.awt.image.BufferedImage;import java.io.File;import java.io.IOException;@RestController @RequestMapping ("/test" )public class TestController @GetMapping ("/{id}" ) public String getById (@PathVariable Integer id) throws AWTException, IOException System.out.println("id : " + id); Robot robot = new Robot(); Dimension screenSize = Toolkit.getDefaultToolkit().getScreenSize(); Rectangle screenRectangle = new Rectangle(screenSize); BufferedImage image = robot.createScreenCapture(screenRectangle); File file = new File("test.png" ); ImageIO.write(image, "png" , file); return "hello , spring boot!" ; } }
请求后,我们会发现报错了,内容如下:
1
2
3
4
5
java.awt.AWTException: headless environment at java.awt.Robot.<init>(Robot.java:91) ~[na:1.8.0_371] at com.kakawanyifan.controller.TestController.getById(TestController.java:21) ~[classes/:na] 【部分运行结果略】
解决
正如告警信息java.awt.AWTException: headless environment,解决方法为关闭headless environment。
示例代码:
1
2
3
4
5
6
7
8
9
10
11
12
13
14
15
16
package com.kakawanyifan;import org.springframework.boot.SpringApplication;import org.springframework.boot.autoconfigure.SpringBootApplication;import org.springframework.boot.builder.SpringApplicationBuilder;@SpringBootApplication public class Application public static void main (String[] args) SpringApplicationBuilder builder = new SpringApplicationBuilder(Application.class ) ; builder.headless(false ).run(args); } }
什么是headless
Headless模式是系统的一种配置模式,不使用显示设备、键盘或鼠标这些外设。
其他构建方式
上文的构建方式,需要机器能连外网。
如果上述地址访问不顺的话,可以访问阿里的地址
手工创建项目
最后,我们还可以自己手工创建项目,注意两点:
pom.xml引导类
完整的pom.xml如下:
1
2
3
4
5
6
7
8
9
10
11
12
13
14
15
16
17
18
19
20
21
22
23
24
25
26
27
28
29
30
31
32
33
34
35
36
37
38
39
40
41
<?xml version="1.0" encoding="UTF-8"?> <project xmlns ="http://maven.apache.org/POM/4.0.0" xmlns:xsi ="http://www.w3.org/2001/XMLSchema-instance" xsi:schemaLocation ="http://maven.apache.org/POM/4.0.0 https://maven.apache.org/xsd/maven-4.0.0.xsd" > <modelVersion > 4.0.0</modelVersion > <parent > <groupId > org.springframework.boot</groupId > <artifactId > spring-boot-starter-parent</artifactId > <version > 2.7.7</version > <relativePath /> </parent > <groupId > com.kakawanyifan</groupId > <artifactId > spb</artifactId > <version > 0.0.1-SNAPSHOT</version > <name > spb</name > <description > spb</description > <properties > <java.version > 8</java.version > </properties > <dependencies > <dependency > <groupId > org.springframework.boot</groupId > <artifactId > spring-boot-starter-web</artifactId > </dependency > <dependency > <groupId > org.springframework.boot</groupId > <artifactId > spring-boot-starter-test</artifactId > <scope > test</scope > </dependency > </dependencies > <build > <plugins > <plugin > <groupId > org.springframework.boot</groupId > <artifactId > spring-boot-maven-plugin</artifactId > </plugin > </plugins > </build > </project >
引导类:
1
2
3
4
5
6
7
8
9
10
11
12
13
package com.kakawanyifan;import org.springframework.boot.SpringApplication;import org.springframework.boot.autoconfigure.SpringBootApplication;@SpringBootApplication public class SpbApplication public static void main (String[] args) SpringApplication.run(SpbApplication.class , args ) ; } }
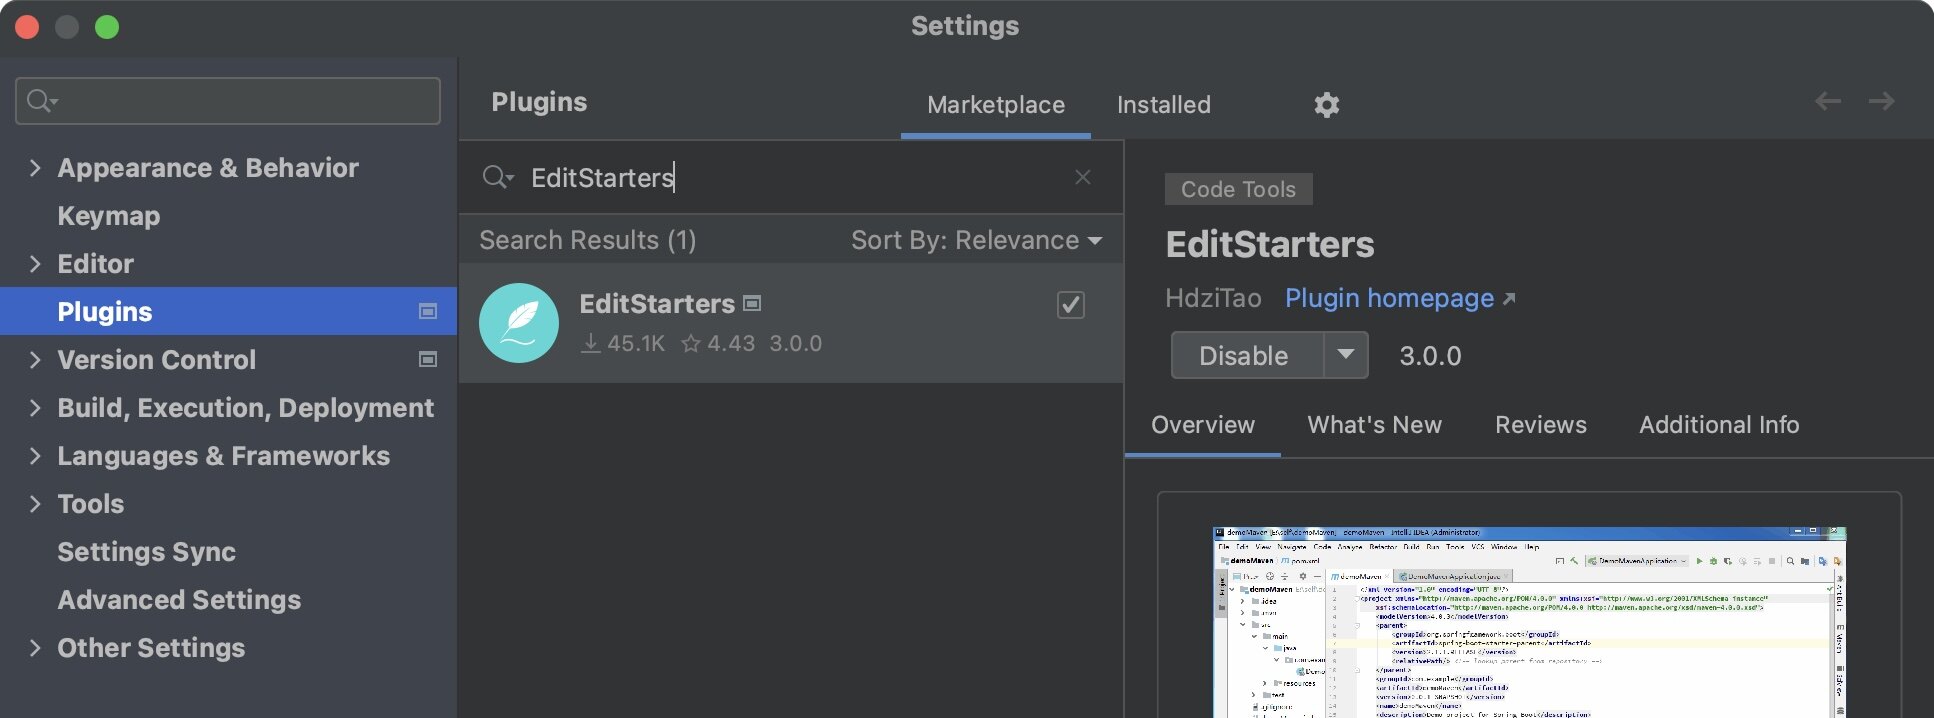
EditStarters
如果工程已经构建好了,在开发过程中,想图形化添加新的启动器,可以安装插件EditStarters。
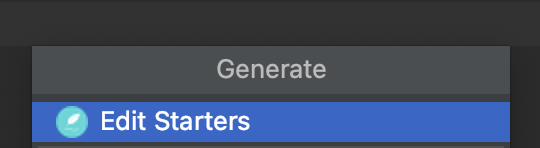
然后在pom.xml,右键,Generate,Edit Starters。
配置
方式
SpringBoot提供了三种配置方式:
application.propertiesapplication.ymlapplication.yaml
其中:
文件名必须是application。
yml和yaml在语法上没有区别。优先级:application.properties > application.yml > application.yaml。
在实际开发过程中,通常采用application.yml。
我们下文讨论的,也都是application.yml形式的。
除了修改服务器端口,SpringBoot内置属性还有:
关闭运行日志图标:
1 2 3 spring: main: banner-mode: off
设置日志级别:
1 2 3 logging: level: root: debug
更多的SpringBoot内置属性,可以参考
在IDEA中,在书写配置的时候,会有提示。
如果没有提示,按照如下方式,指明我们的配置文件为SpringBoot的配置文件;这样就能有提示了。
yml
两种扩展名
yml,一种配置文件的格式,有两种扩展名:
使用更多的是yml。
语法
格式
大小写敏感。
属性层级关系使用多行描述。
使用缩进表示层级关系,同层级左侧对齐,只允许使用空格(不允许使用Tab),空格的个数并不重要(惯例是两个),只要保证同层级的左侧对齐即可。
属性值前面添加空格,即属性名与属性值之间使用: 作为分隔。
#开头表示注释。
字面值表示方式
布尔类型
TRUE,true,True,FALSE,false,False均可。
整型
支持二进制(0b1010)、八进制、十六进制,默认十进制。
浮点型
支持科学计数法(6.8523015e+5)。
字符串
字符串可以直接书写
可以使用双引号包裹空格、转义字符等特殊符号。
1 2 string2: "Hello World" string3: "Spring\tboot\nlesson"
日期时间
日期必须使用yyyy-MM-dd格式
时间和日期之间使用T连接,最后使用+代表时区
1 datetime: 2018 -02 -17T15:02:31+08:00
对象表示方法
1 2 3 4 5 person: name: zhangsan person: {name: zhangsan}
数组表示方式
数组表示方式:在属性名书写位置的下方使用减号(-)作为数据开始符号,每行书写一个数据,减号与数据间空格分隔。
1 2 3 4 5 6 7 8 9 10 11 12 13 14 15 16 17 18 19 20 21 22 23 24 25 26 27 28 29 30 31 32 33 34 subject: - Java - 前端 - 大数据 enterprise: name: kaka age: 16 subject: - Java - 前端 - 大数据 likes: [王者荣耀,刺激战场] users: - name: Tom age: 4 - name: Jerry age: 5 users: - name: Tom age: 4 - name: Jerry age: 5 users2: [ { name:Tom , age:4 } , { name:Jerry , age:5 } ]
公共属性
1 2 3 4 5 center: dataDir: /usr/local/fire/data tmpDir: /usr/local/fire/tmp logDir: /usr/local/fire/log msgDir: /usr/local/fire/msgDir
1 2 3 4 5 6 baseDir: /usr/local/fire center: dataDir: ${baseDir}/data tmpDir: ${baseDir}/tmp logDir: ${baseDir}/log msgDir: ${baseDir}/msgDir
数据读取
假设存在配置文件application.yml,如下:
1 2 3 4 5 6 7 enterprise: name: kaka age: 16 subject: - Java - 前端 - 大数据
如果用application.properties,如下:
1 2 3 4 5 enterprise.name =kaka enterprise.age =16 enterprise.subject[0] =Java enterprise.subject[1] =前端 enterprise.subject[2] =大数据
@Value注解
使用@Value("表达式")注解可以从配合文件中读取数据,注解中用于读取属性名引用方式是:${一级属性名.二级属性名...}。
示例代码:
1 2 3 4 5 6 7 8 9 10 11 12 13 14 15 16 17 18 19 20 21 22 23 24 25 26 27 28 29 30 31 32 33 34 35 package com.kakawanyifan;import org.junit.jupiter.api.Test;import org.springframework.beans.factory.annotation.Value;import org.springframework.boot.test.context.SpringBootTest;@SpringBootTest (classes = SpbApplication.class ) class SpbApplicationTests @Value ("常量" ) private String constant; @Value ("${enterprise.name}" ) private String name; @Value ("${enterprise.age}" ) private Integer age; @Value ("${enterprise.subject[0]}" ) private String subject_1; @Value ("${enterprise.subject[2]}" ) private String subject_2; @Test void readPro () System.out.println(constant); System.out.println(name); System.out.println(age); System.out.println(subject_1); System.out.println(subject_2); } }
运行结果:
Environment对象
我们还可以使用@Autowired注解注入Environment对象的方式读取数据。SpringBoot会将配置文件中所有的数据封装到Environment对象中,如果需要使用哪个数据只需要通过调用Environment对象的 getProperty(String name) 方法获取。
示例代码:
1 2 3 4 5 6 7 8 9 10 11 12 13 14 15 16 17 18 19 20 21 22 23 package com.kakawanyifan;import org.junit.jupiter.api.Test;import org.springframework.beans.factory.annotation.Autowired;import org.springframework.boot.test.context.SpringBootTest;import org.springframework.core.env.Environment;@SpringBootTest (classes = SpbApplication.class ) class SpbApplicationTests @Autowired private Environment env; @Test void readProEnv () System.out.println(env.getProperty("enterprise.name" )); System.out.println(env.getProperty("enterprise.age" )); System.out.println(env.getProperty("enterprise.subject[0]" )); System.out.println(env.getProperty("enterprise.subject[1]" )); } }
运行结果:
这种方式,env对象中会有大量数据,会把配置文件中的内容都读进去。在实际开发中我们很少使用。
自定义类
这种方法,在实际开发过程,使用的更多。
@ConfigurationProperties
自定义一个类。
添加@Component注解,将其交给Spring管理。
添加@ConfigurationProperties注解表示加载配置文件。
使用 prefix 属性指定只加载指定前缀的数据。
示例代码:
1 2 3 4 5 6 7 8 9 10 11 12 13 14 15 16 package com.kakawanyifan;import org.springframework.boot.context.properties.ConfigurationProperties;import org.springframework.stereotype.Component;import java.io.Serializable;@Component @ConfigurationProperties (prefix = "enterprise" )public class Enterprise implements Serializable private String name; private int age; private String[] subject; 【Getter和Setter代码略】 }
1 2 3 4 5 6 7 8 9 10 11 12 13 14 15 16 17 18 19 20 21 22 package com.kakawanyifan;import org.junit.jupiter.api.Test;import org.springframework.beans.factory.annotation.Autowired;import org.springframework.boot.test.context.SpringBootTest;@SpringBootTest (classes = SpbApplication.class ) class SpbApplicationTests @Autowired private Enterprise enterprise; @Test void readProEnv () System.out.println(enterprise.getName()); System.out.println(enterprise.getAge()); System.out.println(enterprise.getSubject()[0 ]); System.out.println(enterprise.getSubject()[1 ]); } }
运行结果:
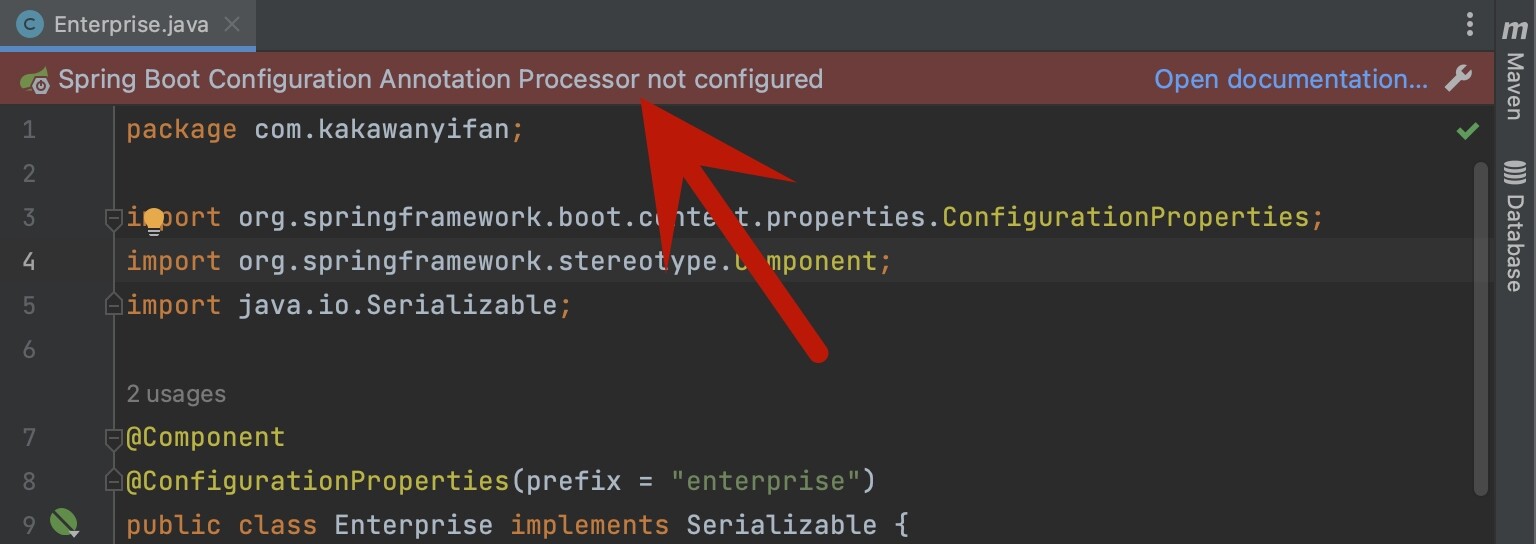
如果在实体类上有如下警告提示
在pom.xml中添加如下依赖:
1 2 3 4 5 <dependency > <groupId > org.springframework.boot</groupId > <artifactId > spring-boot-configuration-processor</artifactId > <optional > true</optional > </dependency >
如果还有问题,我们可以指定版本,版本号通常就是SpringBoot的版本号。
1 2 3 4 5 6 <dependency > <groupId > org.springframework.boot</groupId > <artifactId > spring-boot-configuration-processor</artifactId > <version > 2.7.7</version > <optional > true</optional > </dependency >
宽松绑定
@ConfigurationProperties绑定属性支持属性名宽松绑定。
驼峰模式 :ipAddress: 192.168.1.1下划线模式 :ip_address: 192.168.1.2中划线模式 :ip-address: 192.168.1.3大写字母模式 :IP_ADDRESS: 192.168.1.4
这几种模式都支持。@Value注解。
@EnableConfigurationProperties
在上文,我们在类上添加@Component注解,将其交给Spring管理。还有一种方法是不添加@Component注解,在引导类上加上注解@EnableConfigurationProperties。
注意!@EnableConfigurationProperties与@Component不能同时使用。
1 2 3 4 5 6 7 8 9 10 11 12 13 14 package com.kakawanyifan;import org.springframework.boot.context.properties.ConfigurationProperties;import java.io.Serializable;@ConfigurationProperties (prefix = "enterprise" )public class Enterprise implements Serializable private String name; private int age; private String[] subject; 【Getter和Setter代码略】 }
1 2 3 4 5 6 7 8 9 10 11 12 13 14 15 package com.kakawanyifan;import org.springframework.boot.SpringApplication;import org.springframework.boot.autoconfigure.SpringBootApplication;import org.springframework.boot.context.properties.EnableConfigurationProperties;@SpringBootApplication @EnableConfigurationProperties (Enterprise.class ) public class SpbApplication public static void main (String[] args) SpringApplication.run(SpbApplication.class , args ) ; } }
读取数组
假如我们只读取数组类型数据,例如,我们只读取subject。
报错
1 2 3 4 5 6 7 8 9 10 11 12 13 14 15 16 17 18 19 20 21 package com.kakawanyifan;import org.junit.jupiter.api.Test;import org.springframework.beans.factory.annotation.Value;import org.springframework.boot.test.context.SpringBootTest;import java.util.List;@SpringBootTest (classes = SpbApplication.class ) class SpbApplicationTests @Value ("${enterprise.subject}" ) private List<String> subjectList; @Test void readProEnv () System.out.println(subjectList); } }
运行结果:
1 2 3 4 5 6 7 org.springframework.beans.factory.BeanCreationException: Error creating bean with name 'com.kakawanyifan.SpbApplicationTests': Injection of autowired dependencies failed; nested exception is java.lang.IllegalArgumentException: Could not resolve placeholder 'enterprise.subject' in value "${enterprise.subject}" 【部分运行结果略】 Caused by: java.lang.IllegalArgumentException: Could not resolve placeholder 'enterprise.subject' in value "${enterprise.subject}" 【部分运行结果略】
报错了。
1 Could not resolve placeholder 'enterprise.subject' in value "${enterprise.subject}"
yml和properties,只是同一种内容的不同表现形式。结合我们application.properties的内容,就知道肯定报错,会找不到。
自定义类
但是我们上文,自定义类,是OK的。
示例代码:
1 2 3 4 5 6 7 8 9 10 11 12 13 14 15 package com.kakawanyifan;import lombok.Data;import org.springframework.boot.context.properties.ConfigurationProperties;import org.springframework.stereotype.Component;import java.util.List;@Component @ConfigurationProperties (prefix = "enterprise" )@Data public class TestList private List<String> subject; }
1 2 3 4 5 6 7 8 9 10 11 12 13 14 15 16 17 18 19 package com.kakawanyifan;import org.junit.jupiter.api.Test;import org.springframework.beans.factory.annotation.Autowired;import org.springframework.boot.test.context.SpringBootTest;@SpringBootTest (classes = SpbApplication.class ) class SpbApplicationTests @Autowired TestList testList; @Test void readProList () System.out.println(testList.getSubject()); } }
运行结果:
数组类型
或者,我们用专门的数组类型。
1 2 3 4 test: array1: aaa,bbb,ccc array2: 111 ,222,333 array3: 11.1 ,22.2,33.3
示例代码:
1 2 3 4 5 6 7 8 9 10 11 12 13 14 15 16 17 18 19 20 21 22 23 24 25 26 27 28 29 30 package com.kakawanyifan;import org.junit.jupiter.api.Test;import org.springframework.beans.factory.annotation.Value;import org.springframework.boot.test.context.SpringBootTest;import java.util.Arrays;@SpringBootTest (classes = SpbApplication.class ) class SpbApplicationTests @Value ("${test.array1}" ) private String[] testArray1; @Value ("${test.array2}" ) private int [] testArray2; @Value ("${test.array3}" ) private double [] testArray3; @Test void readProList () System.out.println(Arrays.toString(testArray1)); System.out.println(Arrays.toString(testArray2)); System.out.println(Arrays.toString(testArray3)); } }
运行结果:
1 2 3 [aaa, bbb, ccc] [111, 222, 333] [11.1, 22.2, 33.3]
特别的,我们还可以为${}加上一个:,表示当"key"不存在时候使用默认值,默认值的数组长度为0。
1 2 3 4 5 6 7 8 @Value ("${test.array1:}" )private String[] testArray1;@Value ("${test.array2:}" )private int [] testArray2;@Value ("${test.array3:}" )private double [] testArray3;
EL表达式
但是在实际开发中,我们很少使用数组,更多的时候还是使用List。
借助EL表达式的split()函数进行切分。
1 2 3 4 5 6 7 8 9 10 11 12 13 14 15 16 17 18 19 20 21 package com.kakawanyifan;import org.junit.jupiter.api.Test;import org.springframework.beans.factory.annotation.Value;import org.springframework.boot.test.context.SpringBootTest;import java.util.List;@SpringBootTest (classes = SpbApplication.class ) class SpbApplicationTests @Value ("#{'${test.array1}'.split(',')}" ) private List<String> testList; @Test void readProList () System.out.println(testList); } }
运行结果:
为了避免某个key不存在,我们还可以加上:
示例代码:
1 2 3 4 5 6 7 8 9 10 11 12 13 14 15 16 17 18 19 20 21 22 package com.kakawanyifan;import org.junit.jupiter.api.Test;import org.springframework.beans.factory.annotation.Value;import org.springframework.boot.test.context.SpringBootTest;import java.util.List;@SpringBootTest (classes = SpbApplication.class ) class SpbApplicationTests @Value ("#{'${test.list1:}'.split(',')}" ) private List<String> testList; @Test void readProList () System.out.println(testList); System.out.println(testList.size()); } }
运行结果:
但这么做有一个坑,我们看到,SIZE居然是1。
类似的情况,在Java代码中,也会有。
示例代码:
1 2 3 List<String> list = Arrays.asList("" .split("," )); System.out.println(list); System.out.println(list.size());
运行结果:
所以, 我们还需要在split()前判断下是否为空
1 2 @Value ("#{'${test.list1:}'.empty ? null : '${test.list1:}'.split(',')}" )private List<String> testList;
示例代码:
1 2 3 4 5 6 7 8 9 10 11 12 13 14 15 16 17 18 19 20 21 22 package com.kakawanyifan;import org.junit.jupiter.api.Test;import org.springframework.beans.factory.annotation.Value;import org.springframework.boot.test.context.SpringBootTest;import java.util.List;@SpringBootTest (classes = SpbApplication.class ) class SpbApplicationTests @Value ("#{'${test.list1:}'.empty ? null : '${test.list1:}'.split(',')}" ) private List<String> testList; @Test void readProList () System.out.println(testList); System.out.println(testList == null ); } }
运行结果:
这样的话,如果没对应的key,是空(null)。
解析Set
解析Set和解析List方法是一样的,唯一的区别是Set本身会做去重操作。
1 2 @Value ("#{'${test.set:}'.empty ? null : '${test.set:}'.split(',')}" )private Set<Integer> testSet;
数据校验
添加JSR303规范坐标与Hibernate校验框架对应坐标:
1 2 3 4 5 6 7 8 <dependency > <groupId > javax.validation</groupId > <artifactId > validation-api</artifactId > </dependency > <dependency > <groupId > org.hibernate.validator</groupId > <artifactId > hibernate-validator</artifactId > </dependency >
(只是利用的Hibernate的校验,并没有利用其数据库框架。)
利用@Validated注解,对Bean开启校验功能。
设置校验规则:
1 @Max (value = 10 ,message = "最大不能超过10" )
(闭区间,可以等于10。)
示例代码:
1 2 3 4 5 6 7 8 9 10 11 12 13 14 15 16 17 18 19 20 21 22 23 package com.kakawanyifan;import org.springframework.boot.context.properties.ConfigurationProperties;import org.springframework.stereotype.Component;import org.springframework.validation.annotation.Validated;import javax.validation.constraints.Max;import java.io.Serializable;@Component @ConfigurationProperties (prefix = "enterprise" )@Validated public class Enterprise implements Serializable private String name; @Max (value = 10 ,message = "最大不能超过10" ) private int age; private String[] subject; private String ipAddress; 【Getter和Setter方法略】 }
这时候,我们再启动的话,会报错:
1 2 3 4 5 6 7 8 9 10 11 12 13 Description: Binding to target org.springframework.boot.context.properties.bind.BindException: Failed to bind properties under 'enterprise' to com.kakawanyifan.Enterprise failed: Property: enterprise.age Value: "16" Origin: class path resource [application.yml] - 19:8 Reason: 最大不能超过10 Action: Update your application's configuration
多环境
多个yml文件
我们创建多个配置文件。
application.yml:主配置文件。application-dev.yml:开发环境的配置。application-sit.yml:测试环境的配置。application-prd.yml:生产环境的配置。
application-dev.yml:
application-sit.yml:
application-prd.yml:
然后我们可以在application.yml指定环境。
1 2 3 spring: profiles: active: prd
这时候,我们启动环境,观察日志,会发现已经切换到生产环境了。
1 2 3 4 5 6 7 【部分运行结果略】 2023-01-03 14:28:22.890 INFO 2683 --- [ main] com.kakawanyifan.SpbApplication : Starting SpbApplication using Java 1.8.0_333 on Kakas-MBP with PID 2683 (/Users/kaka/Documents/s/spb/target/classes started by kaka in /Users/kaka/Documents/s/spb) 2023-01-03 14:28:22.892 INFO 2683 --- [ main] com.kakawanyifan.SpbApplication : The following 1 profile is active: "prd" 【部分运行结果略】
当选择的文件和application.yml文件存在相同的配置时,application.yml中的配置会被覆盖掉。
主配置文件中设置公共配置(全局)
环境分类配置文件中常用于设置冲突属性(局部)
我们在active: prd中其实可以填多个,之间用,分隔。所以该方法有时候也用户配置文件的拆分,比如专门的数据库相关配置的配置文件application-db.yml
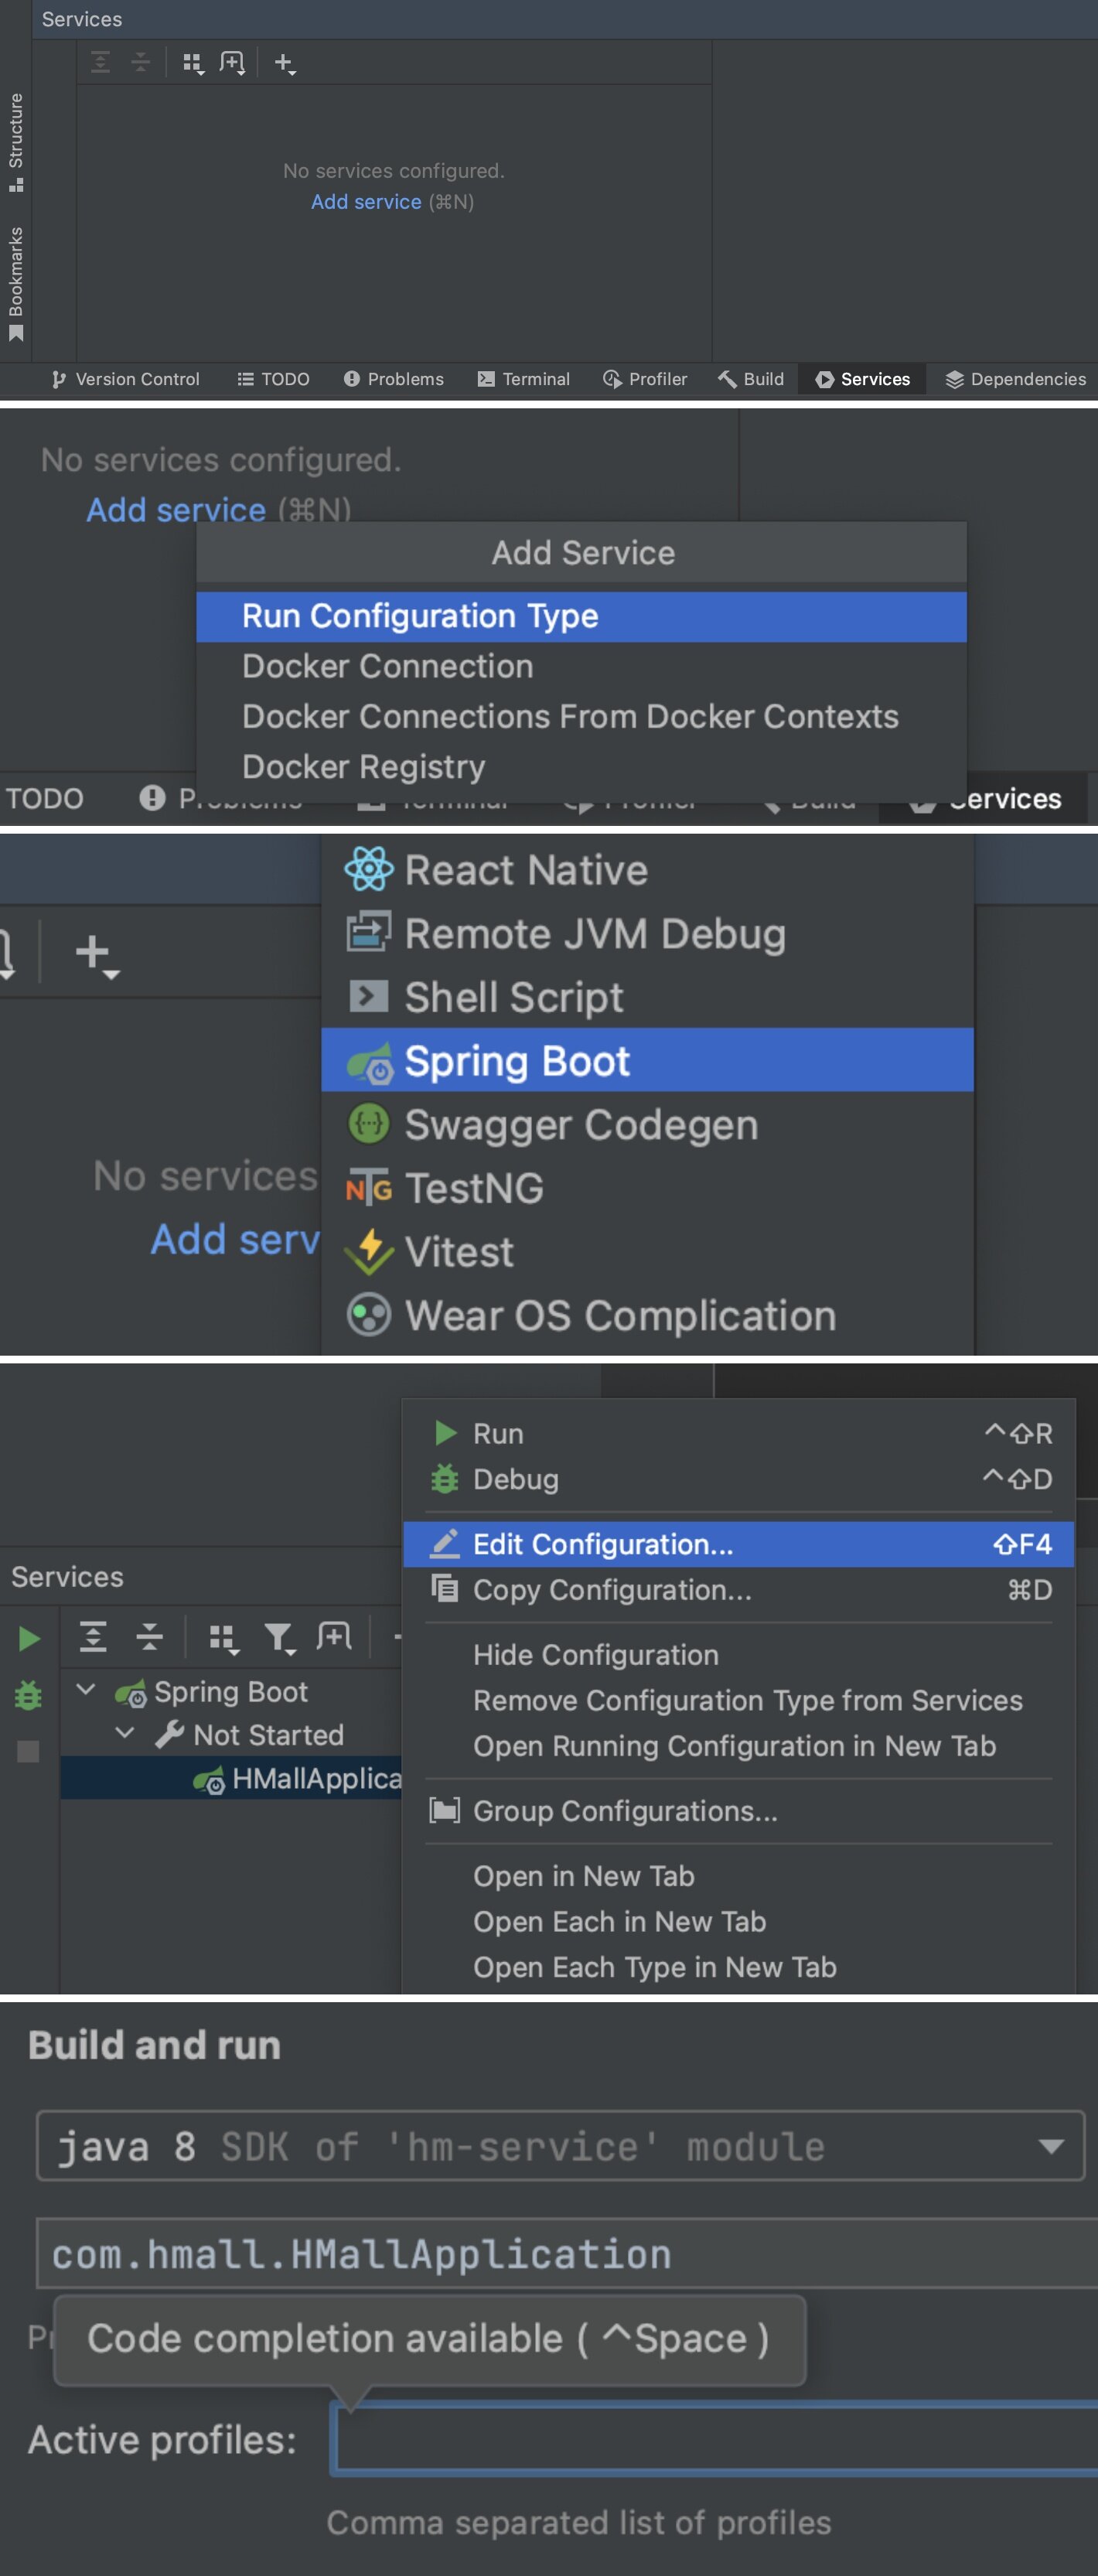
平时开发过程中,直接修改application.yml,存在一个问题,这个是侵入式的。将来代码合并等,都可能会有冲突。一个更好的方法是在IDEA中指定。
最后一步的profiles,只需要填写后缀,dev、sit和prd等。
结合Maven
上述,我们需要在每一次打包的时候,都要修改配置文件。如果能结合Maven的话,会更方便。《18.SSM》 讨论过如何在Maven配置多环境打包。整体差不多。
SpringBoot使用@...@读取Maven对应的配置属性。 插件maven-resources-plugin。
@…@
pom.xml:
1 2 3 4 5 6 7 8 9 10 11 12 13 14 15 16 17 18 19 20 21 22 23 <profiles > <profile > <id > dev</id > <properties > <env-id > dev</env-id > </properties > <activation > <activeByDefault > true</activeByDefault > </activation > </profile > <profile > <id > sit</id > <properties > <env-id > sit</env-id > </properties > </profile > <profile > <id > prd</id > <properties > <env-id > prd</env-id > </properties > </profile > </profiles >
application.yml:
1 2 3 spring: profiles: active: @env-id@
SpringBoot使用@...@读取Maven对应的配置属性。
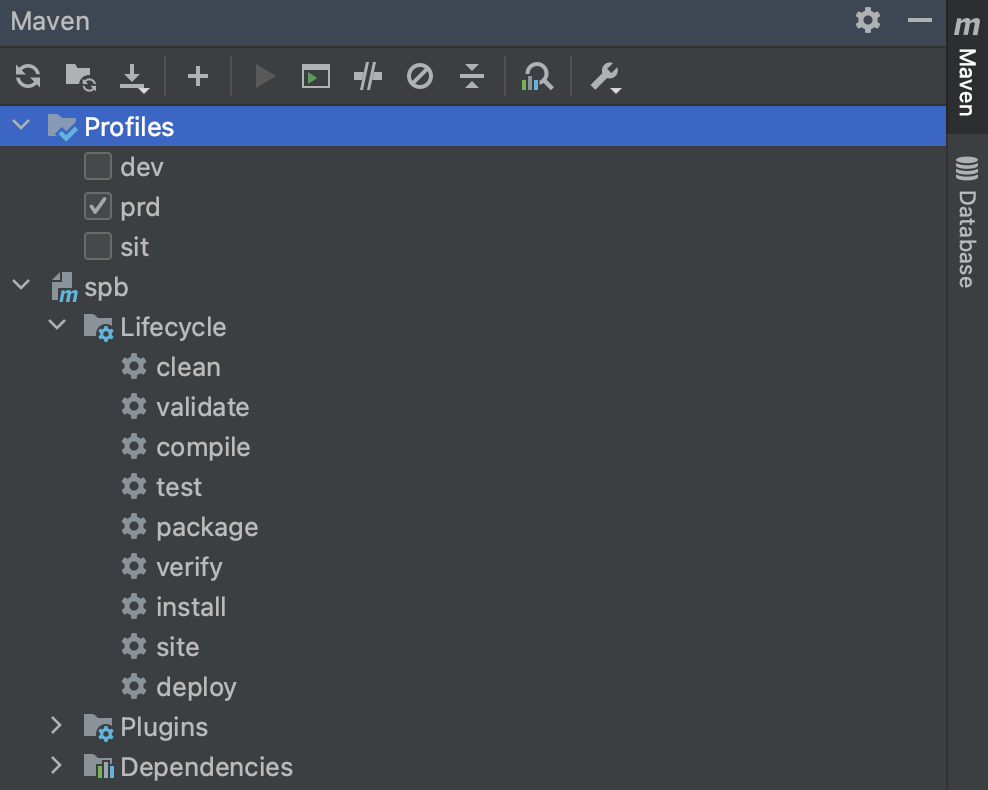
然后我们在IDEA可以看到:
maven-resources-plugin
我们还可以在pom.xml新增插件maven-resources-plugin。
1 2 3 4 5 6 7 8 9 <plugin > <groupId > org.apache.maven.plugins</groupId > <artifactId > maven-resources-plugin</artifactId > <version > 3.2.0</version > <configuration > <useDefaultDelimiters > true</useDefaultDelimiters > <encoding > utf-8</encoding > </configuration > </plugin >
在application.yml配置的以${}包裹。
1 2 3 spring: profiles: active: ${env-id}
其他方法
---除了上述拆分文件的方式。application.yml中使用---来分割不同的配置。
我个人感觉这种方法不够清晰。
---的形式,还在一个地方有,Hexo。
1 2 3 4 5 6 7 8 9 10 11 12 13 14 15 16 17 18 19 20 21 22 23 24 spring: config: activate: on-profile: dev server: port: 8080 --- spring: config: activate: on-profile: sit server: port: 8081 --- spring: config: activate: on-profile: prd server: port: 8082 ---
除了上述的
1 2 3 4 spring: config: activate: on-profile: dev
还有一种方式
这种配置方法确实更清晰,但是已经过时了,不建议使用。
外部配置文件
SpringBoot中有4级配置文件放置位置:
1级:classpath:application.yml
2级:classpath:config/application.yml
3级:file:application.yml
4级:file:config/application.yml
级别越高优先级越高
所以,我们还可以利用外部配置文件。
命令行启动参数设置
最后一种方法,命令行启动参数设置。
1 java –jar xxx.jar –-spring.profiles.active=dev
这种方式的优先级最高。
(在《23.SpringBoot [3/3]》 的configurePropertySources部分,我们会讨论为什么是命令行的优先级最高。)
整合
整合Junit
SpringBootTest注解
上文,在举关于"配置"的例子时,就已经整合了Junit。
关键点: 在测试类上添加SpringBootTest注解。
在我们上文的例子中,我们指定了引导类。
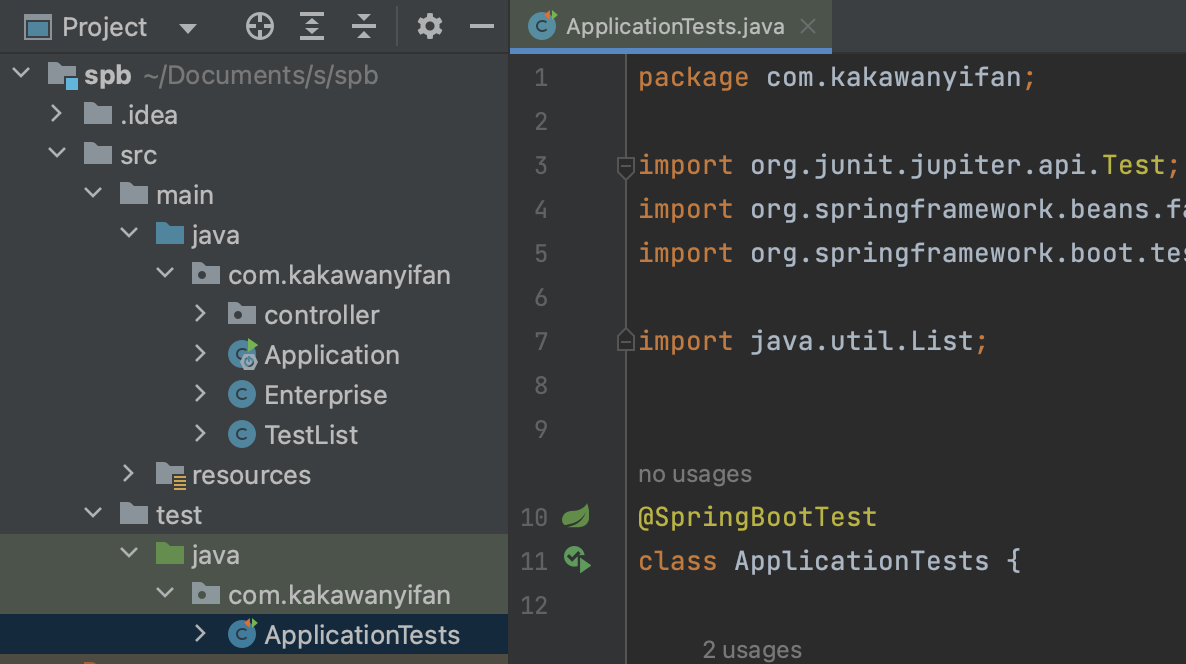
引导类所在包必须是测试类所在包及其子包。
引导类的名字是Application
启用Web环境
启用Web环境,这样我们可以直接对Controller层进行测试呢。
模拟端口
1 @SpringBootTest (webEnvironment = SpringBootTest.WebEnvironment.RANDOM_PORT)
SpringBootTest.WebEnvironment.NONE:不启动Web环境。SpringBootTest.WebEnvironment.DEFINED_PORT:配置文件中定义的端口。SpringBootTest.WebEnvironment.RANDOM_PORT:随机端口。
示例代码:
1 2 3 4 5 6 7 8 9 10 11 12 13 package com.kakawanyifan;import org.junit.jupiter.api.Test;import org.springframework.boot.test.context.SpringBootTest;@SpringBootTest (classes = Application.class ,webEnvironment = SpringBootTest.WebEnvironment.RANDOM_PORT)class WebTest @Test public void test () } }
虚拟请求测试
@AutoConfigureMockMvc,开启虚拟MVC调用。
1 2 3 4 5 6 7 8 9 10 11 12 13 14 15 16 17 18 19 20 21 22 23 package com.kakawanyifan;import org.junit.jupiter.api.Test;import org.springframework.beans.factory.annotation.Autowired;import org.springframework.boot.test.autoconfigure.web.servlet.AutoConfigureMockMvc;import org.springframework.boot.test.context.SpringBootTest;import org.springframework.test.web.servlet.MockMvc;import org.springframework.test.web.servlet.ResultActions;import org.springframework.test.web.servlet.request.MockHttpServletRequestBuilder;import org.springframework.test.web.servlet.request.MockMvcRequestBuilders;@SpringBootTest (classes = Application.class ,webEnvironment = SpringBootTest.WebEnvironment.RANDOM_PORT)@AutoConfigureMockMvc public class WebTest @Test public void test (@Autowired MockMvc mvc) throws Exception MockHttpServletRequestBuilder builder = MockMvcRequestBuilders.get("/books/1" ); ResultActions action = mvc.perform(builder); } }
运行结果:
虚拟请求状态匹配
StatusResultMatchers status = MockMvcResultMatchers.status();:定义执行状态匹配器。ResultMatcher ok = status.isOk();:定义预期执行状态。action.andExpect(ok);:使用本次真实执行结果与预期结果进行比对。
示例代码:
1 2 3 4 5 6 7 8 9 10 11 12 13 14 15 16 17 18 19 20 21 22 23 24 25 26 27 28 29 30 31 32 33 34 35 36 package com.kakawanyifan;import org.junit.jupiter.api.Test;import org.springframework.beans.factory.annotation.Autowired;import org.springframework.boot.test.autoconfigure.web.servlet.AutoConfigureMockMvc;import org.springframework.boot.test.context.SpringBootTest;import org.springframework.test.web.servlet.MockMvc;import org.springframework.test.web.servlet.ResultActions;import org.springframework.test.web.servlet.ResultMatcher;import org.springframework.test.web.servlet.request.MockHttpServletRequestBuilder;import org.springframework.test.web.servlet.request.MockMvcRequestBuilders;import org.springframework.test.web.servlet.result.MockMvcResultMatchers;import org.springframework.test.web.servlet.result.StatusResultMatchers;@SpringBootTest (classes = Application.class ,webEnvironment = SpringBootTest.WebEnvironment.RANDOM_PORT)@AutoConfigureMockMvc public class WebTest @Test public void test (@Autowired MockMvc mvc) throws Exception MockHttpServletRequestBuilder builder = MockMvcRequestBuilders.get("/books/1" ); ResultActions action = mvc.perform(builder); StatusResultMatchers status = MockMvcResultMatchers.status(); ResultMatcher error4xx = status.is4xxClientError(); action.andExpect(error4xx); } }
运行结果:
1 2 3 4 5 6 7 8 【部分运行结果略】 java.lang.AssertionError: Range for response status value 200 expected:<CLIENT_ERROR> but was:<SUCCESSFUL> Expected :CLIENT_ERROR Actual :SUCCESSFUL 【部分运行结果略】
虚拟请求响应体匹配
ContentResultMatchers content = MockMvcResultMatchers.content();:定义执行结果匹配器。ResultMatcher result = content.string("springboot");:定义预期执行结果。action.andExpect(result);:使用本次真实执行结果与预期结果进行比对。
如果我们需要与JSON匹配,可以采取如下的方式。
1 ResultMatcher result = content.json("{\"id\":1,\"name\":\"SpringBoot2\"}" );
示例代码:
1 2 3 4 5 6 7 8 9 10 11 12 13 14 15 16 17 18 19 20 21 22 23 24 25 26 27 28 29 30 31 package com.kakawanyifan;import org.junit.jupiter.api.Test;import org.springframework.beans.factory.annotation.Autowired;import org.springframework.boot.test.autoconfigure.web.servlet.AutoConfigureMockMvc;import org.springframework.boot.test.context.SpringBootTest;import org.springframework.test.web.servlet.MockMvc;import org.springframework.test.web.servlet.ResultActions;import org.springframework.test.web.servlet.ResultMatcher;import org.springframework.test.web.servlet.request.MockHttpServletRequestBuilder;import org.springframework.test.web.servlet.request.MockMvcRequestBuilders;import org.springframework.test.web.servlet.result.ContentResultMatchers;import org.springframework.test.web.servlet.result.MockMvcResultMatchers;@SpringBootTest (classes = Application.class ,webEnvironment = SpringBootTest.WebEnvironment.RANDOM_PORT)@AutoConfigureMockMvc public class WebTest @Test public void test (@Autowired MockMvc mvc) throws Exception MockHttpServletRequestBuilder builder = MockMvcRequestBuilders.get("/books/1" ); ResultActions action = mvc.perform(builder); ContentResultMatchers content = MockMvcResultMatchers.content(); ResultMatcher result = content.string("springboot" ); action.andExpect(result); } }
虚拟请求响应头匹配
1 2 3 4 5 6 7 8 9 10 11 12 13 14 15 16 17 18 19 20 21 22 23 24 25 26 27 package com.kakawanyifan;import org.junit.jupiter.api.Test;import org.springframework.beans.factory.annotation.Autowired;import org.springframework.boot.test.autoconfigure.web.servlet.AutoConfigureMockMvc;import org.springframework.boot.test.context.SpringBootTest;import org.springframework.test.web.servlet.MockMvc;import org.springframework.test.web.servlet.ResultActions;import org.springframework.test.web.servlet.ResultMatcher;import org.springframework.test.web.servlet.request.MockHttpServletRequestBuilder;import org.springframework.test.web.servlet.request.MockMvcRequestBuilders;import org.springframework.test.web.servlet.result.HeaderResultMatchers;import org.springframework.test.web.servlet.result.MockMvcResultMatchers;@SpringBootTest (classes = Application.class ,webEnvironment = SpringBootTest.WebEnvironment.RANDOM_PORT)@AutoConfigureMockMvc public class WebTest @Test public void test (@Autowired MockMvc mvc) throws Exception MockHttpServletRequestBuilder builder = MockMvcRequestBuilders.get("/books/1" ); ResultActions action = mvc.perform(builder); HeaderResultMatchers header = MockMvcResultMatchers.header(); ResultMatcher resultHeader = header.string("Content-Type" , "application/json" ); action.andExpect(resultHeader); } }
业务层回滚
默认在测试期间,事务会提交。如果不想让其提交,可以加上@Transactional注解。示例代码:
1 2 3 4 5 6 7 8 9 10 11 12 13 14 15 16 17 18 19 20 package com.kakawanyifan;import com.kakawanyifan.service.BookService;import org.junit.jupiter.api.Test;import org.springframework.beans.factory.annotation.Autowired;import org.springframework.boot.test.context.SpringBootTest;import org.springframework.transaction.annotation.Transactional;@SpringBootTest (classes = Application.class ) @Transactional public class ServiceTest @Autowired BookService bookService; @Test public void test () bookService.delete(2 ); } }
如果加上了@Transactional注解,又想让其提交,可以通过@Rollback注解设置。
示例代码:
1
2
3
4
5
6
7
8
9
10
11
12
13
14
15
16
17
18
19
20
21
22
package com.kakawanyifan;import com.kakawanyifan.service.BookService;import org.junit.jupiter.api.Test;import org.springframework.beans.factory.annotation.Autowired;import org.springframework.boot.test.context.SpringBootTest;import org.springframework.test.annotation.Rollback;import org.springframework.transaction.annotation.Transactional;@SpringBootTest (classes = Application.class ) @Transactional @Rollback (value = false )public class ServiceTest @Autowired BookService bookService; @Test public void test () bookService.delete(2 ); } }
整合MyBatis
依赖
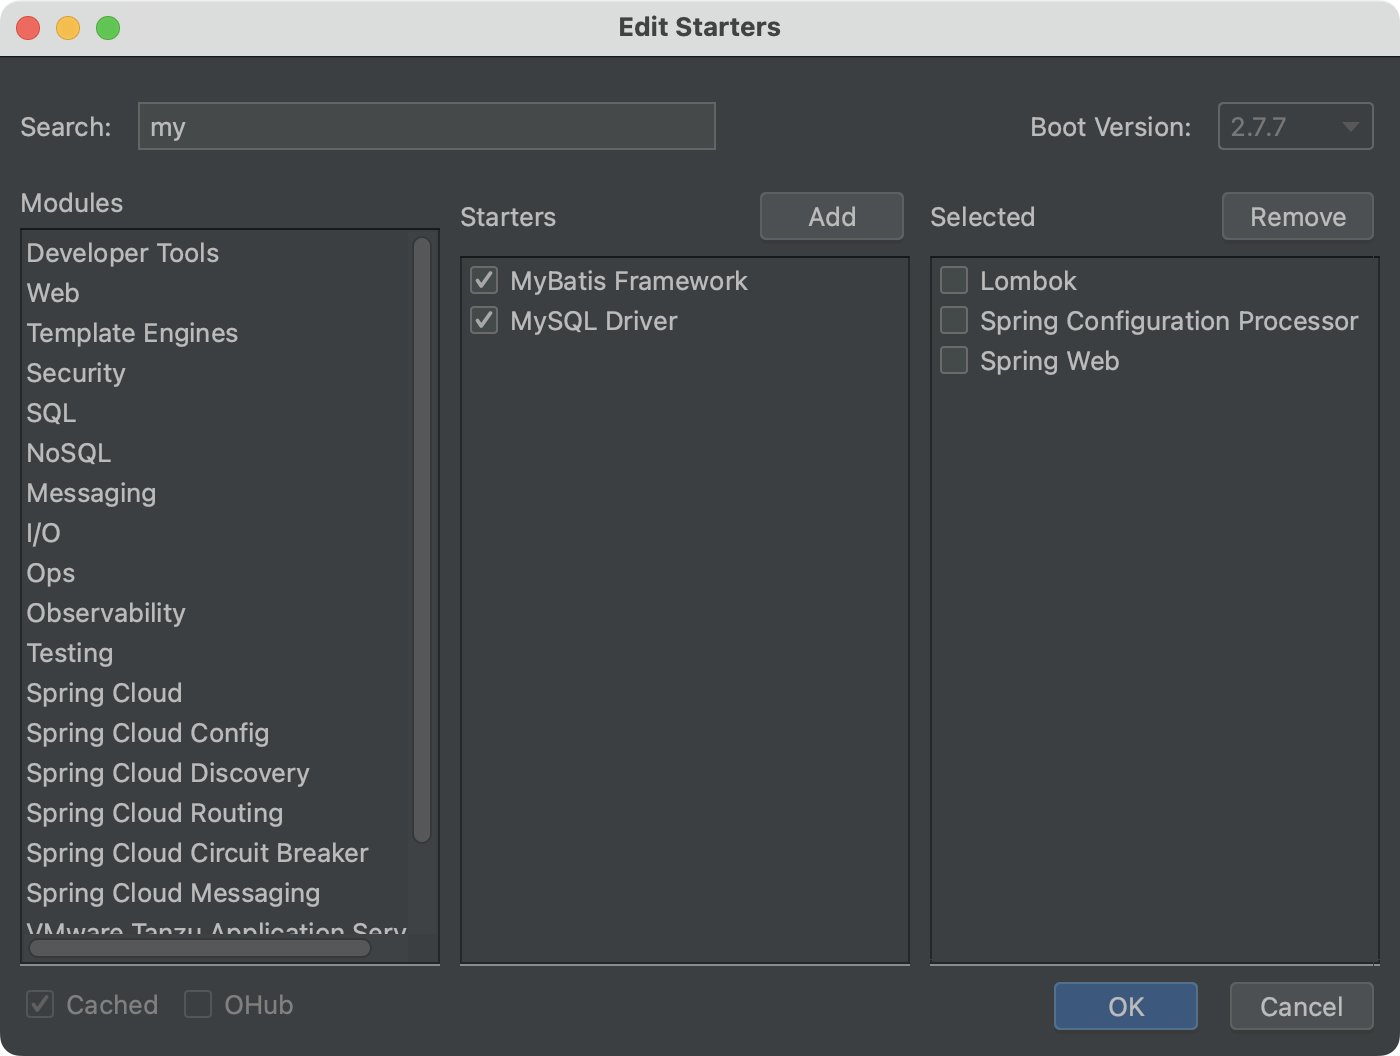
我们利用我们上文讨论的插件EditStarters,添加两个依赖:
MyBatis Framework
MySQL Driver
然后我们会在pom.xml看到新增了如下两项
1 2 3 4 5 6 7 8 9 10 <dependency > <groupId > org.mybatis.spring.boot</groupId > <artifactId > mybatis-spring-boot-starter</artifactId > <version > 2.3.0</version > </dependency > <dependency > <groupId > com.mysql</groupId > <artifactId > mysql-connector-j</artifactId > <scope > runtime</scope > </dependency >
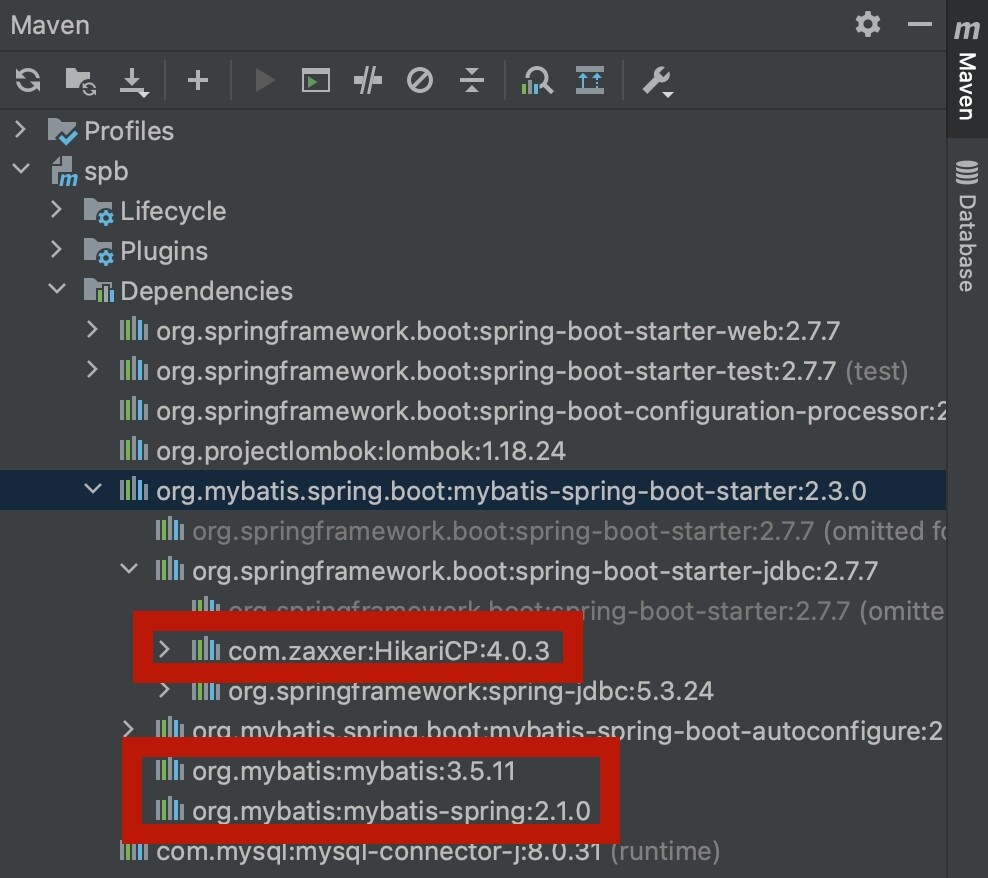
特别的,我们还可以看看mybatis-spring-boot-starter里面都有什么。
有我们熟悉的mybatis和mybatis-spring,还有一个连接池,HikariCP。
(关于"HikariCP",我们在《10.JDBC》 ,有过讨论。)
例子
关于"定义实体类"、“定义DAO接口”、"定义Service及其实现类"等,我们在之前的文章中,也都有很多讨论。这里不赘述。
在application.yml配置数据库的连接。
1 2 3 4 5 spring: datasource: url: jdbc:mysql://127.0.0.1:3306/ssm username: root password: MySQL@2022
新建测试类。
1 2 3 4 5 6 7 8 9 10 11 12 13 14 15 16 17 18 19 20 21 22 23 24 25 26 27 28 29 package com.kakawanyifan.service;import com.kakawanyifan.Application;import com.kakawanyifan.pojo.Book;import org.junit.jupiter.api.Test;import org.springframework.beans.factory.annotation.Autowired;import org.springframework.boot.test.context.SpringBootTest;import java.util.List;@SpringBootTest (classes = Application.class ) public class BookServiceTest @Autowired private BookService bookService; @Test public void testGetById () Book book = bookService.getById(1 ); System.out.println(book); } @Test public void testGetAll () List<Book> all = bookService.getAll(); System.out.println(all); } }
运行结果:
1 2 3 4 5 6 7 8 9 10 11 12 java.lang.IllegalStateException: Failed to load ApplicationContext 【部分运行结果略】 Caused by: org.springframework.beans.factory.UnsatisfiedDependencyException: Error creating bean with name 'bookServiceImpl': Unsatisfied dependency expressed through field 'bookDao'; nested exception is org.springframework.beans.factory.NoSuchBeanDefinitionException: No qualifying bean of type 'com.kakawanyifan.dao.BookDao' available: expected at least 1 bean which qualifies as autowire candidate. Dependency annotations: {@org.springframework.beans.factory.annotation.Autowired(required=true)} 【部分运行结果略】 Caused by: org.springframework.beans.factory.NoSuchBeanDefinitionException: No qualifying bean of type 'com.kakawanyifan.dao.BookDao' available: expected at least 1 bean which qualifies as autowire candidate. Dependency annotations: {@org.springframework.beans.factory.annotation.Autowired(required=true)} 【部分运行结果略】
错误信息的含义:在Spring容器中没有BookDao类型的bean,为什么会出现这种情况呢?Mybatis会扫描接口并创建接口的代码对象交给Spring管理,《15.Spring Framework [1/2]》 配置的:
1 2 3 4 5 6 @Bean public MapperScannerConfigurer mapperScannerConfigurer () MapperScannerConfigurer mapperScannerConfigurer = new MapperScannerConfigurer(); mapperScannerConfigurer.setBasePackage("com.kakawanyifan.mapper" ); return mapperScannerConfigurer; }
1 2 3 <bean id ="mapperScannerConfigurer" class ="org.mybatis.spring.mapper.MapperScannerConfigurer" > <property name ="basePackage" value ="com.kakawanyifan.mapper" > </property > </bean >
但是现在并没有告诉MyBatis哪个是DAO接口。
在BookDao接口上使用@Mapper注解。 在引导类上使用@MapperScan("com.kakawanyifan.dao"),标记扫描。
在BookDao接口上使用@Mapper注解:
1 2 3 4 5 6 7 8 9 10 11 12 13 14 15 16 17 18 19 20 21 22 23 24 package com.kakawanyifan.dao;import com.kakawanyifan.pojo.Book;import org.apache.ibatis.annotations.*;import java.util.List;@Mapper public interface BookDao @Insert ("insert into book (type,name,description) values(#{type},#{name},#{description})" ) public void save (Book book) @Update ("update book set type = #{type}, name = #{name}, description = #{description} where id = #{id}" ) public void update (Book book) @Delete ("delete from book where id = #{id}" ) public void delete (Integer id) @Select ("select * from book where id = #{id}" ) public Book getById (Integer id) @Select ("select * from book" ) public List<Book> getAll () }
在引导类上使用@MapperScan("com.kakawanyifan.dao"),标记扫描:
1
2
3
4
5
6
7
8
9
10
11
12
13
14
15
package com.kakawanyifan;import org.mybatis.spring.annotation.MapperScan;import org.springframework.boot.SpringApplication;import org.springframework.boot.autoconfigure.SpringBootApplication;@SpringBootApplication @MapperScan ("com.kakawanyifan.dao" )public class Application public static void main (String[] args) SpringApplication.run(Application.class , args ) ; } }
配置
我们可以在application.yml上,对MyBatis进行更多的配置:
1 2 3 4 5 6 7 mybatis: mapper-locations: classpath:mapper/* type-aliases-package: com.example.entity config-location: classpath:mybatis/mybatis-config.xml configuration: map-underscore-to-camel-case: true log-impl: org.apache.ibatis.logging.stdout.StdOutImpl
mapper-locations:用来指定mapper.xml文件的路径,该文件用于编写SQL语句。type-aliases-package:用来设置别名,作用是告诉MyBatis需要设置别名的实体类的所在的包。config-location:MyBatis配置文件。map-underscore-to-camel-case:用来开启驼峰命名自动映射,如将数据表中的字段"user_name"映射到实体对象的属性"userName"。log-impl:打印日志,在这里我们配置的只会输出到控制台。
整合Druid
正如我们上文说的,SpringBoot使用的是Hikari连接池,一般观点,该连接池比Druid连接池要好。
如果我们一定要换成Druid连接池呢?
不使用启动器
添加Druid依赖:
1 2 3 4 5 <dependency > <groupId > com.alibaba</groupId > <artifactId > druid</artifactId > <version > 1.2.12</version > </dependency >
然后配置为Druid数据,添加
1 type: com.alibaba.druid.pool.DruidDataSource
即:
1 2 3 4 5 6 spring: datasource: url: jdbc:mysql://127.0.0.1:3306/ssm username: root password: MySQL@2022 type: com.alibaba.druid.pool.DruidDataSource
对于,Druid的其他配置,设置方法:
1 2 3 4 5 6 7 8 9 10 11 12 13 14 15 16 17 18 19 20 21 22 23 24 25 26 27 28 29 30 spring: datasource: url: jdbc:mysql://127.0.0.1:3306/ssm username: root password: MySQL@2022 type: com.alibaba.druid.pool.DruidDataSource initialSize: 5 minIdle: 5 maxActive: 200 maxWait: 60000 timeBetweenEvictionRunsMillis: 60000 minEvictableIdleTimeMillis: 300000 validationQuery: SELECT 1 testWhileIdle: true testOnBorrow: false testOnReturn: false poolPreparedStatements: false max-pool-prepared-statement-per-connection-size: 50
但是SpringBoot默认是不注入上述属性值的,需要自己绑定。
1 2 3 4 5 6 7 8 9 10 11 12 13 14 15 16 17 18 19 20 21 22 23 24 package com.kakawanyifan;import com.alibaba.druid.pool.DruidDataSource;import org.springframework.boot.context.properties.ConfigurationProperties;import org.springframework.context.annotation.Bean;import org.springframework.context.annotation.Configuration;import javax.sql.DataSource;@Configuration public class DruidConfig @ConfigurationProperties (prefix = "spring.datasource" ) @Bean public DataSource druidDataSource () return new DruidDataSource(); } }
使用启动类
这个启动类,并不是SpringBoot提供的,而是由阿里巴巴提供的。
1 2 3 4 5 <dependency > <groupId > com.alibaba</groupId > <artifactId > druid-spring-boot-starter</artifactId > <version > 1.2.15</version > </dependency >
需要注意,此时Druid的专有配置,都在druid:之下。
1 2 3 4 5 6 7 8 9 10 11 12 13 14 15 16 17 18 19 20 21 22 23 24 25 26 27 28 29 30 spring: datasource: url: jdbc:mysql://127.0.0.1:3306/ssm username: root password: MySQL@2022 type: com.alibaba.druid.pool.DruidDataSource druid: initialSize: 5 minIdle: 5 maxActive: 200 maxWait: 60000 timeBetweenEvictionRunsMillis: 60000 minEvictableIdleTimeMillis: 300000 validationQuery: SELECT 1 FROM DUAL testWhileIdle: true testOnBorrow: false testOnReturn: false poolPreparedStatements: true max-pool-prepared-statement-per-connection-size: 50
事务
无论我们使用的是默认的Hikari连接池,还是Druid连接池。关于事务
只需要我们使用了@Transactional注解进行事务配置 。
示例代码:
1 2 3 4 5 6 7 8 9 10 11 12 13 package com.kakawanyifan.service.impl;【部分代码略】 import org.springframework.stereotype.Service;import org.springframework.transaction.annotation.Transactional;import java.util.List;@Transactional @Service public class BookServiceImpl implements BookService 【部分代码略】
整合Redis客户端
简介
SpringData是Spring中数据操作的模块,包含对各种数据库的集成,其中对Redis的集成模块就叫做SpringDataRedis。
官网地址:https://spring.io/projects/spring-data-redis
特点有:
提供了对不同Redis客户端的整合(Lettuce和Jedis)。
提供了RedisTemplate统一API来操作Redis。
支持Redis的发布订阅模型。
支持Redis哨兵和Redis集群。
支持基于Lettuce的响应式编程。
支持基于JDK、JSON、字符串、Spring对象的数据序列化及反序列化。
支持基于Redis的JDKCollection实现。
SpringDataRedis中提供了RedisTemplate工具类,其中封装了各种对Redis的操作。并且将不同数据类型的操作API封装到了不同的类型中:
API
返回值类型
说明
redisTemplate.opsForValue()ValueOperations操作String类型数据
redisTemplate.opsForHash()HashOperations操作Hash类型数据
redisTemplate.opsForList()ListOperations操作List类型数据
redisTemplate.opsForSet()SetOperations操作Set类型数据
redisTemplate.opsForZSet()ZSetOperations操作SortedSet类型数据
redisTemplate通用的命令
入门案例
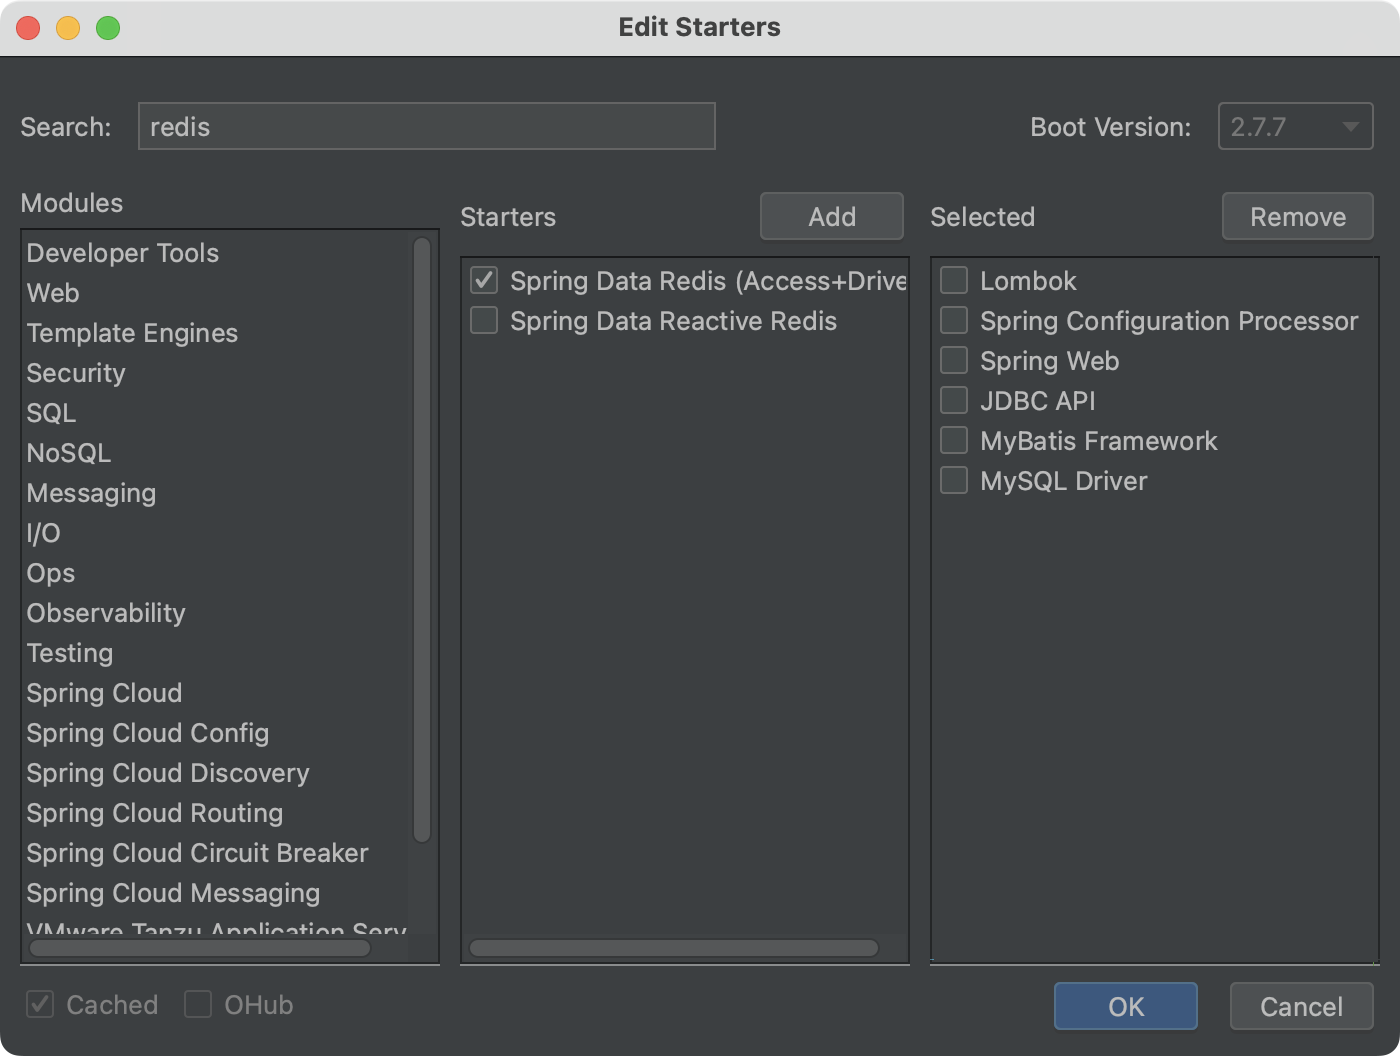
添加启动器依赖spring-boot-starter-data-redis:
(选择图中的第二个Spring Data Reactive Redis也可以,其实际包含了第一个。)
1 2 3 4 <dependency > <groupId > org.springframework.boot</groupId > <artifactId > spring-boot-starter-data-redis</artifactId > </dependency >
配置application.yml中Redis的连接参数:
1 2 3 4 5 6 7 8 9 10 11 spring: redis: host: 10.211 .55 .14 port: 6379 password: Redis@2023 lettuce: pool: max-active: 8 max-wait: 100ms max-idle: 8 min-idle: 0
编写测试类,使用RedisTemplate操作redis中的5种数据类型:
1 2 3 4 5 6 7 8 9 10 11 12 13 14 15 16 17 18 19 20 21 22 23 24 25 26 27 28 29 30 31 32 33 34 35 36 37 38 39 40 41 42 43 44 45 46 47 48 49 50 51 52 53 54 55 56 package com.kakawanyifan;import org.junit.jupiter.api.Test;import org.springframework.beans.factory.annotation.Autowired;import org.springframework.boot.test.context.SpringBootTest;import org.springframework.data.redis.core.RedisTemplate;import java.util.List;import java.util.Set;@SpringBootTest (classes = Application.class ) public class RedisAppTest @Autowired private RedisTemplate redisTemplate; @Test public void test () redisTemplate.boundValueOps("str" ).set("kaka" ); System.out.println("str = " + redisTemplate.opsForValue().get("str" )); redisTemplate.boundHashOps("h_key" ).put("name" , "kaka" ); redisTemplate.boundHashOps("h_key" ).put("age" , 13 ); Set set = redisTemplate.boundHashOps("h_key" ).keys(); System.out.println("hash散列的所有域:" + set); List list = redisTemplate.boundHashOps("h_key" ).values(); System.out.println("hash散列的所有域的值:" + list); redisTemplate.boundListOps("l_key" ).leftPush("c" ); redisTemplate.boundListOps("l_key" ).leftPush("b" ); redisTemplate.boundListOps("l_key" ).leftPush("a" ); list = redisTemplate.boundListOps("l_key" ).range(0 , -1 ); System.out.println("list列表中的所有元素:" + list); redisTemplate.boundSetOps("s_key" ).add("a" , "b" , "c" ); set = redisTemplate.boundSetOps("s_key" ).members(); System.out.println("set集合中的所有元素:" + set); redisTemplate.boundZSetOps("z_key" ).add("a" , 30 ); redisTemplate.boundZSetOps("z_key" ).add("b" , 20 ); redisTemplate.boundZSetOps("z_key" ).add("c" , 10 ); set = redisTemplate.boundZSetOps("z_key" ).range(0 , -1 ); System.out.println("zset有序集合中的所有元素:" + set); } }
运行结果:
1 2 3 4 5 6 str = kaka hash散列的所有域:[age, name] hash散列的所有域的值:[13, kaka] list列表中的所有元素:[a, b, c, a, b, c] set集合中的所有元素:[c, a, b] zset有序集合中的所有元素:[c, b, a]
切换客户端
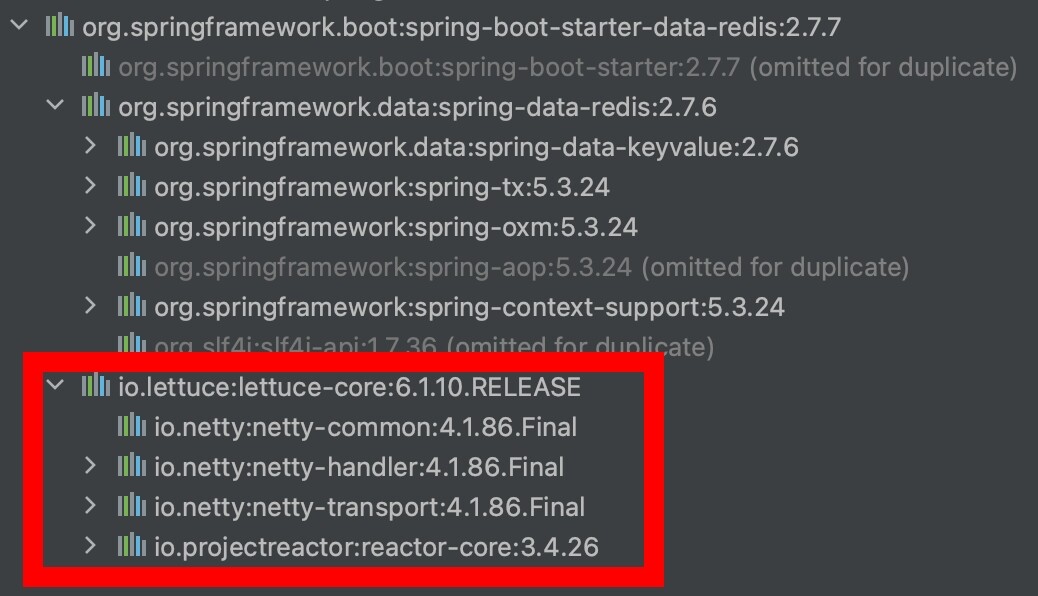
我们观察spring-boot-starter-data-redis所依赖的包,会发现其Redis客户端是"lettuce"。
如果我们需要切换为jedis客户端。
需要引入jedis的包,注意不用配置版本。
1 2 3 4 <dependency > <groupId > redis.clients</groupId > <artifactId > jedis</artifactId > </dependency >
并在client-type,配置为jedis。
1 2 3 4 5 redis: host: 10.211 .55 .14 port: 6379 password: Redis@2023 client-type: jedis
两种客户端的比较:
jedis连接Redis服务器是直连模式,当多线程模式下使用jedis会存在线程安全问题,解决方案可以通过配置连接池使每个连接专用,但这样整体性能就大受影响。
lettuce基于Netty框架进行与Redis服务器连接,底层设计中采用StatefulRedisconnection。StatefulRedisConnection自身是线程安全的,可以保障并发访问安全问题,所以一个连接可以被多线程复用。当然lettuce也支持多连接实例一起工作。
推荐使用默认的lettcus
日志
作用
SpringBoot中自带了日志框架,我们不需要额外引入。
记录日志
方法一,每一个需要打印日志的类,都添加类似于如下的代码:
1 private static final Logger log = LoggerFactory.getLogger(BookController.class ) ;
方法二,导入lombok后使用注解@Slf4j,日志对象名为log:
1 2 3 4 5 6 @Slf 4j@RestController @RequestMapping ("/books" )public class BookController 【部分代码略】
示例代码:
1 2 3 4 5 6 7 8 9 10 11 12 13 14 15 16 17 18 19 20 21 22 23 24 package com.kakawanyifan.controller;import org.slf4j.Logger;import org.slf4j.LoggerFactory;import org.springframework.web.bind.annotation.GetMapping;import org.springframework.web.bind.annotation.PathVariable;import org.springframework.web.bind.annotation.RequestMapping;import org.springframework.web.bind.annotation.RestController;@RestController @RequestMapping ("/books" )public class BookController private static final Logger log = LoggerFactory.getLogger(BookController.class ) ; @GetMapping ("/{id}" ) public String getById (@PathVariable Integer id) log.debug("debug..." ); log.info("info..." ); log.warn("warn..." ); log.error("error..." ); System.out.println("id : " + id); return "hello , spring boot 123" ; } }
然后我们请求接口,会打印日志如下:
1 2 3 2023-01-04 16:59:22.479 INFO 8292 --- [nio-8080-exec-2] c.k.controller.BookController : info... 2023-01-04 16:59:22.479 WARN 8292 --- [nio-8080-exec-2] c.k.controller.BookController : warn... 2023-01-04 16:59:22.480 ERROR 8292 --- [nio-8080-exec-2] c.k.controller.BookController : error...
只有三行,没有debug...,因为默认情况下,系统启动的日志级别是"info"。
有些资料说,如果在application.yml设置
就能打印"debug"级别的日志。debug: true,只能打印和SpringBoot有关的debug日志。
日志级别
日志的级别分为6种,分别是:
TRACE:运行堆栈信息,使用率低。DEBUG:程序员调试代码使用。INFO:记录运维过程数据。WARN:记录运维过程报警数据。ERROR:记录错误堆栈信息。FATAL:灾难信息,合并计入ERROR。
一般情况下,开发时候使用"DEBUG",上线后使用"INFO",运维信息记录使用"WARN"即可。
root表示根节点,即整体应用日志级别。
1 2 3 logging: level: root: debug
上述的设置方法,包括SpringBoot的debug级别的日志,也会被打印出来。我们可以更细粒度的控制。
我们直接对包设置日志级别。
1 2 3 4 logging: level: root: info com.kakawanyifan: debug
但是,如果包太多的话,上述方法繁琐。
我们可以直接设置组。
group:设置当前组中所包含的包,多个包用,分隔。
1 2 3 4 5 6 logging: level: root: info kaka: debug group: kaka: com.kakawanyifan,com.kaka
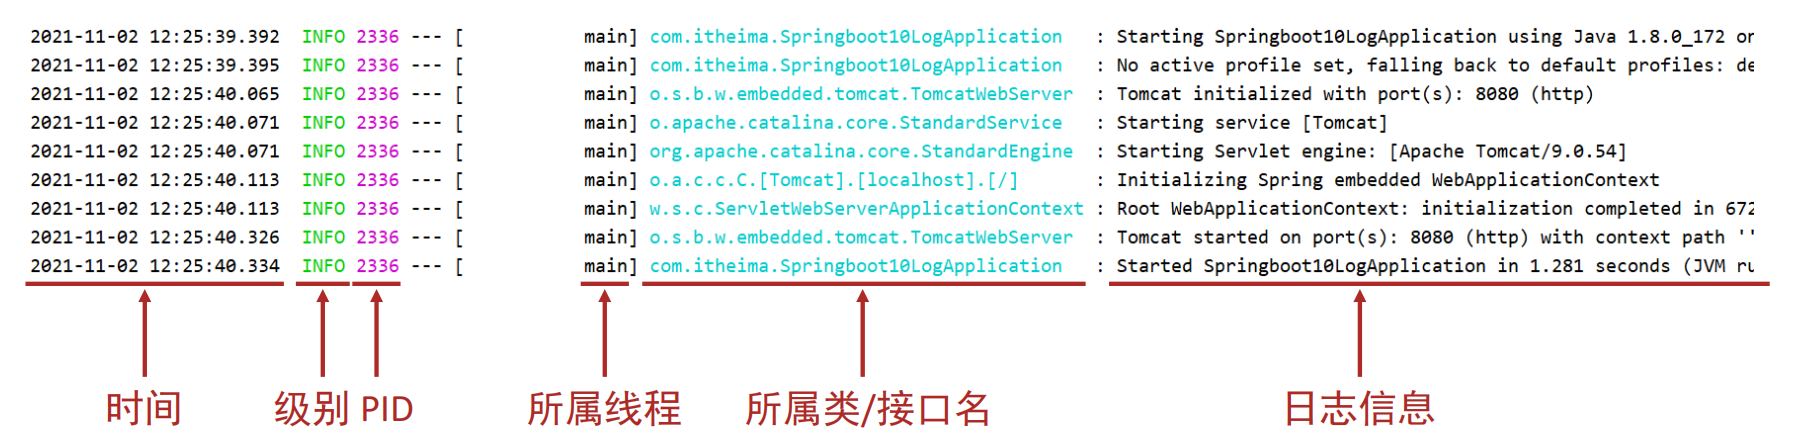
日志格式
所属类/接口名:当前显示信息为SpringBoot重写后的信息,名称过长时,会简化包名书写为首字母,甚至直接删除部分。
我们可以自定义日志日志,例如
1 2 3 logging: pattern: console: "%d - %m %n"
1 2 3 4 5 2023-01-04 19:33:39,458 - Initializing Spring embedded WebApplicationContext 2023-01-04 19:33:39,459 - Root WebApplicationContext: initialization completed in 972 ms 2023-01-04 19:33:40,294 - LiveReload server is running on port 35729 2023-01-04 19:33:40,327 - Tomcat started on port(s): 8080 (http) with context path '' 2023-01-04 19:33:40,337 - Started Application in 2.192 seconds (JVM running for 2.638)
一般情况下,我们不用调整日志格式,因为SpringBoot的默认日志格式,确实很好。
日志文件
日志不能仅显示在控制台上,我们还需要把日志记录到文件中,方便后期维护查阅。
1 2 3 logging: file: name: server.log
那么我们的日志会被记录在哪个目录的server.log中呢?
在我们程序启动的时候,会打印:
1 2023-01-04 19:57:05.876 【部分内容略】Starting Application using Java 1.8.0_333 on Kakas-MacBook-Pro.local with PID 2537 (/Users/kaka/Documents/s/spb/target/classes started by kaka in /Users/kaka/Documents/s/spb)
就在/Users/kaka/Documents/s/spb。
如果我们将其打成一个Jar包的话,日志文件就在Jar包所在目录下。
1 2 file: name: log/server.log
在系统运行期间:
需要每天记录日志文件。
为了便于维护,还要限制每个日志文件的大小。
太早之前的日志要及时清理,否则会大量占用磁盘空间。
有三个参数可以帮忙实现:
max-file-size: 10MB:文件最大10MB。file-name-pattern: server.%d{yyyyMMdd}.%i.log:文件名格式,%d{yyyyMMdd}日期,%i序号。max-history: 365:最多保留365天的日志。
1 2 3 4 5 logback: rollingpolicy: max-file-size: 10MB file-name-pattern: server.%d{yyyyMMdd}.%i.log max-history: 365
其中,可以file-name-pattern不额外设置,其默认值,会把历史的日志压缩成一个.gz包,我个人观点这样更好。
对于.gz包,在Linux上我们可以通过vi或vim可以直接查看,不用解压。
部署
热部署
手动热部署
在《13.Servlet、Filter和Listener》 ,我们讨论过如何在Tomcat中实现热部署。但是现在,我们的Tomcat其实是SpringBoot管控的,是SpringBoot中内置的Tomcat。
新增依赖spring-boot-devtools:
1 2 3 4 5 <dependency > <groupId > org.springframework.boot</groupId > <artifactId > spring-boot-devtools</artifactId > <scope > runtime</scope > </dependency >
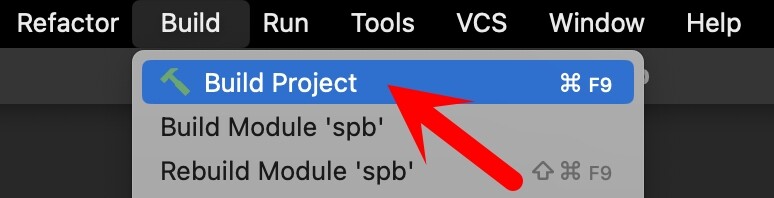
但是仅仅添加了依赖,并不会自动热部署,我们还需要每次都重新Build。
关于两种重新部署的方式:
重启(restart):自定义开发代码,包含类、页面、配置文件等。
重载(reload):Jar包
我们启用热部署,只会进行重启(restart),如果我们引入了新的Jar包或者引入的Jar包有修改(版本修改)的话,是不会生效的。热部署仅仅加载当前开发者自定义开发的资源,不加载Jar资源。
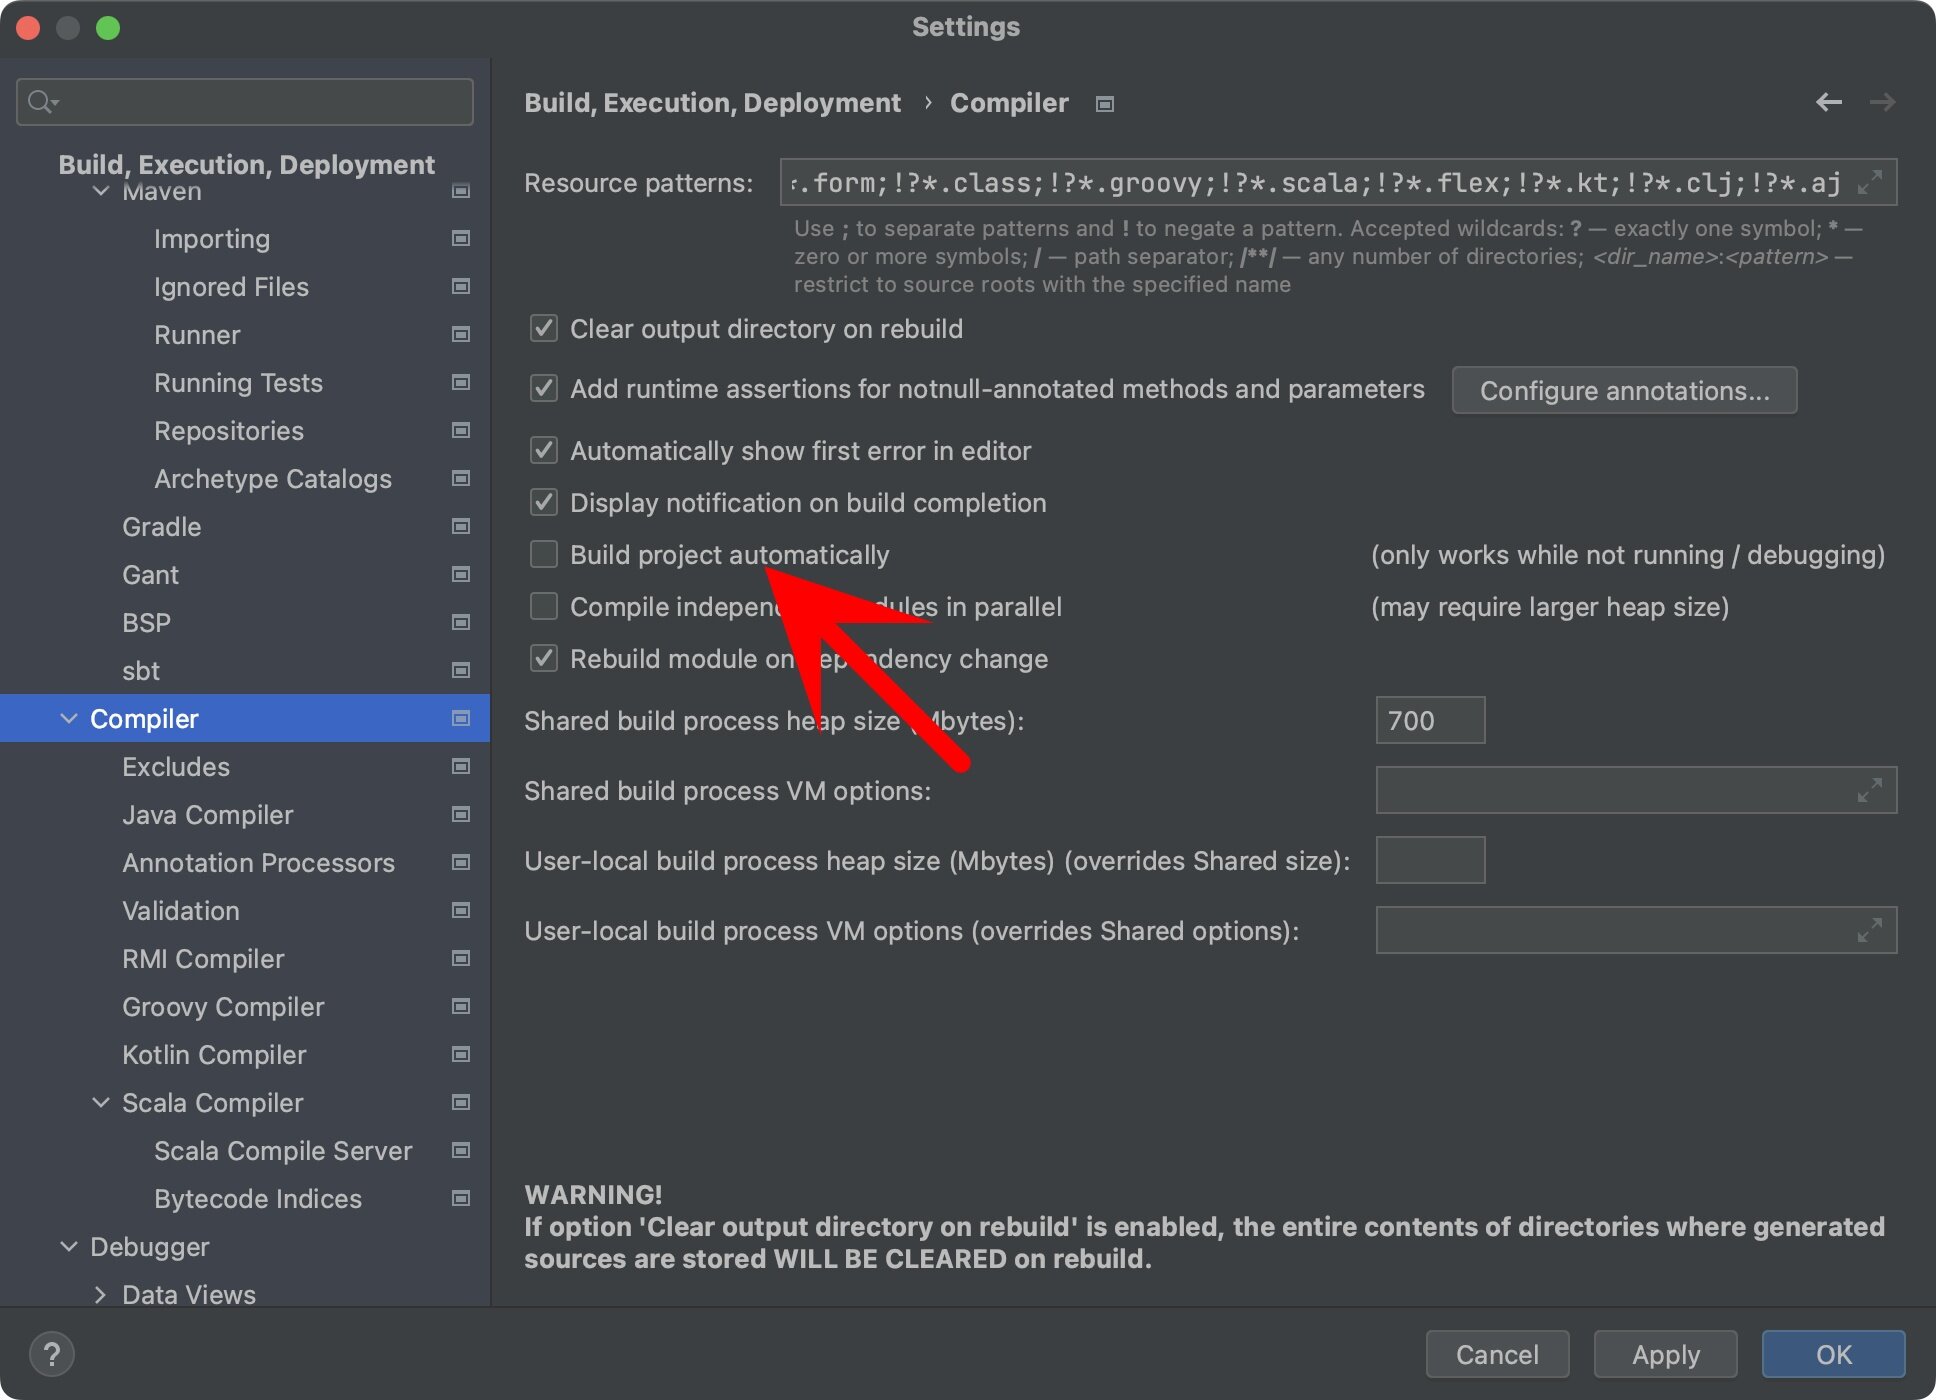
自动热部署
第一步:勾选Build project automatically:
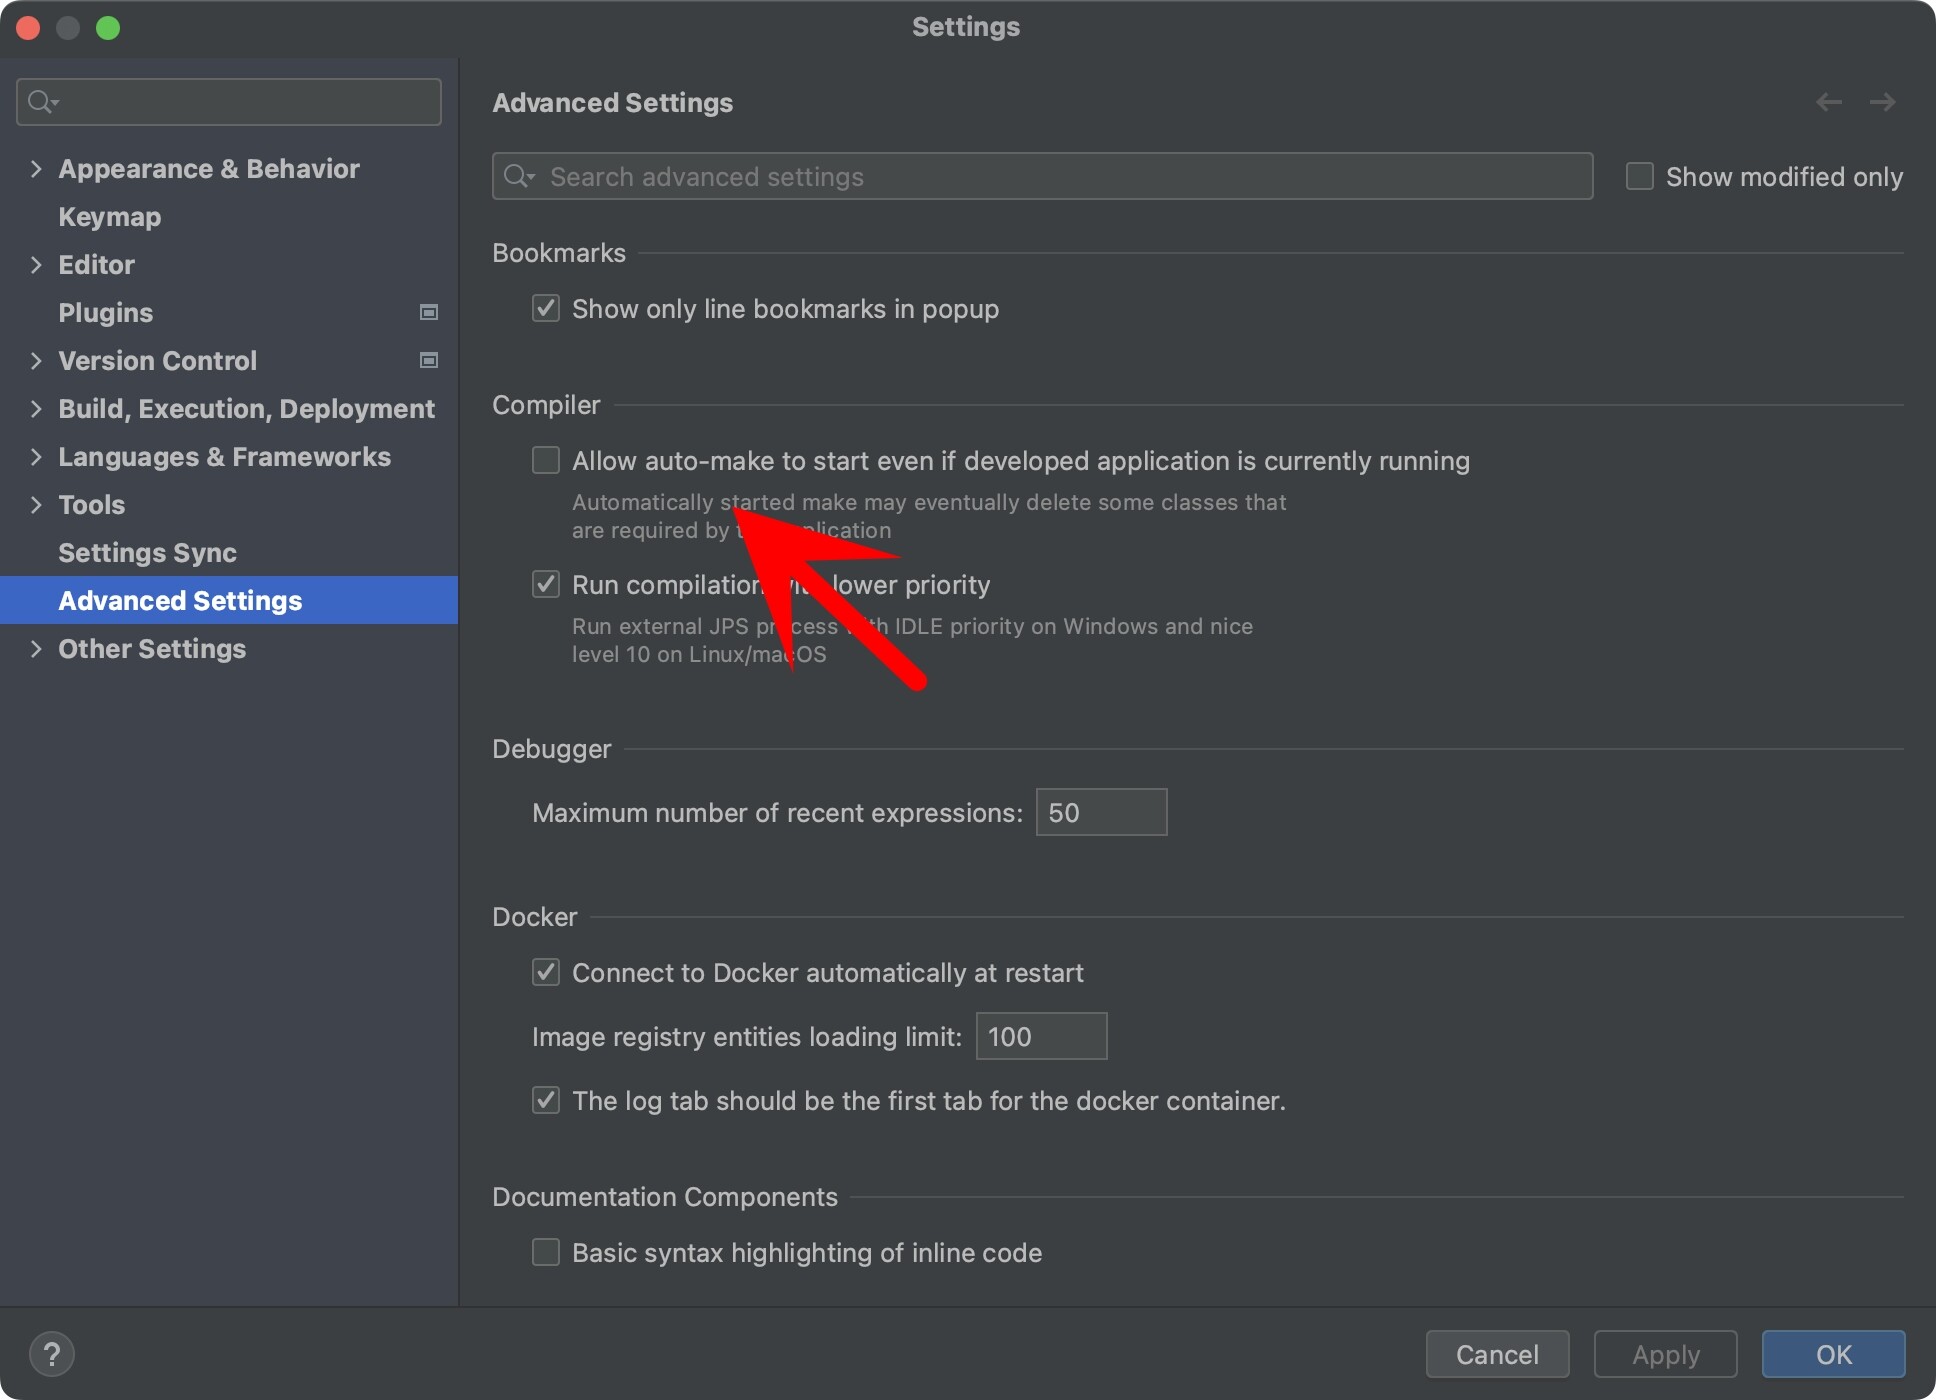
第二步:勾选Allow auto-make to start even if developed application is currently running:
第三步:重启IDEA
第四步:还需要IDEA失去鼠标的焦点超过5秒,才会自动构建。
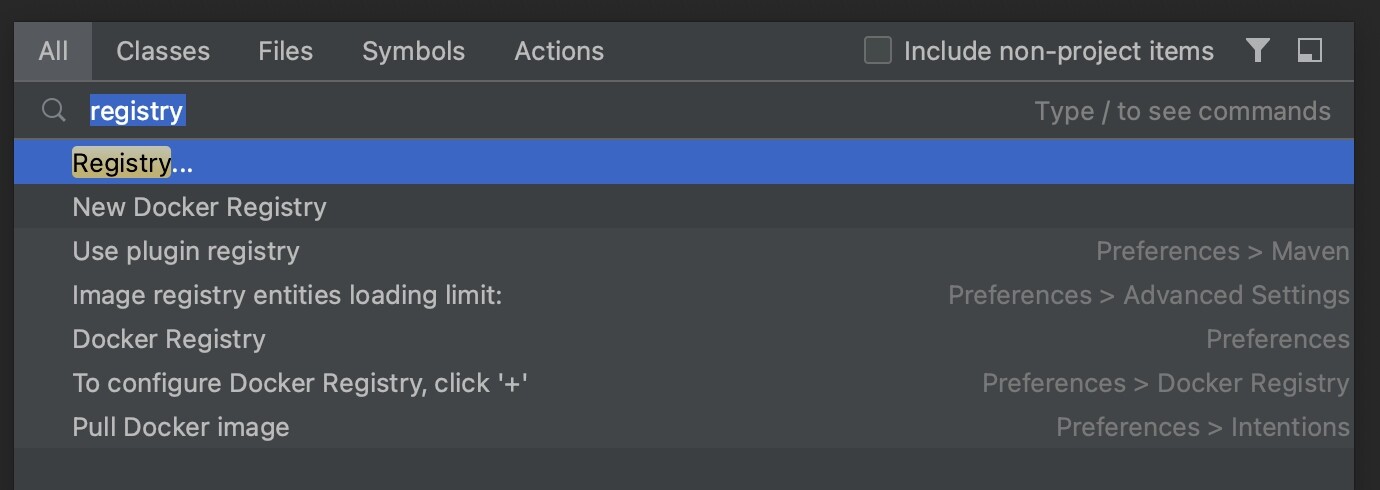
如果我们用的是旧版本的IDEA,对于"第二步",需要按照如下的方法操作。
搜索"Registry"。
勾选compile.automake.allow.when.app.running。
设置
在application.yml文件中,我们可以关闭热部署:
1 2 3 4 spring: devtools: restart: enabled: false
可以配置不参与热部署的目录列表有:
1 2 3 devtools: restart: exclude:
默认不参与热部署的目录列表有:
/META-INF/maven/META-INF/resources/resources/static/public/templates
exclude:,会覆盖默认的目录列表,我们可以不覆盖,只新增。
1 2 3 devtools: restart: additional-exclude:
打包部署
打包的话,一定要有spring-boot-maven-plugin这个插件。
1 2 3 4 5 6 7 8 <build > <plugins > <plugin > <groupId > org.springframework.boot</groupId > <artifactId > spring-boot-maven-plugin</artifactId > </plugin > </plugins > </build >
如果我们是部署在Linux上,通过java -jar命令启动。要注意:后台运行 且 不挂起 。
1 nohup java -jar testJ.jar > myout.txt 2>&1 &
关于该部分,我们在《Linux操作系统使用入门:2.命令》 的"后台运行"部分有讨论。
停服务
那么,我们怎么停服务呢?kill,这是一种方法,但是这样会导致一些没有执行完的任务会直接退出。
pom.xml配置增加:
1 2 3 4 <dependency > <groupId > org.springframework.boot</groupId > <artifactId > spring-boot-starter-actuator</artifactId > </dependency >
application.properties配置:
1 2 3 4 5 endpoints.shutdown.enabled =true endpoints.shutdown.sensitive =false
服务启动后,可以通过linux的curl命令发送POST请求的方式停止服务。
1 curl -X POST host(ip):port(端口)/shutdown
比较好的停服务的方式还有很多,这里暂且只讨论这一种。