开始
create-react-app
create-react-app,快速创建React开发环境的工具。
如下,基于create-react-app,创建React项目:
1 npx create-react-app react-basic
运行结果:
1
2
3
4
5
6
7
8
9
10
11
12
13
14
15
16
17
18
19
20
21
22
23
24
25
26
27
【部分运行结果略】 Success! Created react-basic at /Users/kaka/Desktop/s/react-basic Inside that directory, you can run several commands: npm start Starts the development server. npm run build Bundles the app into static files for production. npm test Starts the test runner. npm run eject Removes this tool and copies build dependencies, configuration files and scripts into the app directory. If you do this, you can’t go back! We suggest that you begin by typing: cd react-basic npm start Happy hacking! 【部分运行结果略】
解释说明:
npx,Node.js工具命令,查找并执行包。create-react-app,核心包(固定写法)。react-basic,React项目的名称(可以自定义)。
根据运行结果,我们知道依次执行cd react-basic、npm start,即可启动项目。
特别的,如果执行缓慢,可以考虑切换源:
1 npm config set registry https://registry.npmmirror.com/
目录结构
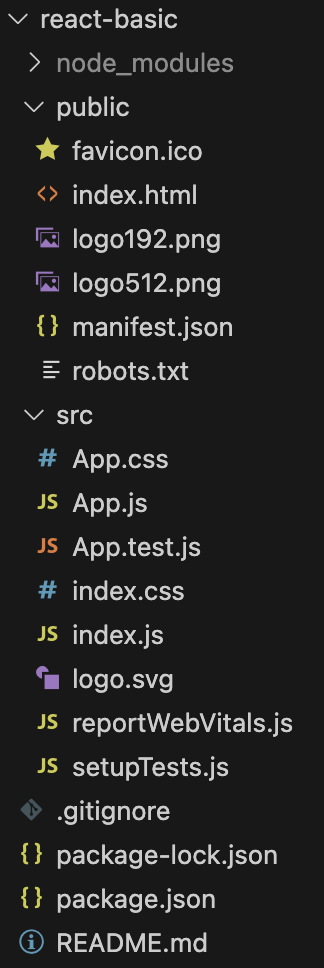
"react-basic"的目录结构如下:
特别的,我们可以在package.json中看到React相关的依赖和命令。
示例代码:
1
2
3
4
5
6
7
8
9
10
11
【部分内容略】 "scripts" : { "start" : "react-scripts start" , "build" : "react-scripts build" , "test" : "react-scripts test" , "eject" : "react-scripts eject" }, 【部分内容略】
然后我们进行如下操作:
对于src目录下的文件,只保留index.js和App.js。
修改index.js,修改后如下:1 2 3 4 5 6 7 8 9 10 11 12 13 14 import React from 'react' ;import ReactDOM from 'react-dom/client' ;import App from './App' ;const root = ReactDOM.createRoot(document .getElementById('root' ));root.render( <App /> );
修改App.js,修改如下:1 2 3 4 5 6 7 8 9 10 11 function App ( return ( <div> this is app </div> ) } export default App
解释说明:
index.js,是项目的入口,从这里开始运行。App.js被引入到index.js然后被渲染到public/index.html的root节点。
特别的,我们可以看一下public/index.html的内容。示例代码:
1 2 3 4 5 6 7 8 9 10 11 12 13 14 15 <!DOCTYPE html > <html lang ="en" > <head > 【部分运行结果略】 </head > <body > <noscript > You need to enable JavaScript to run this app.</noscript > <div id ="root" > </div > 【部分运行结果略】 </body > </html >
Chrome浏览器的一个插件,用于更方便的开发基于React的程序。https://reactjs.org/link/react-devtools
JSX
什么是JSX
JSX是JavaScript和XML(HTML)的缩写,表示在JavaScript代码中编写HTML模版结构,是React中构建UI的方式。
如下,是一段JSX代码:
1 2 3 4 5 6 7 8 9 10 const message = 'this is message' function App ( return ( <div> <h1>this is title</h1> {message} </ div> ) }
JSX的优点有:
HTML的声明式模版写法
JavaScript的可编程能力
需要注意的是,JSX不是标准的JavaScript语法,而是JavaScript的语法扩展。浏览器本身不能识别,需要通过解析工具做解析之后才能在浏览器中使用。
大括号语法{}
在JSX中可以通过大括号语法{}识别JavaScript中的表达式,比如常见的变量、函数调用、方法调用等等。
在下文的例子中,展示了
使用引号传递字符串
使用JavaScript变量
函数调用和方法调用
使用JavaScript对象
示例代码:
1 2 3 4 5 6 7 8 9 10 11 12 13 14 15 16 17 18 19 20 21 22 23 const message = 'this is message' function getAge ( return 18 } function App ( return ( <div> <h1>this is title</h1> {/ * 字符串识别 */} {'this is str'} {/ * 变量识别 */} {message} {/ * 函数调用 渲染为函数的返回值 */} {getAge()} {/ * 方法调用 */} {new Date().getDate()} {/ * 使用JavaScript对象 */} <div style={{color :'red'}}>this is a div</ div> </div> ) }
注意:if语句、switch语句、变量声明不属于表达式,不能出现在{}中。
列表渲染
在JSX中可以使用JavaScript的map方法实现列表渲染。
示例代码:
1 2 3 4 5 6 7 8 9 10 11 12 13 14 15 const list = [ {id :1001 , name :'Vue' }, {id :1002 , name : 'React' }, {id :1003 , name : 'Angular' } ] function App ( return ( <ul> {list.map(item =><li key ={item.id} > {item.name}</li > </ul> ) } export default App
在上文,如果我们去除key={item.id},会有告警。这个key是React内部用的,用于提升渲染性能。
条件渲染
语法规则
逻辑与运算符 &&1 {flag && <span > this is span</span >
flag为true显示&&后的内容,否则不显示。
三元表达式 ? :1 {loading ? <span > loading...</span > <span > this is span</span >
简单应用
示例代码:
1 2 3 4 5 6 7 8 9 10 11 const flag = true const loading = false function App ( return ( <> {flag && <span > this is span</span > {loading ? <span > loading...</span > <span > this is span</span > </> ) }
复杂应用
假设存在一个需求,列表中需要根据文章的状态适配。
这时候,我们就可以用"自定义函数"+"判断语句"的方式实现。
示例代码:
1 2 3 4 5 6 7 8 9 10 11 12 13 14 15 16 17 18 19 20 21 const type = 1 function getArticleJSX ( if (type === 0 ){ return <div > 无图模版</div > }else if (type === 1 ){ return <div > 大图模版</div > }else if (type === 3 ){ return <div > 小图模版</div > } } function App ( return ( <> { getArticleJSX() } </> ) } export default App
事件绑定
绑定方法
React中的事件绑定,通过语法on + 事件名称 = { 事件处理程序 },整体上遵循驼峰命名法。
如下,展示的是click事件的绑定,其他事件的绑定方法,一模一样。示例代码:
1 2 3 4 5 6 7 8 function App ( const clickHandler = () => console .log('button按钮点击了' ) } return ( <button onClick={clickHandler}>click me</button> ) }
传递事件参数
在事件回调函数中设置形参e,即可以使用事件参数。
示例代码:
1 2 3 4 5 6 7 8 function App ( const clickHandler = (e )=> { console .log('button按钮点击了' , e) } return ( <button onClick={clickHandler}>click me</button> ) }
传递自定义参数
步骤:
事件绑定的位置改造成箭头函数的写法,并传递参数。
在事件回调函数中设置形参。
示例代码:
1 2 3 4 5 6 7 8 function App ( const clickHandler = (name )=> { console .log('button按钮点击了' , name) } return ( <button onClick={()=>clickHandler('jack' )}>click me</button> ) }
重点关注如下部分:
onClick={()=>clickHandler('jack')}const clickHandler = (name)=>{ ... }
同时传递事件对象和自定义参数
步骤:
在事件绑定的位置传递事件参数e和自定义参数。
在事件回调函数中声明形参,注意顺序对应。
示例代码:
1 2 3 4 5 6 7 8 function App ( const clickHandler = (name,e )=> { console .log('button按钮点击了' , name,e) } return ( <button onClick={(e)=>clickHandler('jack' ,e)}>click me</button> ) }
重点关注如下部分:
onClick={(e)=>clickHandler('jack',e)}const clickHandler = (name,e)=>{ ... }
组件概述
什么是组件
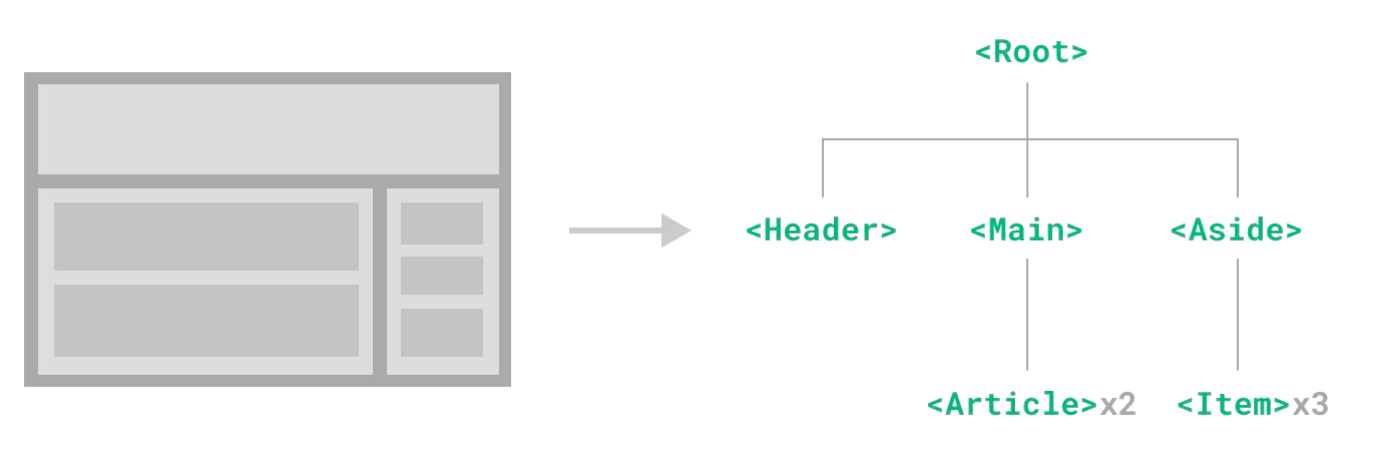
组件是用户界面的一部分。
组件化开发可以让开发者像搭积木一样构建一个完整的庞大的应用。
使用方法
在React中,组件通常是首字母大写的函数,内部存放组件的逻辑和视图UI,渲染组件只需要把组件当成标签书写即可。
使用组件有两种方法:
定义组件
使用组件
自闭和
成对标签
示例代码:
1 2 3 4 5 6 7 8 9 10 11 12 13 14 15 16 function Button ( return <button > click me</button > } function App ( return ( <div> {} <Button/> {} <Button></Button> </ div> ) }
useState
概述
useState是一个ReactHook(函数),允许我们向组件添加一个状态变量,从而控制影响组件的渲染结果。
组件状态变量和普通JavaScript变量不同之处在于:状态变量一旦发生变化组件的视图UI也会跟着变化,即数据驱动视图。
使用方法
下文展示了一个useState的例子,示例代码:
1 const [ count, setCount ] = useState(0 )
解释说明:
useState是一个函数,返回值是一个数组。数组中的第一个参数是状态变量,第二个参数是set函数用来修改状态变量。
useState的参数将作为count的初始值。
简单案例
在下文,我们定义了一个button,每点击一次,button上的数字会+1。
示例代码:
1 2 3 4 5 6 7 8 9 10 11 12 13 14 15 16 17 18 19 20 import React, {useState} from "react" ;function App ( const [ count, setCount ] = useState(0 ) return ( <div> <button onClick={()=>setCount(count+1 )}>{ count }</button> </ div> ) } export default App
状态不可变
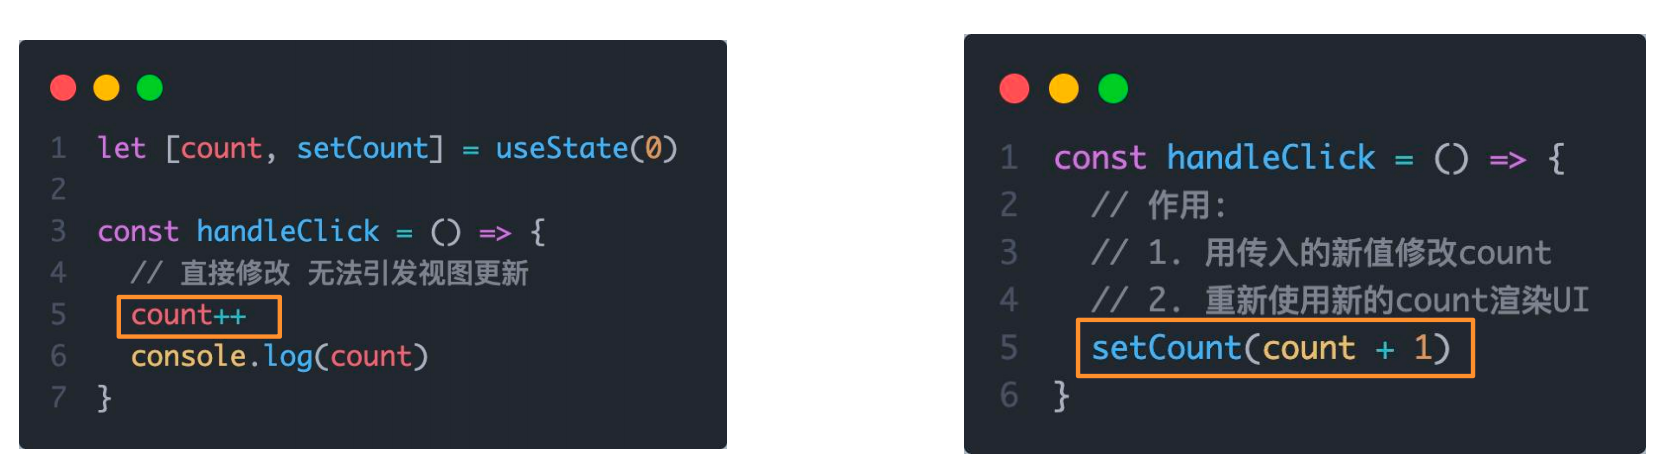
需要注意的是,修改状态有一定的规则。状态不可变 。
即,在React中状态被认为是只读的,我们应该始终替换它而不是修改它,直接修改状态不能引发视图更新。
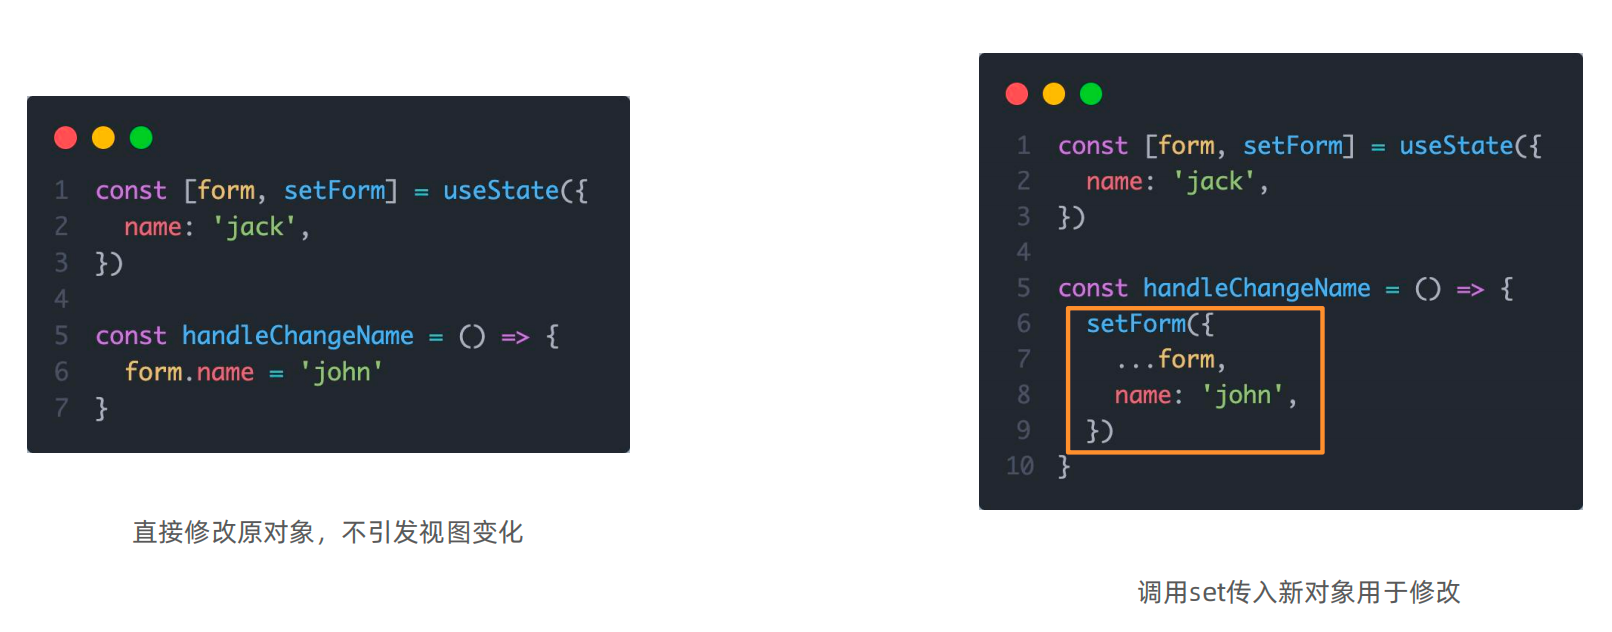
同样的,对于对象类型的状态变量,我们也应该始终给set一个全新的对象来进行修改。
样式处理
两种方式
React组件样式的控制,有两种方式:
行内样式
1 <div style={{color :'red' }}>this is div</div>
这种方式不推荐。
class类名控制
1 2 3 4 5 6 7 8 9 10 11 import './index.css' function App ( return ( <div> <span className="foo" >this is span</span> </ div> ) } export default App
classnames
解决的问题
一种常见的需求,我们需要通过条件状态控制class类名的显示。
例如nav-item active和nav-item:
1 2 3 className={ item.type === activeTab ? 'nav-item active' : 'nav-item' }
如果我们采用字符串的拼接方式不够直观,也容易出错。classnames是一个JavaScript库,可以非常方便的通过条件状态控制class类名的显示。
GitHub地址:https://github.com/JedWatson/classnames
使用方法
示例代码:
1 2 3 import classNames from 'classnames' ;className={classNames('nav-item' , {active : activeTab === item.type })}
解释说明:
nav-item是静态的类名active是动态类名type === item.type是控制语句
案例一
背景介绍
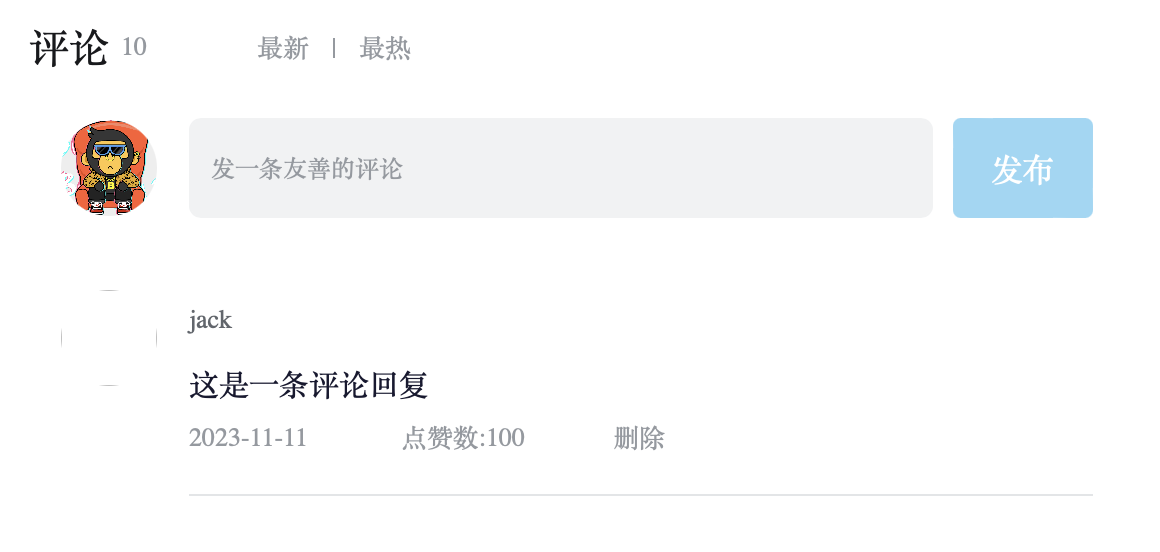
完成一个评论列表,需要实现如下功能:
渲染评论列表
删除评论
渲染导航Tab和高亮
评论列表排序
已有App.js,内容如下:
1 2 3 4 5 6 7 8 9 10 11 12 13 14 15 16 17 18 19 20 21 22 23 24 25 26 27 28 29 30 31 32 33 34 35 36 37 38 39 40 41 42 43 44 45 46 47 48 49 50 51 52 53 54 55 56 57 58 59 60 61 62 63 64 65 66 67 68 69 70 71 72 73 74 75 76 77 78 79 80 81 82 83 84 85 86 87 88 89 90 91 92 93 94 95 96 97 98 99 100 101 102 103 104 105 106 107 108 109 110 import './App.scss' import avatar from './images/bozai.png' const defaultList=[{rpid :3 ,user :{uid :'13258165' ,avatar :'' ,uname :'周杰伦' ,},content :'哎哟,不错哦' ,ctime :'10-18 08:15' ,like :88 ,},{rpid :2 ,user :{uid :'36080105' ,avatar :'' ,uname :'许嵩' ,},content :'我寻你千百度 日出到迟暮' ,ctime :'11-13 11:29' ,like :88 ,},{rpid :1 ,user :{uid :'30009257' ,avatar,uname :'前端' ,},content :'学前端' ,ctime :'10-19 09:00' ,like :66 ,},]const user={uid :'30009257' ,avatar,uname :'前端' ,}const tabs=[{type :'hot' ,text :'最热' },{type :'time' ,text :'最新' },]const App = () => return ( <div className="app" > {} <div className="reply-navigation" > <ul className="nav-bar" > <li className="nav-title" > <span className="nav-title-text" >评论</span> {/ * 评论数量 */} <span className="total-reply">{10}</ span> </li> <li className="nav-sort"> {/ * 高亮类名: active */} <span className='nav-item'>最新</ span> <span className='nav-item' >最热</span> </ li> </ul> </ div> <div className="reply-wrap" > {} <div className="box-normal" > {} <div className="reply-box-avatar" > <div className="bili-avatar" > <img className="bili-avatar-img" src={avatar} alt="用户头像" /> </div> </ div> <div className="reply-box-wrap" > {} <textarea className="reply-box-textarea" placeholder="发一条友善的评论" /> {} <div className="reply-box-send" > <div className="send-text" >发布</div> </ div> </div> </ div> {} <div className="reply-list" > {} <div className="reply-item" > {} <div className="root-reply-avatar" > <div className="bili-avatar" > <img className="bili-avatar-img" alt="" /> </div> </ div> <div className="content-wrap" > {} <div className="user-info" > <div className="user-name" >jack</div> </ div> {} <div className="root-reply" > <span className="reply-content" >这是一条评论回复</span> <div className="reply-info"> {/ * 评论时间 */} <span className="reply-time">{'2023-11-11'}</ span> {} <span className="reply-time" >点赞数:{100 }</span> <span className="delete-btn"> 删除 </ span> </div> </ div> </div> </ div> </div> </ div> </div> ) } export default App
App.scss提供 下载链接
注意:是scss格式的,可能需要安装对应的包;命令为npm install sass;是sass,不是scss。
渲染评论列表
步骤:
使用useState维护评论列表。
使用map方法对列表数据进行遍历渲染。
示例代码:
1 2 3 4 5 6 7 8 9 10 11 12 13 14 15 16 17 18 19 20 21 22 23 24 25 26 27 28 29 30 31 32 33 34 35 36 37 38 39 40 41 42 const [list, setList] = useState(defaultList){} <div className="reply-list" > {} {list.map(item => return ( <div key={item.rpid} className="reply-item" > {} <div className="root-reply-avatar" > <div className="bili-avatar" > <img className="bili-avatar-img" src={item.user.avatar} alt="" /> </div> </ div> <div className="content-wrap" > {} <div className="user-info" > <div className="user-name" >{item.user.uname}</div> </ div> {} <div className="root-reply" > <span className="reply-content" >{item.content}</span> <div className="reply-info"> {/ * 评论时间 */} <span className="reply-time">{item.ctime}</ span> {} <span className="reply-time" >点赞数:{item.like}</span> 【删除按钮的相关代码】 </ div> </div> </ div> </div> ) })} </ div>
删除评论
要求,只有自己的评论才显示删除按钮,点击删除按钮,删除当前评论,列表中不再显示。
步骤:
只有自己的评论才显示删除按钮,条件渲染。
删除评论,拿到当前项id,以id为条件对评论列表做filter过滤。
示例代码:
1 2 3 4 5 6 7 8 9 10 11 12 13 14 15 {user.uid === item.user.uid && ( <span className="delete-btn" onClick={() => onDelete(item.rpid)} > 删除 </span> )} / / 删除评论 const onDelete = rpid => { / / 如果要删除数组中的元素,需要调用 filter 方法,并且一定要调用 setList 才能更新状态 setList(list.filter(item => item.rpid !== rpid)) }
渲染导航Tab和高亮实现
要求,点击哪个tab,哪个tab做高亮处理。
步骤:
点击谁就把谁的type记录下来
和遍历时的每一项的type做匹配,谁匹配到就设置负责高亮的类名。
为了自动渲染,该部分必须用useState管理。
示例代码:
1 2 3 4 5 6 7 8 9 10 11 12 13 14 15 16 17 18 19 20 21 22 23 24 25 26 27 const [activeTab, setActiveTab] = useState('hot' )const onToggle = type => setActiveTab(type) 【评论列表排序功能相关的代码】 } <li className="nav-sort" > {} {tabs.map(item => return ( <div key={item.type} className={ item.type === activeTab ? 'nav-item active' : 'nav-item' } onClick={() => onToggle(item.type)} > {item.text} </div> ) })} </ li>
特别的,我们可以基于classnames包,更方便的实现上述功能,示例代码:
1 2 3 4 5 6 import classNames from 'classnames' ;className={classNames('nav-item' , {active : activeTab === item.type })}
评论列表排序
背景
需求:点击最新,评论列表按照创建时间倒序排列(新的在前);点击最热,按照点赞数排序(点赞多的在前)。
思路:把评论列表状态数据进行不同的排序处理,当成新值传给set函数重新渲染视图UI。
lodash
对于排序部分,我们可以基于lodash实现。
loadsh,一个包,封装了很多常用的功能。
示例代码
1 2 3 4 5 6 7 8 9 10 11 12 13 14 const onToggle = type => setActiveTab(type) let newList if (type === 'time' ) { newList = orderBy(list, 'ctime' , 'desc' ) } else { newList = orderBy(list, 'like' , 'desc' ) } setList(newList) }
表单绑定
受控表单绑定
定义
受控表单绑定,即使用React的useState控制表单的状态。具体操作是,基于useState定义一个变量,然后用这个变量和表单的值,实时保持同步。
实践
示例代码:
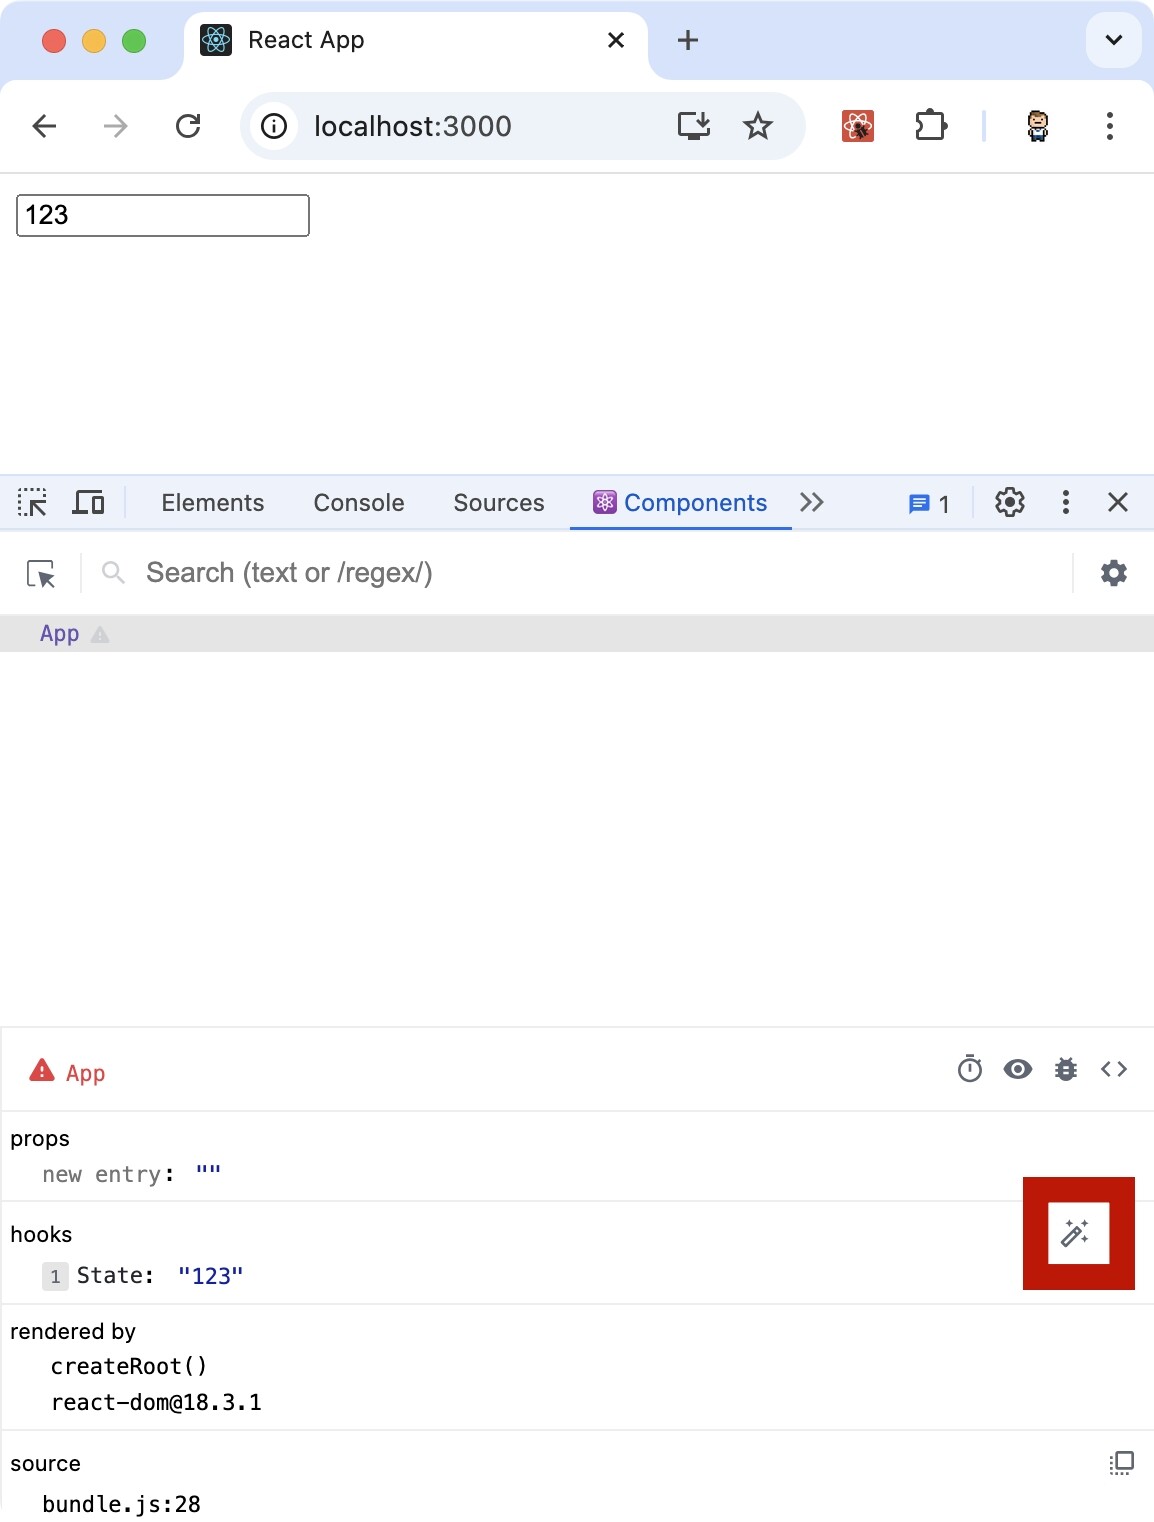
1 2 3 4 5 6 7 8 9 10 11 12 13 14 15 16 17 18 19 import React, { useState } from "react" ;function App ( const [value, setValue] = useState('' ) return ( <input type="text" value={value} onChange={e => setValue(e.target.value)} /> ) } export default App
我们可以点击红框处,编辑state的值,会发现input框的值也变化了,即两者之间绑定了。
非受控表单绑定
定义
非受控表单绑定,即在React中获取DOM,通过获取DOM的方式获取表单的输入数据。
useRef
在React组件中获取/操作DOM,需要基于useRef函数。
步骤:
使用useRef创建ref对象,并与JSX绑定。
在DOM可用时,通过inputRef.current拿到DOM对象。
实践
示例代码:
1 2 3 4 5 6 7 8 9 10 11 12 13 14 15 16 17 import React, { useRef } from "react" ;function App ( const inputRef = useRef(null ) const onChange = () => console .log(inputRef.current.value) } return ( <input type="text" ref={inputRef} onChange={onChange} /> ) }
案例二
背景介绍
我们在案例一的基础上继续,实现"发布评论"的功能。主要两点:
获取评论内容。
点击发布按钮,发布评论。
uuid
uuid,一个和UUID有关的JavaScript库。https://github.com/uuidjs/uuid
dayjs
dayjs,一个处理时间和日期的JavaScript库。https://day.js.org https://github.com/iamkun/dayjs
实现
示例代码:
1 2 3 4 5 6 7 8 9 10 11 12 13 14 15 16 17 18 19 20 21 22 23 24 25 26 27 28 29 30 31 32 33 34 const [content, setContent] = useState('' )const inputRef = useRef(null )const handlePublish = () => let newList = [...list,{ rpid: uuidv4(), user: { uid: '30009257' , avatar, uname: '前端' , }, content: content, ctime: dayjs().format('MM-DD HH:mm' ), like: 66 , }] setList(newList) setContent('' ) inputRef.current.focus() } <div className="reply-box-wrap" > {} <textarea className="reply-box-textarea" placeholder="发一条友善的评论" value={content} ref={inputRef} onChange={(e) => setContent(e.target.value)} /> {} <div className="reply-box-send" > <div className="send-text" onClick={handlePublish}>发布</div> </ div></div>
解释说明:
基于useState定义了content,并与textarea,进行受控绑定。
基于useRef定义了inputRef,并与textarea,进行了非受控绑定。
useEffect
什么是useEffect
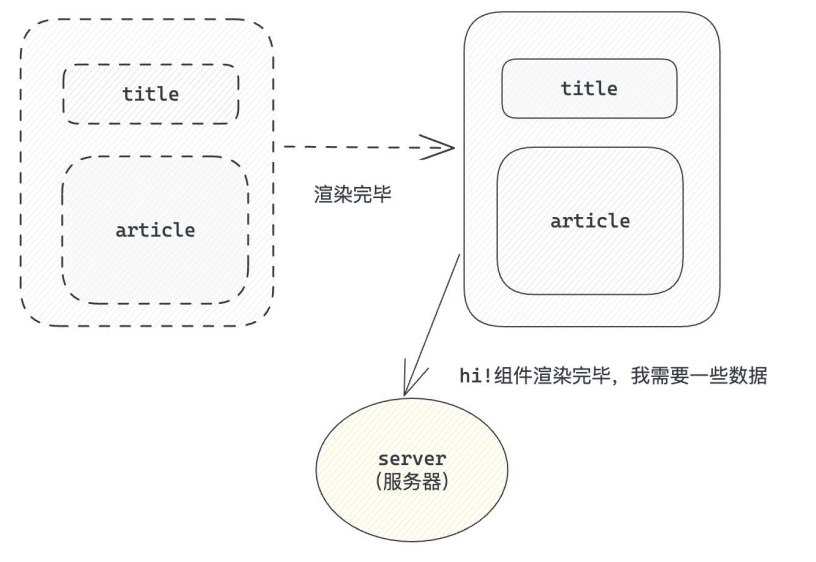
useEffect是一个Hook函数,用于在React组件中执行不是由事件引起而是由渲染本身引起的操作(副作用),比如发送AJAX请求,更改DOM等等。
这么说或许很难理解,我们举个例子。
上述过程中,组件中没有发生任何的用户事件,组件渲染完毕之后就需要和服务器要数据,整个过程属于"只由渲染引起的操作"。
操作方法
1 useEffect(() =>
参数1{ }是一个函数,在函数内部可以放置要执行的操作。参数2[ ]是一个数组(可选),在数组里放置依赖项,不同依赖项会影响第一个参数函数的执行(具体在下文讨论)。
入门案例
假设存在一个需求,在组件渲染完毕之后,立刻从服务端获取频道列表数据。
示例代码:
1 2 3 4 5 6 7 8 9 10 11 12 13 14 15 16 17 18 19 20 import { useEffect } from "react" function App ( useEffect(() => async function getList ( const res = await fetch('XXX' ) const list = await res.json console .log(list) } getList() },[] ) return (<div > this is app </div > )} export default App
依赖项(参数2)
三种情况
对于依赖项(参数2),根据传入依赖项的不同,会有不同的执行情况。
依赖项 副作用功函数的执行时机
没有依赖项
组件初始渲染 + 组件更新时执行
空数组依赖
只在初始渲染时执行一次
添加特定依赖项
组件初始渲染 + 依赖项变化时执行
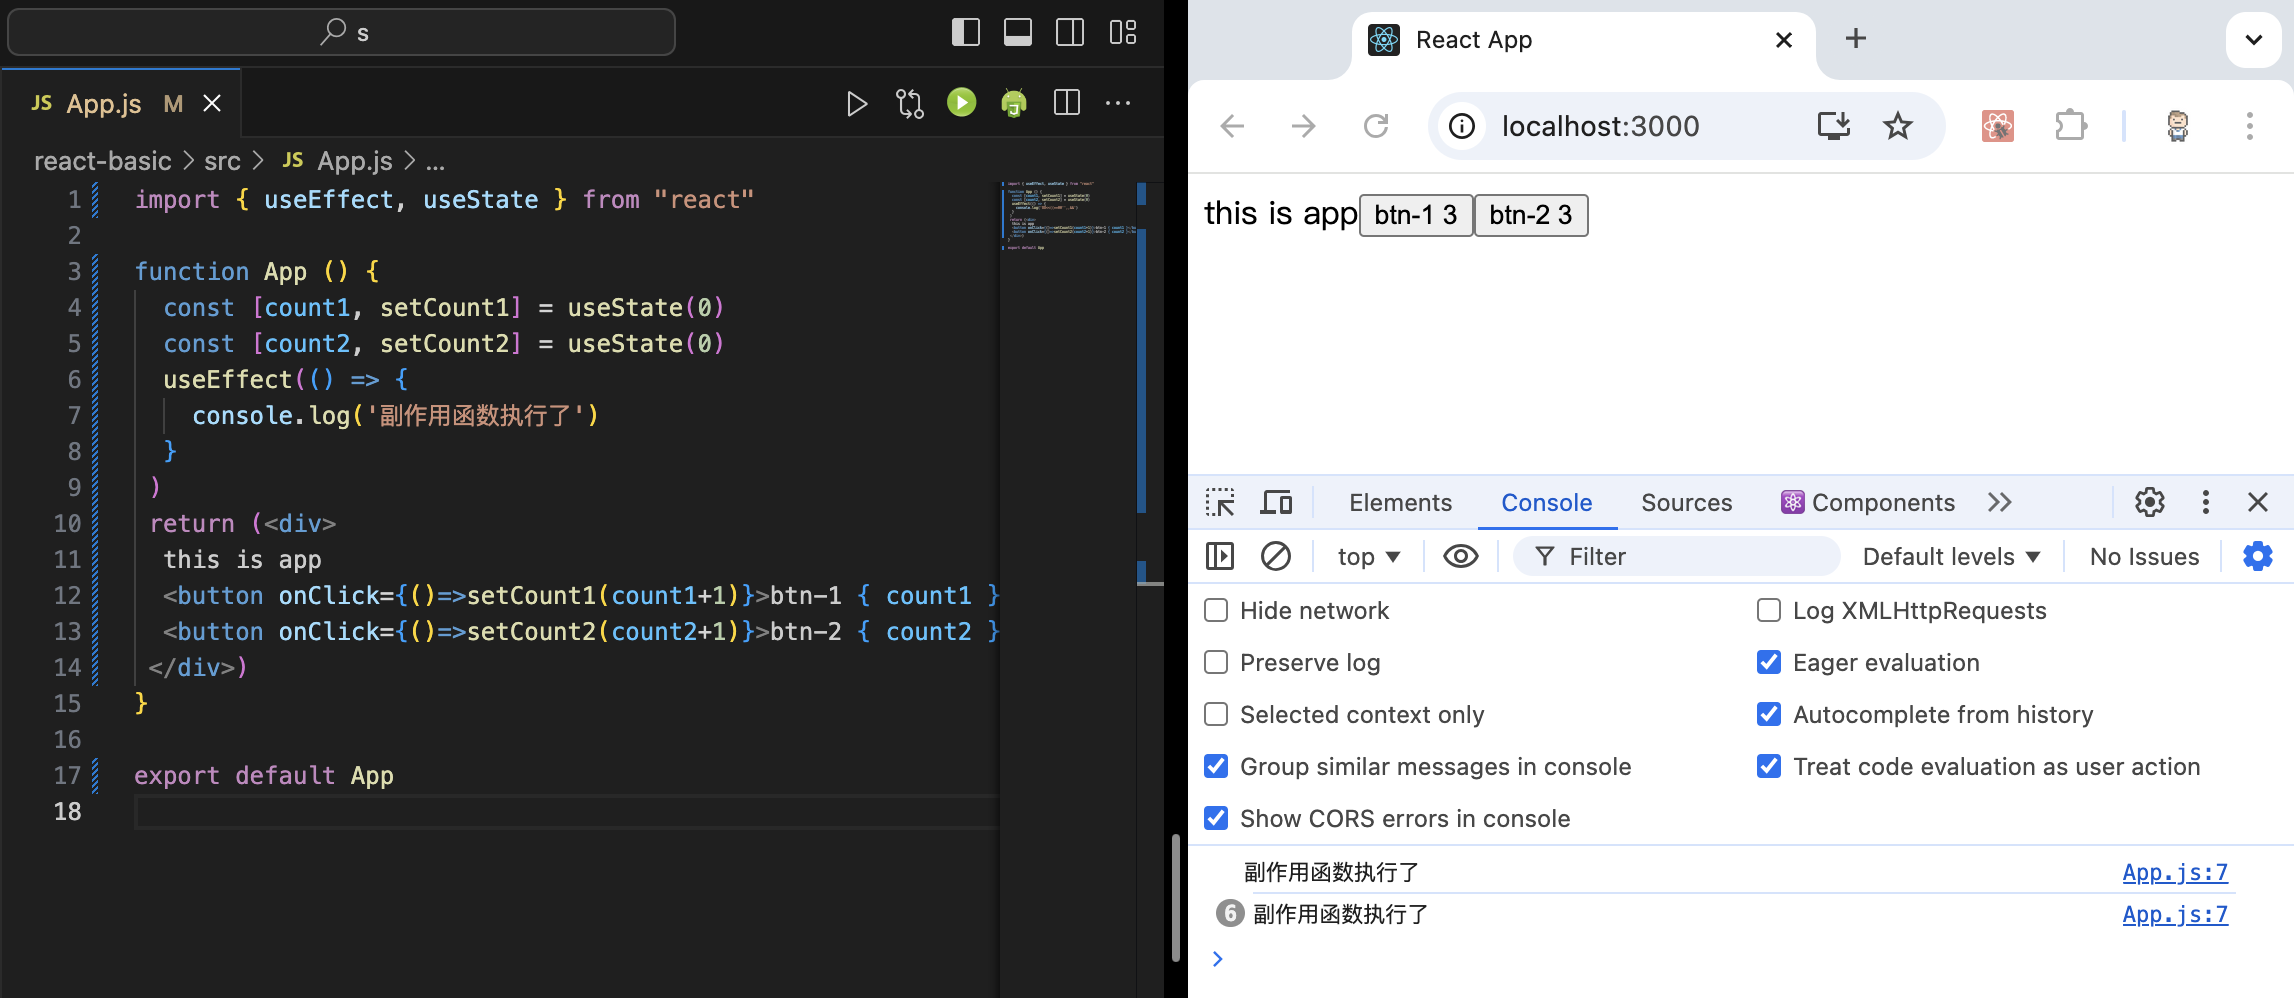
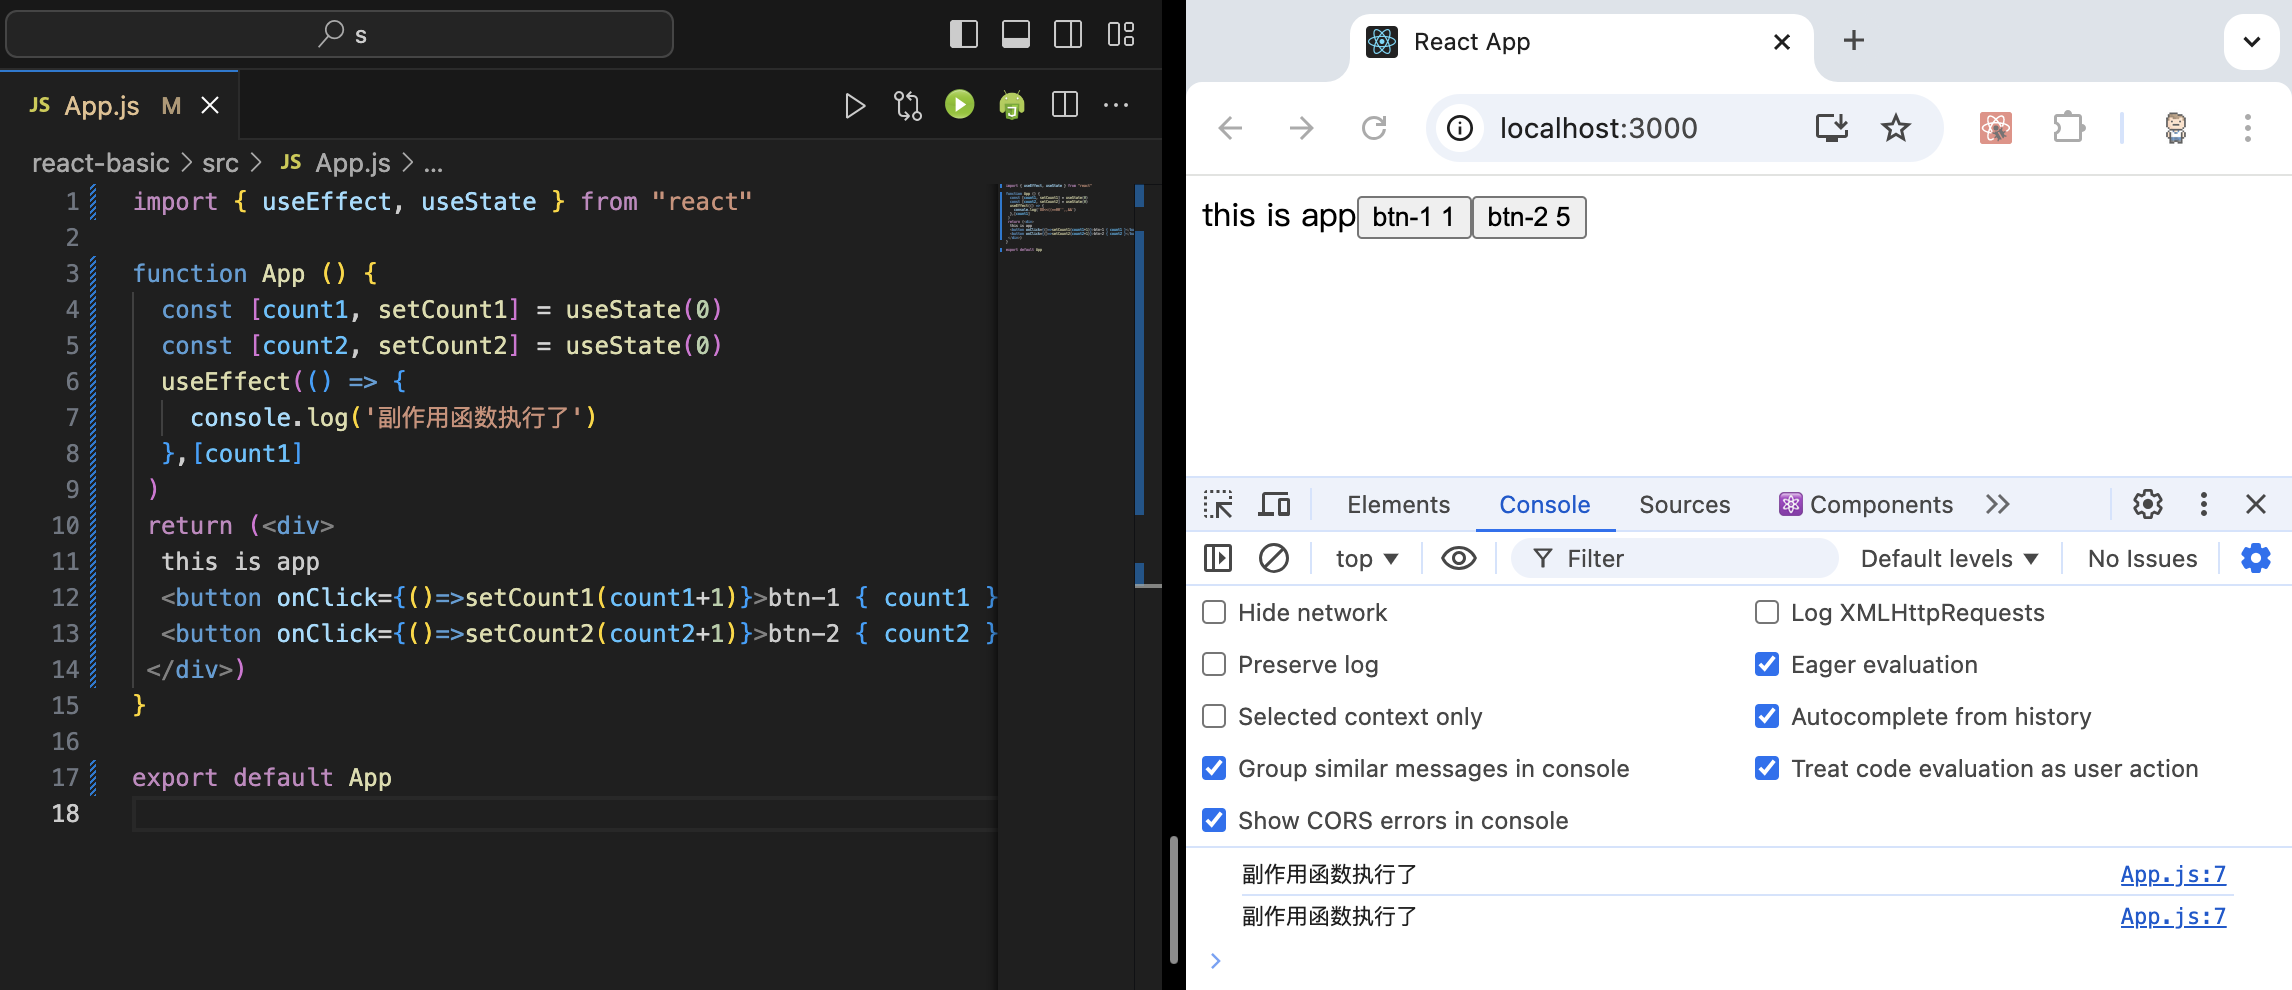
没有依赖项
我们看到,组件初始渲染时会执行,之后我们每一次点击btn-1或btn-2,也都会引起组件更新,触发执行。
示例代码:
1 2 3 4 5 6 7 8 9 10 11 12 13 14 15 16 17 import { useEffect, useState } from "react" function App ( const [count1, setCount1] = useState(0 ) const [count2, setCount2] = useState(0 ) useEffect(() => console .log('副作用函数执行了' ) } ) return (<div > this is app <button onClick ={() => setCount1(count1+1)}>btn-1 { count1 }</button > <button onClick ={() => setCount2(count2+1)}>btn-2 { count2 }</button > </div > )} export default App
空数组依赖
这种情况只有初始渲染时执行一次。
示例代码:
1 2 3 4 5 6 7 8 9 10 11 12 13 14 15 16 17 import { useEffect, useState } from "react" function App ( const [count1, setCount1] = useState(0 ) const [count2, setCount2] = useState(0 ) useEffect(() => console .log('副作用函数执行了' ) },[] ) return (<div > this is app <button onClick ={() => setCount1(count1+1)}>btn-1 { count1 }</button > <button onClick ={() => setCount2(count2+1)}>btn-2 { count2 }</button > </div > )} export default App
运行结果略
添加特定依赖项
我们看到,组件初始渲染时会执行;因为绑定的是count1,之后只有点击和count1关联的btn-1会执行,点击btn-2不会执行,
示例代码:
1 2 3 4 5 6 7 8 9 10 11 12 13 14 15 16 17 import { useEffect, useState } from "react" function App ( const [count1, setCount1] = useState(0 ) const [count2, setCount2] = useState(0 ) useEffect(() => console .log('副作用函数执行了' ) },[count1] ) return (<div > this is app <button onClick ={() => setCount1(count1+1)}>btn-1 { count1 }</button > <button onClick ={() => setCount2(count2+1)}>btn-2 { count2 }</button > </div > )} export default App
运行结果:
清除副作用
什么是清除副作用
比如在useEffect中开启了一个定时器,我们想在组件卸载时把这个定时器再清理掉,这个过程就是清除副作用。
语法格式
1 2 3 4 5 6 useEffect(() => return () => } }, [])
在return中执行清除副作用逻辑。
清除副作用的函数最常见的执行时机是在组件卸载时自动执行。
实现
示例代码:
1 2 3 4 5 6 7 8 9 10 11 12 13 14 15 16 17 18 19 20 21 22 23 24 25 26 27 28 29 import { useEffect, useState } from "react" function Son ( useEffect(() => const timer = setInterval(() => console .log('定时器执行中...' ) }, 1000 ) return () => clearInterval(timer) } }, []) return <div > this is son</div > } function App ( const [show, setShow] = useState(true ) return ( <div> {show && <Son /> <button onClick={() => setShow(false )}>卸载Son组件</button> </ div> ) } export default App
Hook
自定义Hook
什么是自定义Hook
自定义Hook,即通过"以use开头的函数",实现"逻辑的封装和复用"。
案例
例如,我们定义btn,然后通过该btn控制某个div的显示与隐藏。
不封装直接实现
示例代码:
1 2 3 4 5 6 7 8 9 10 11 12 13 14 import { useState } from "react" function App ( const [value, setValue] = useState(true ) const toggle = () => return ( <div> {value && <div > this is div</div > <button onClick={toggle}>toggle</button> </ div> ) } export default App
自定义Hook(封装)
示例代码:
1 2 3 4 5 6 7 8 9 10 11 12 13 14 15 16 17 18 19 20 21 22 23 24 25 import { useState } from "react" function useToggle ( const [value, setValue] = useState(true ) const toggle = () => return [ value, toggle ] } function App ( const [value, toggle] = useToggle() return ( <div> {value && <div > this is div</div > <button onClick={toggle}>toggle</button> </ div> ) } export default App
小结
封装自定义Hook的思路:
声明一个以use打头的函数。
在函数体内封装可复用的逻辑(所有可复用的逻辑)。
把组件中用到的状态或者回调return出去(以对象或者数组的方式)。
哪个组件中要用到这个逻辑,就执行这个函数,解构出来状态和回调进行使用。
Hooks使用规则
需要注意,Hooks有两个使用规则
只能在组件中或者其他自定义Hook函数中调用,不能在组件外使用。
只能在组件的顶层调用,不能嵌套在if、for或其它的函数中。
反例一示例代码:
1 2 3 4 5 6 7 8 9 10 11 import { useState } from "react" const [value, setValue] = useState('' )function App ( return ( <div>this is App </div> ) } export default App
运行结果:
1 2 3 4 5 6 ERROR [eslint] src/App.js Line 3:27: React Hook "useState" cannot be called at the top level. React Hooks must be called in a React function component or a custom React Hook function react-hooks/rules-of-hooks Search for the keywords to learn more about each error.
反例二示例代码:
1 2 3 4 5 6 7 8 9 10 11 12 13 import { useState } from "react" function App ( if (true ){ const [value, setValue] = useState('' ) } return ( <div>this is App </div> ) } export default App
运行结果:
1 2 3 4 5 6 ERROR [eslint] src/App.js Line 6:31: React Hook "useState" is called conditionally. React Hooks must be called in the exact same order in every component render react-hooks/rules-of-hooks Search for the keywords to learn more about each error.
案例三
背景
在案例二的基础上,实现:
通过请求接口的方式获取评论列表并渲染。
使用自定义Hook函数封装数据请求的逻辑。
把评论中的每一项抽象成一个独立的组件实现渲染。
通过请求接口的方式获取评论列表并渲染
步骤
使用json-server工具模拟接口服务,通过axios发送接口请求。json-server是一个快速以json文件作为数据源模拟接口服务的工具。axios是一个广泛使用的前端请求库。
使用useEffect调用接口获取数据。
json-server
GitHub地址:https://github.com/typicode/json-server
安装命令(稳定版):
1 npm install -g json-server@0.17.4
安装完成后,我们可以修改package.json,在script标签下,新增如下代码,定义一个npm的快捷方式。
1 "serve" : "json-server db.json --port 3004"
Axios
安装命令:
实现
示例代码:
1 2 3 4 5 6 7 8 9 10 11 12 const [list, setList] = useState([])useEffect(() => async function getList ( const res = await axios.get('http://localhost:3004/list' ) setList(res.data) } getList() },[])
使用自定义Hook函数封装数据请求的逻辑
步骤
编写一个use开头的函数。
函数内部编写封装的逻辑。
return出去组件中用到的状态和方法。
组件中调用函数解构赋值使用。
实现
示例代码:
1 2 3 4 5 6 7 8 9 10 11 12 13 14 15 16 17 18 19 20 function useGetList ( const [list, setList] = useState([]) useEffect(() => async function getList ( const res = await axios.get('http://localhost:3004/list' ) setList(res.data) } getList() },[]) return [list,setList] } const [list,setList] = useGetList()
把评论中的每一项抽象成一个独立的组件实现渲染
示例代码:
1 2 3 4 5 6 7 8 9 10 11 12 13 14 15 16 17 18 19 20 21 22 23 24 25 26 27 28 29 30 31 32 33 34 35 36 37 38 39 40 41 42 43 44 45 46 47 48 49 function Item ({ item, onDel } ) return ( <div key={item.rpid} className="reply-item" > {} <div className="root-reply-avatar" > <div className="bili-avatar" > <img className="bili-avatar-img" src={item.user.avatar} alt="" /> </div> </ div> <div className="content-wrap" > {} <div className="user-info" > <div className="user-name" >{item.user.uname}</div> </ div> {} <div className="root-reply" > <span className="reply-content" >{item.content}</span> <div className="reply-info"> {/ * 评论时间 */} <span className="reply-time">{item.ctime}</ span> {} <span className="reply-time" >点赞数:{item.like}</span> {user.uid === item.user.uid && ( <span className="delete-btn" onClick={() => onDel(item.rpid)} > 删除 </ span> )} </div> </ div> </div> </ div> ) } {} <div className="reply-list" > {} {list.map(item =><Item key ={item.id} item ={item} onDel ={onDelete} /> </div>
在上文的整个过程即"子传父"。
父组件将onDelete函数以参数onDel的形式传递给子组件。
子组件通过参数onDel接收onDelete函数。
子组件再调用参数onDel,即调用onDelete函数,并传入评论ID参数。
关于该部分,可以参考下文的"附录:组件通信"。
完整版本
示例代码:
1 2 3 4 5 6 7 8 9 10 11 12 13 14 15 16 17 18 19 20 21 22 23 24 25 26 27 28 29 30 31 32 33 34 35 36 37 38 39 40 41 42 43 44 45 46 47 48 49 50 51 52 53 54 55 56 57 58 59 60 61 62 63 64 65 66 67 68 69 70 71 72 73 74 75 76 77 78 79 80 81 82 83 84 85 86 87 88 89 90 91 92 93 94 95 96 97 98 99 100 101 102 103 104 105 106 107 108 109 110 111 112 113 114 115 116 117 118 119 120 121 122 123 124 125 126 127 128 129 130 131 132 133 134 135 136 137 138 139 140 141 142 143 144 145 146 147 148 149 150 151 152 153 154 155 156 157 158 159 160 161 162 163 164 165 166 167 168 169 170 171 172 173 174 175 176 177 178 179 180 181 182 183 184 185 186 187 188 189 190 191 192 193 194 195 196 197 198 199 200 201 202 203 204 205 206 import { useEffect, useRef, useState } from 'react' import './App.scss' import avatar from './images/bozai.png' import orderBy from 'lodash/orderBy' import classNames from 'classnames' ;import { v4 as uuidv4 } from 'uuid' ;import dayjs from 'dayjs' import axios from 'axios' const user={uid :'30009257' ,avatar,uname :'前端' ,}const tabs=[{type :'hot' ,text :'最热' },{type :'time' ,text :'最新' },]function useGetList ( const [list, setList] = useState([]) useEffect(() => async function getList ( const res = await axios.get('http://localhost:3004/list' ) setList(res.data) } getList() },[]) return [list,setList] } function Item ({ item, onDel } ) return ( <div key={item.rpid} className="reply-item" > {} <div className="root-reply-avatar" > <div className="bili-avatar" > <img className="bili-avatar-img" src={item.user.avatar} alt="" /> </div> </ div> <div className="content-wrap" > {} <div className="user-info" > <div className="user-name" >{item.user.uname}</div> </ div> {} <div className="root-reply" > <span className="reply-content" >{item.content}</span> <div className="reply-info"> {/ * 评论时间 */} <span className="reply-time">{item.ctime}</ span> {} <span className="reply-time" >点赞数:{item.like}</span> {user.uid === item.user.uid && ( <span className="delete-btn" onClick={() => onDel(item.rpid)} > 删除 </ span> )} </div> </ div> </div> </ div> ) } const App = () => const [activeTab, setActiveTab] = useState('hot' ) const [list,setList] = useGetList() const onDelete = rpid => setList(list.filter(item => } const onToggle = type => setActiveTab(type) let newList if (type === 'time' ) { newList = orderBy(list, 'ctime' , 'desc' ) } else { newList = orderBy(list, 'like' , 'desc' ) } setList(newList) } const [content, setContent] = useState('' ) const inputRef = useRef(null ) const handlePublish = () => let newList = [...list,{ rpid: uuidv4(), user: { uid: '30009257' , avatar, uname: '前端' , }, content: content, ctime: dayjs().format('MM-DD HH:mm' ), like: 66 , }] setList(newList) setContent('' ) inputRef.current.focus() } return ( <div className="app" > {} <div className="reply-navigation" > <ul className="nav-bar" > <li className="nav-title" > <span className="nav-title-text" >评论</span> {/ * 评论数量 */} <span className="total-reply">{list.length}</ span> </li> <li className="nav-sort"> {/ * 高亮类名: active */} {tabs.map(item => { return ( <div key={item.type} / / className={ / / item.type === activeTab ? 'nav-item active' : 'nav-item' / / } className={classNames('nav-item', {active: activeTab === item.type })} onClick={() => onToggle(item.type)} > {item.text} </ div> ) })} </li> </u l> </div> <div className="reply-wrap"> {/ * 发表评论 */} <div className="box-normal"> {/ * 当前用户头像 */} <div className="reply-box-avatar"> <div className="bili-avatar"> <img className="bili-avatar-img" src={avatar} alt="用户头像" / > </div> </ div> <div className="reply-box-wrap" > {} <textarea className="reply-box-textarea" placeholder="发一条友善的评论" value={content} ref={inputRef} onChange={(e) => setContent(e.target.value)} /> {} <div className="reply-box-send" > <div className="send-text" onClick={handlePublish}>发布</div> </ div> </div> </ div> {} <div className="reply-list" > {} {list.map(item =><Item key ={item.id} item ={item} onDel ={onDelete} /> </div> </ div> </div> ) } export default App
附录:组件通信
仅作为了解
关于组件通信部分,仅作为了解。Redux,可以参考《6.React [2/4]》 。
什么是组件通信
组件通信:组件之间的数据传递。
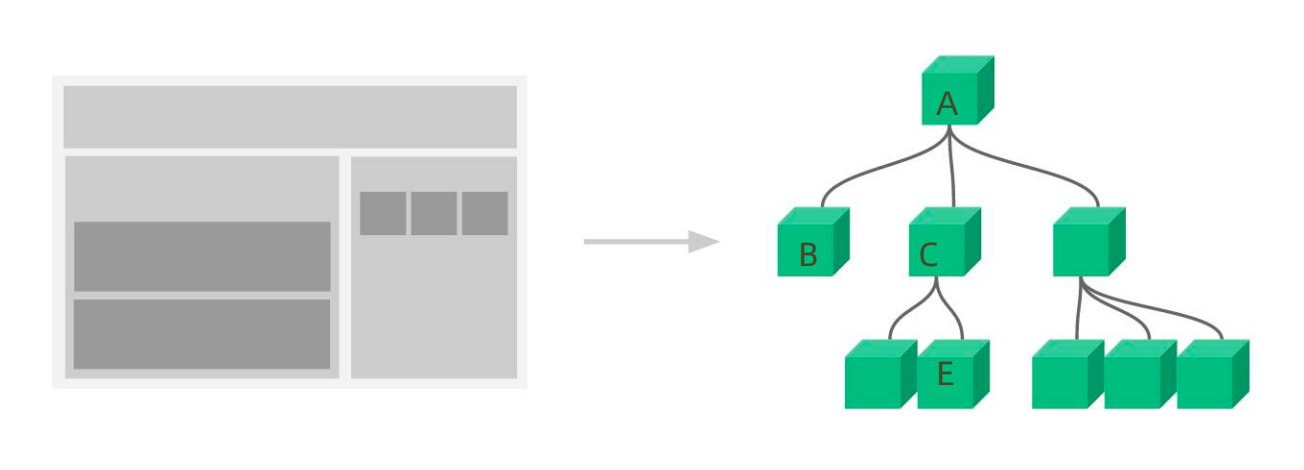
根据组件嵌套关系的不同,有不同的方式:
父子通信,例如"A和B通信"。
兄弟通信,例如"B和C通信"。
跨层通信,例如"A和E通信"。
父子通信:父传子
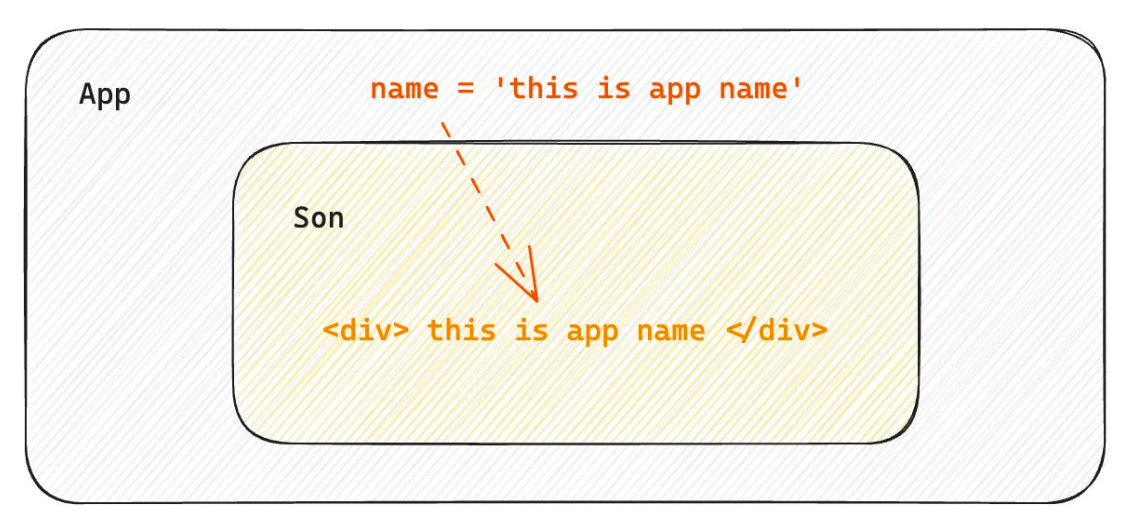
什么是父传子
步骤
父组件传递数据,在子组件标签上绑定属性。
子组件接收数据,子组件通过参数(一般定义为props)接收数据。
实现
示例代码:
1 2 3 4 5 6 7 8 9 10 11 12 13 14 15 16 17 18 19 function Son (props ) return <div > { props.nameKey }</div > } function App ( const nameVal = 'this is app name' return ( <div> <Son nameKey={nameVal}/> </div> ) } export default App
props
props可传递任意数据
props可传递任意数据。
包括:数字、字符串、布尔值、数组、对象、函数、JSX。
示例代码:
1 2 3 4 5 6 7 8 9 10 11 12 13 14 15 16 17 18 19 20 21 22 23 function Son (props ) return <div > { props.child }</div > } function App ( const appName = 'this is app name' return ( <div> <Son name={appName} age={20 } isTrue={false } list={['Vue' , 'React' ]} obj={{ name : 'jack' }} cb={() => console .log(123 )} child={<span>this is span child</span>} / > </div> ) } export default App
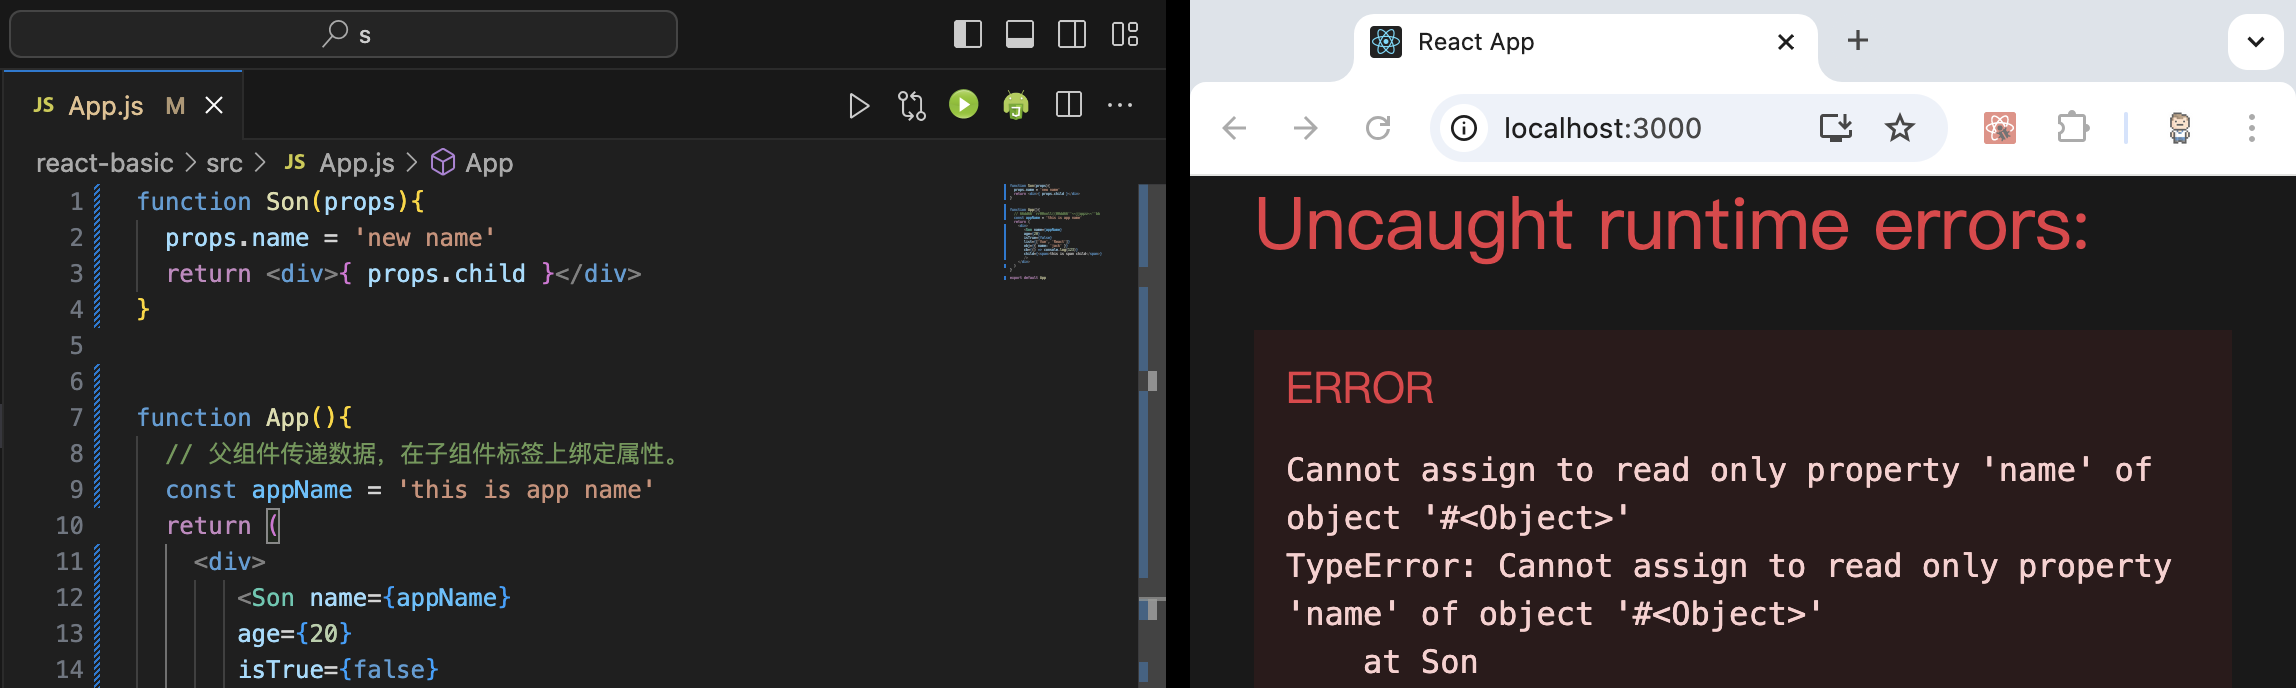
props是只读对象
props是只读对象。
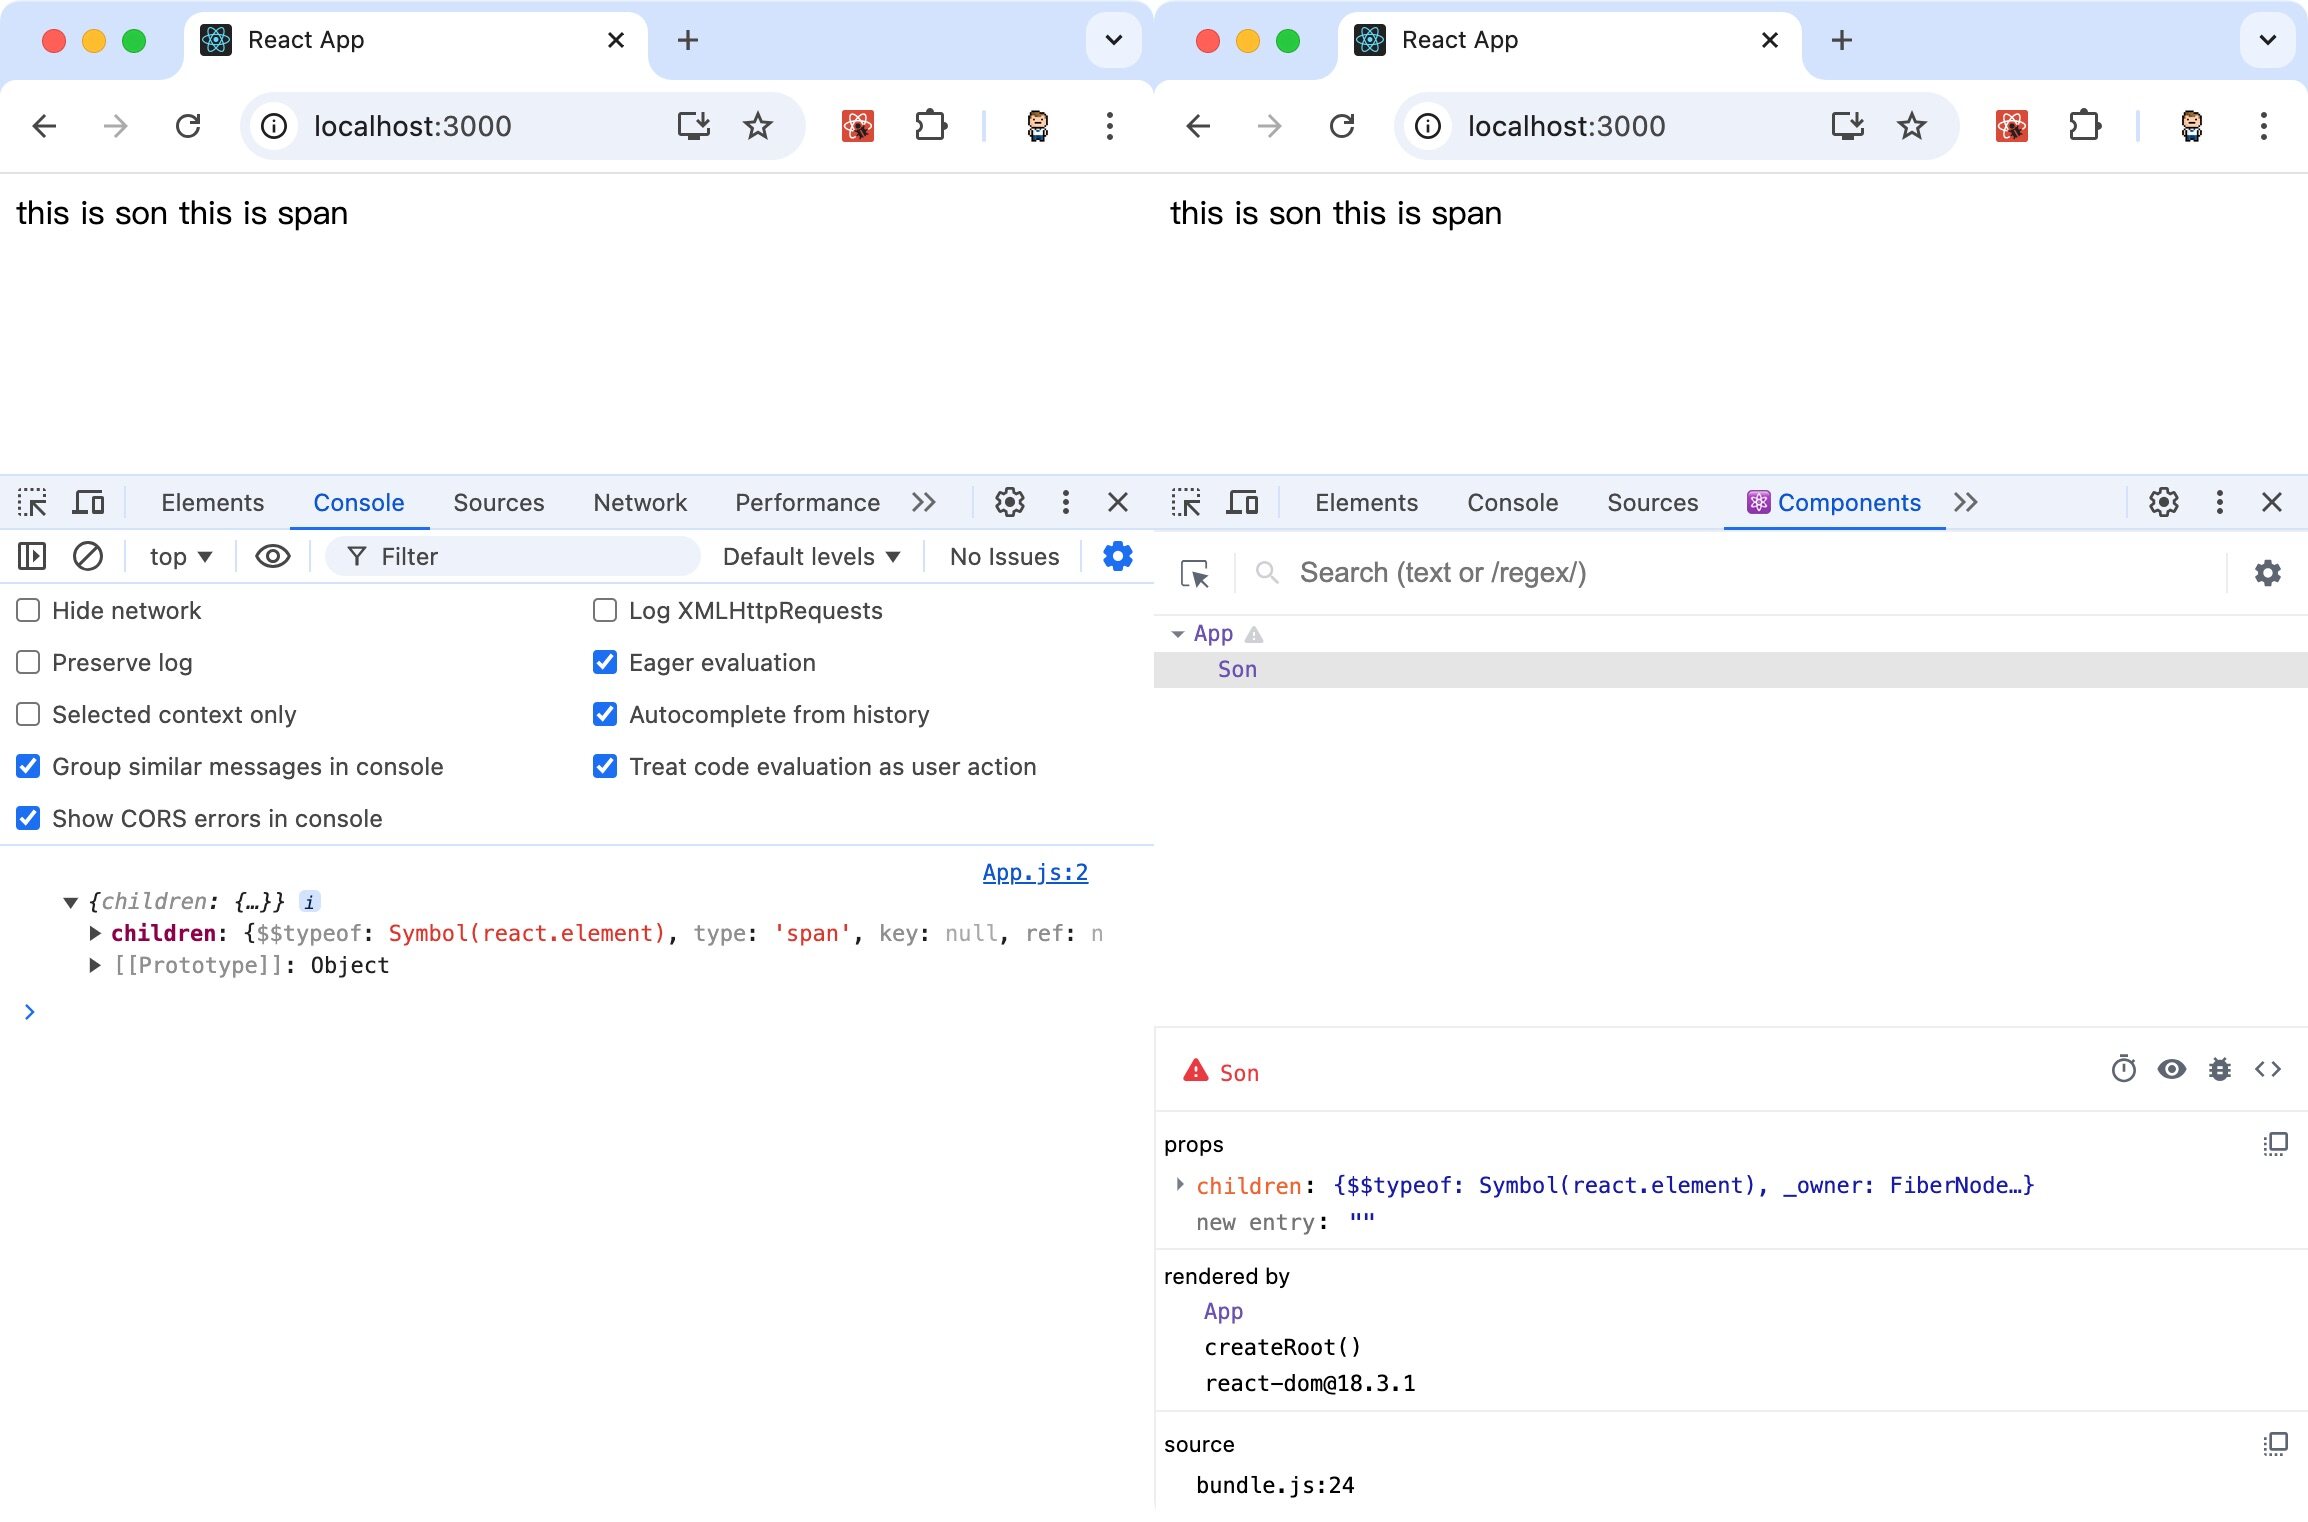
特殊的prop:chilren
当我们把内容嵌套在组件的标签内部时,父组件会自动在名为children的prop属性中接收该内容。
示例代码:
1 2 3 4 5 6 7 8 9 10 11 12 13 14 15 16 17 function Son (props ) console .log(props) return <div > this is son {props.children} </div > } function App ( return ( <div> <Son> <span>this is span</span> </ Son> </div> ) } export default App
运行结果:
父子通信:子传父
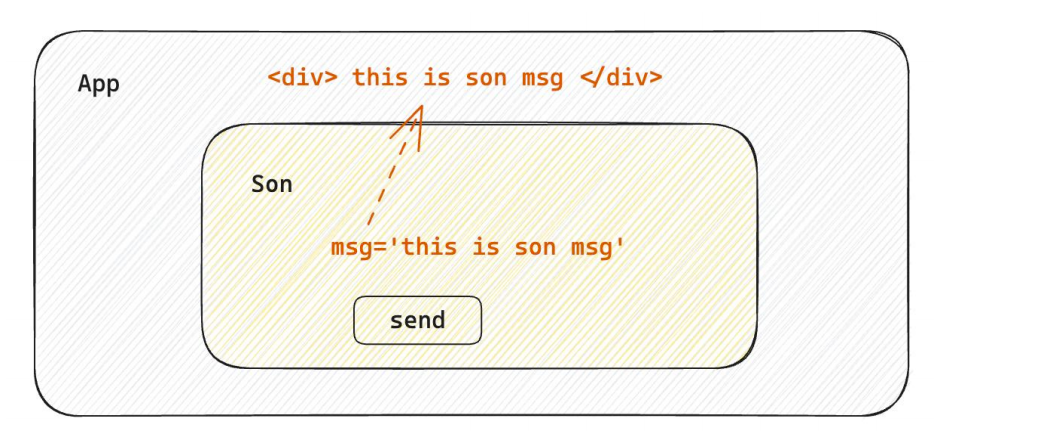
什么是子传父
步骤
思路:在子组件中调用父组件中的函数并传递参数。
步骤:
基于父传子,父组件把一个函数传递给子组件。
在子组件接收函数,并把子组件中的数据作为参数,传递给该函数。
由此实现,子组件的参数,传递给了父组件中的一个函数。
实现
示例代码:
1 2 3 4 5 6 7 8 9 10 11 12 13 14 15 16 17 18 19 20 21 22 23 24 25 26 27 28 29 30 import { useState } from 'react' function Son ({ onGetMsg } ) const sonMsg = 'this is son msg' return ( <div> {} <button onClick={()=>onGetMsg(sonMsg)}>send</button> </ div> ) } function App ( const [msg, setMsg] = useState('' ) const getMsg = (msg )=> { console .log(msg) setMsg(msg) } return ( <div> {} { msg } <Son onGetMsg={ getMsg }/> </div> ) } export default App
兄弟组件通信
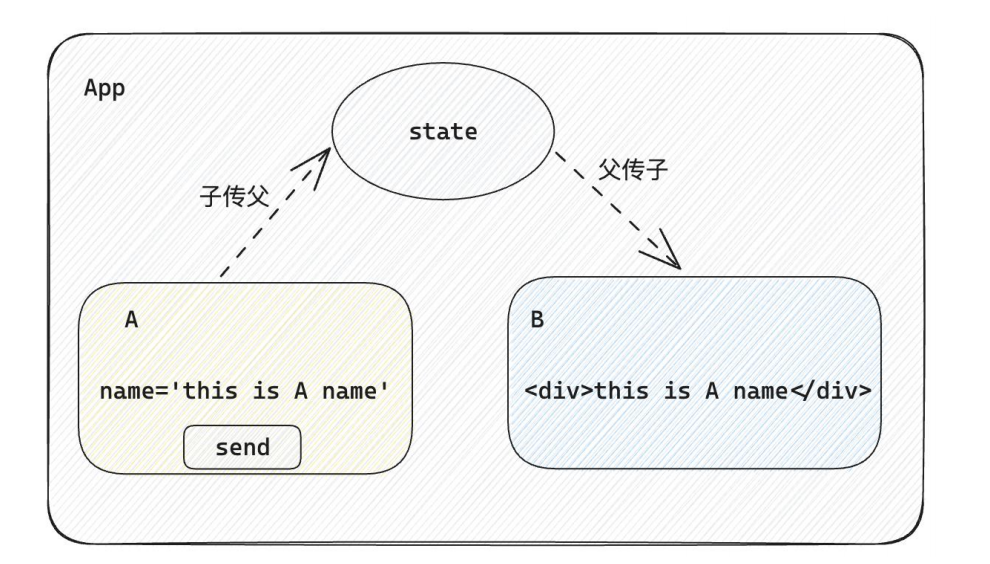
什么是兄弟组件通信
步骤
思路:借助"状态提升"机制,通过共同的父组件进行兄弟之间的数据传递
步骤:
A组件先通过子传父的方式把数据传递给父组件App
App拿到数据之后通过父传子的方式再传递给B组件
实现
示例代码:
1 2 3 4 5 6 7 8 9 10 11 12 13 14 15 16 17 18 19 20 21 22 23 24 25 26 27 28 29 30 31 32 33 34 35 36 37 38 39 40 import { useState } from "react" function A ({ onGetAName } ) const name = 'this is A name' return ( <div> this is A compnent, <button onClick={() => onGetAName(name)}>send</button> </ div> ) } function B ({ name } ) return ( <div> this is B compnent, {name} </div> ) } function App () { const [name, setName] = useState('') const getAName = (name) => { setName(name) } return ( <div> this is App <A onGetAName={getAName} / > <B name={name} /> </div> ) } export default App
跨层组件通信
什么是跨层组件通信
注意:顶层和底层其实是相对的概念,在一个组件树中,可以有多个顶层和底层。
步骤
使用createContext方法创建一个上下文对象Ctx
在顶层组件(App)中通过 Ctx.Provider 组件提供数据
在底层组件(B)中通过 useContext 钩子函数获取消费数据
实现
示例代码:
1 2 3 4 5 6 7 8 9 10 11 12 13 14 15 16 17 18 19 20 21 22 23 24 25 26 27 28 29 30 31 32 33 34 35 36 37 38 39 40 41 42 import { createContext, useContext } from "react" const MsgContext = createContext()function A ( return ( <div> this is A component <B /> </div> ) } function B () { / / 3. 在底层组件 通过useContext钩子函数使用数据 const msg = useContext(MsgContext) return ( <div> this is B compnent,{msg} </ div> ) } function App ( const msg = 'this is app msg' return ( <div> {} <MsgContext.Provider value={msg}> this is App <A /> </MsgContext.Provider> </ div> ) } export default App