概述
什么是消息队列
消息队列是实现应用程序之间通信的中间件产品。
消息队列的应用场景有:
消峰(缓冲)
解耦
异步通信
关于这三种应用场景的具体论述,可以参考《Kafka-1.初步认识》 的讨论。
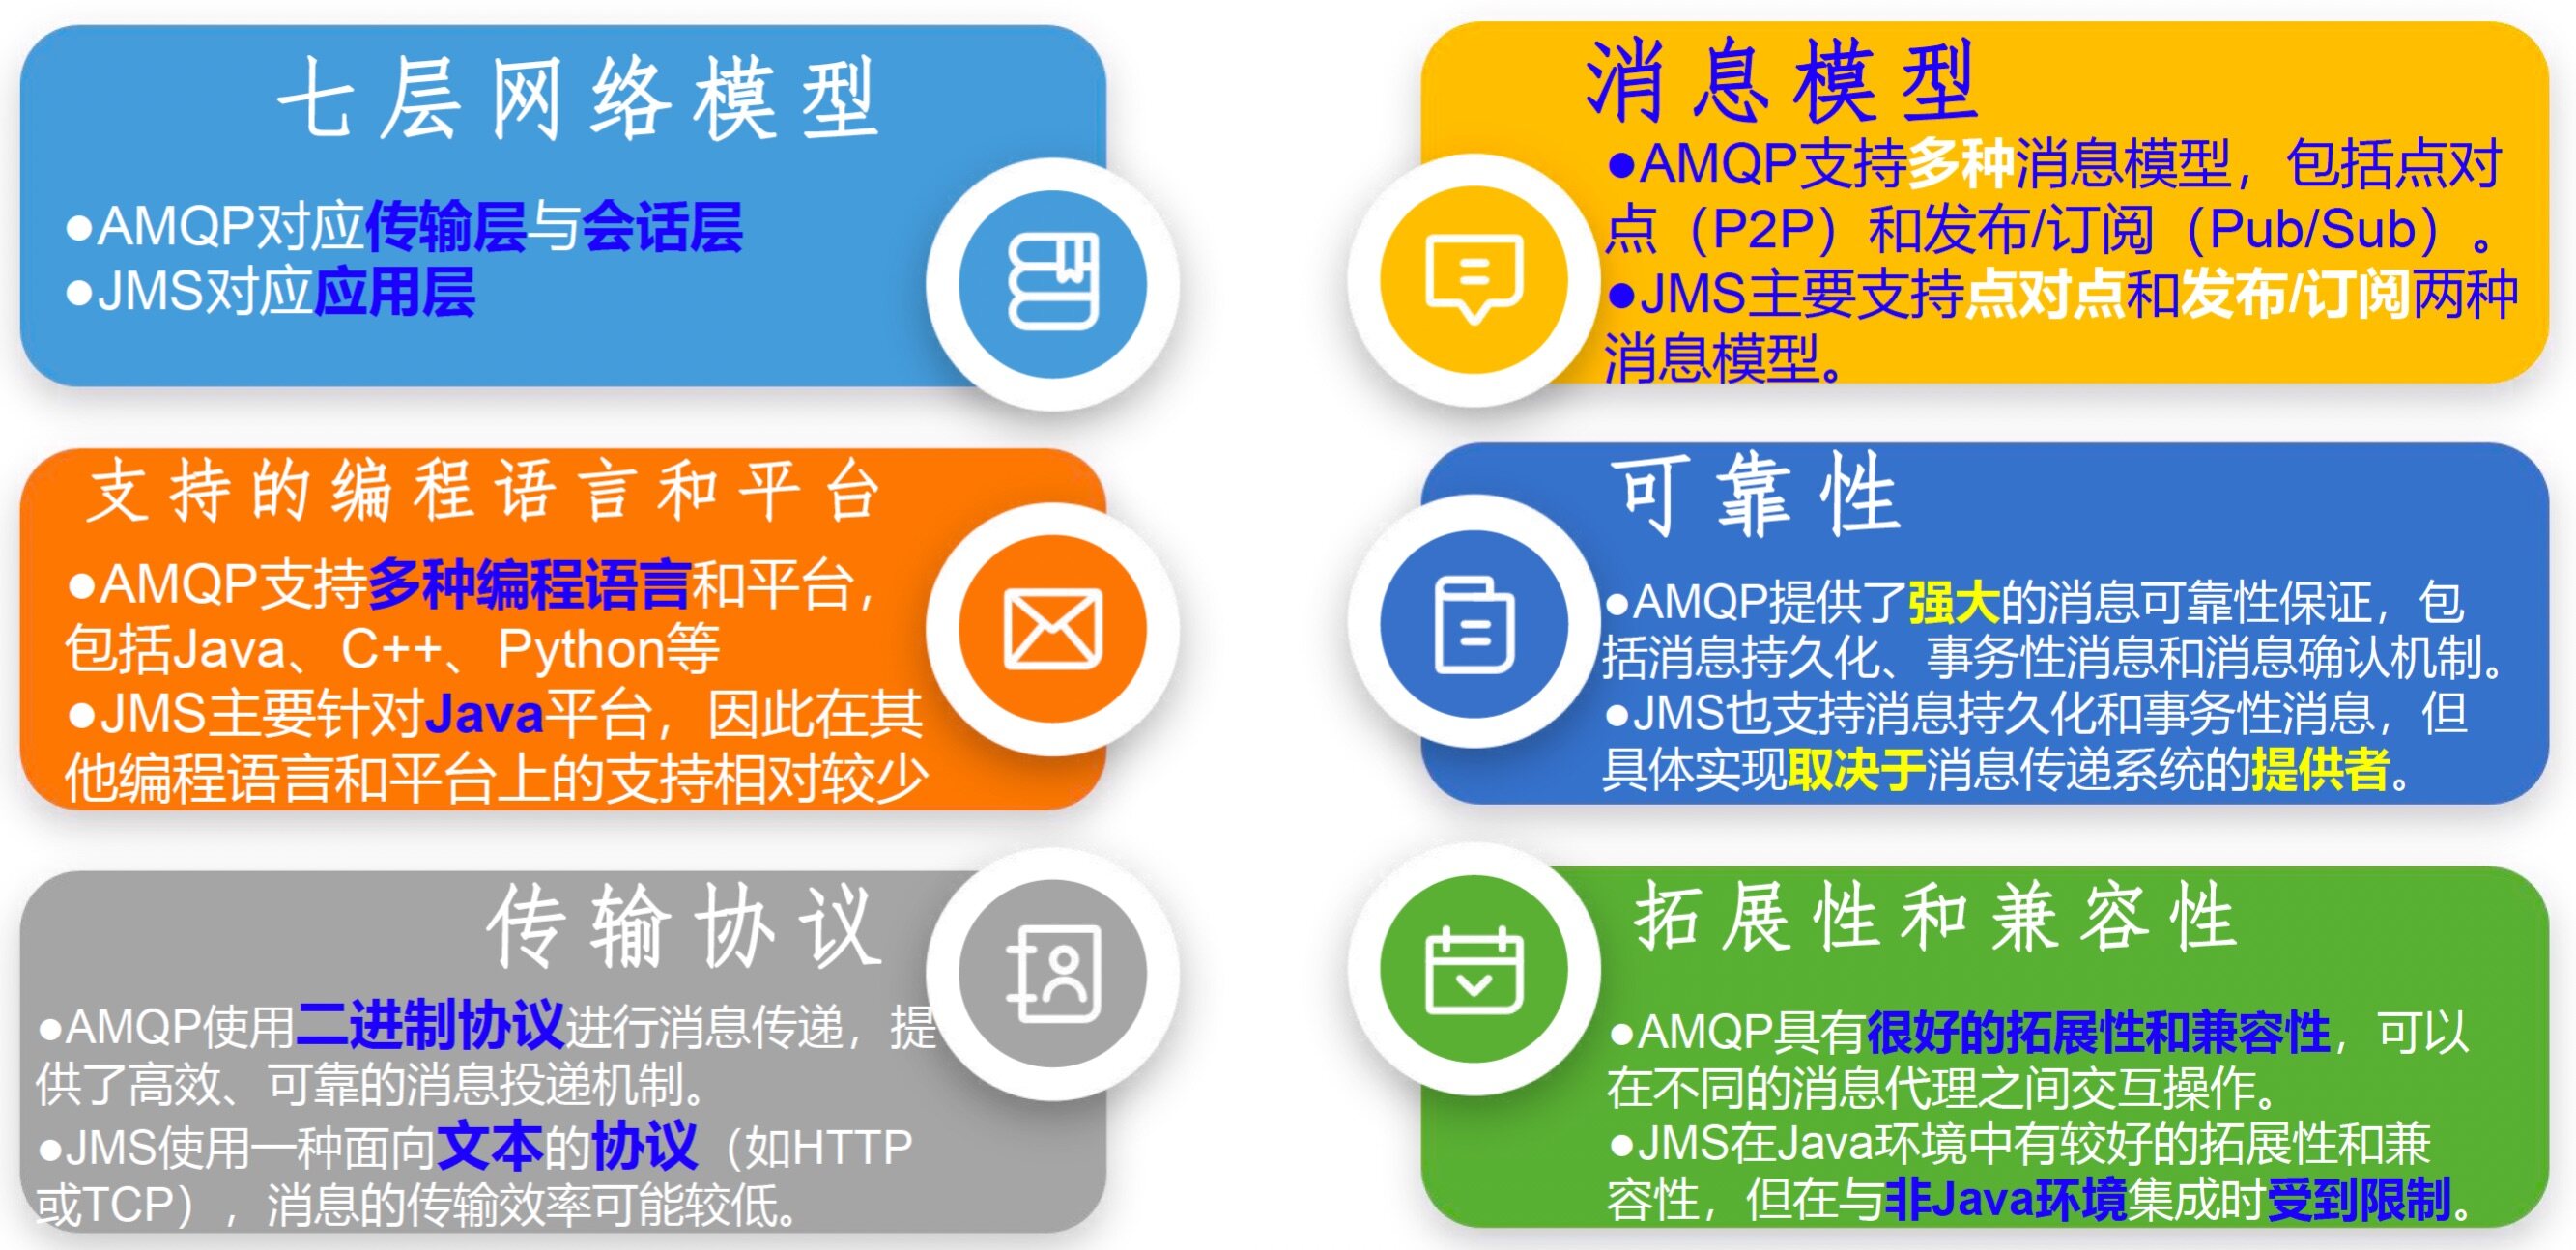
两种通信协议
目前主流的消息队列通信协议标准包括:
AMQP(Advanced Message Queuing Protocol):通用协议,IBM公司研发。
JMS(Java Message Service):专门为Java语言服务,SUN公司研发,一组由Java接口组成的Java标准。
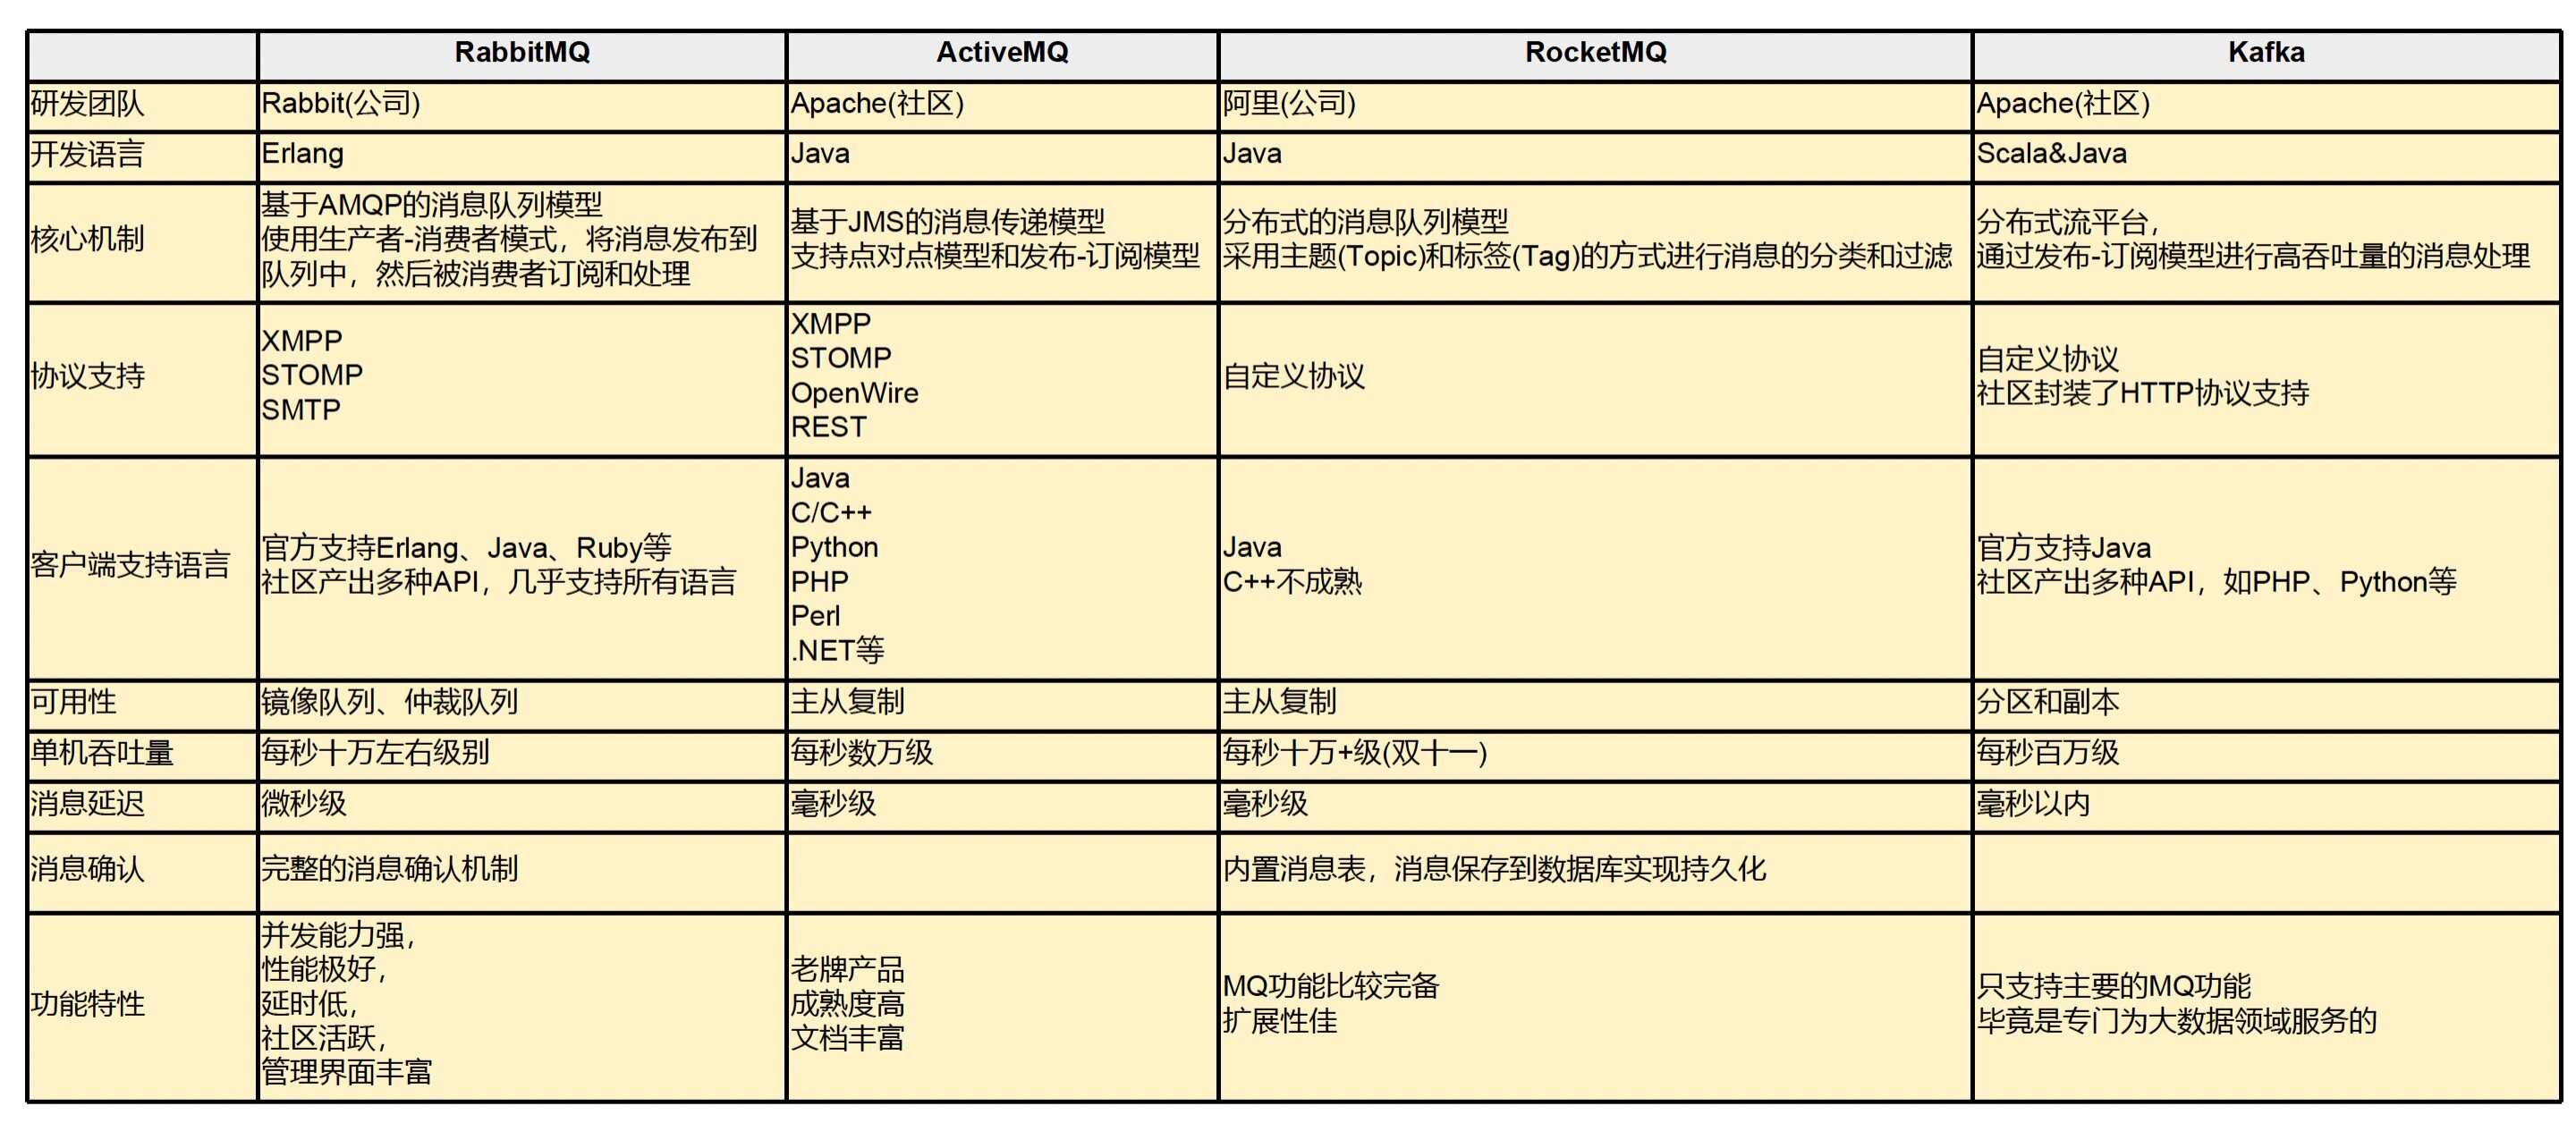
常见的消息队列产品
什么是RabbitMQ
RabbitMQ,一款基于AMQP、由Erlang语言开发的消息队列产品。
官网:https://www.rabbitmq.com https://github.com/rabbitmq/rabbitmq-server
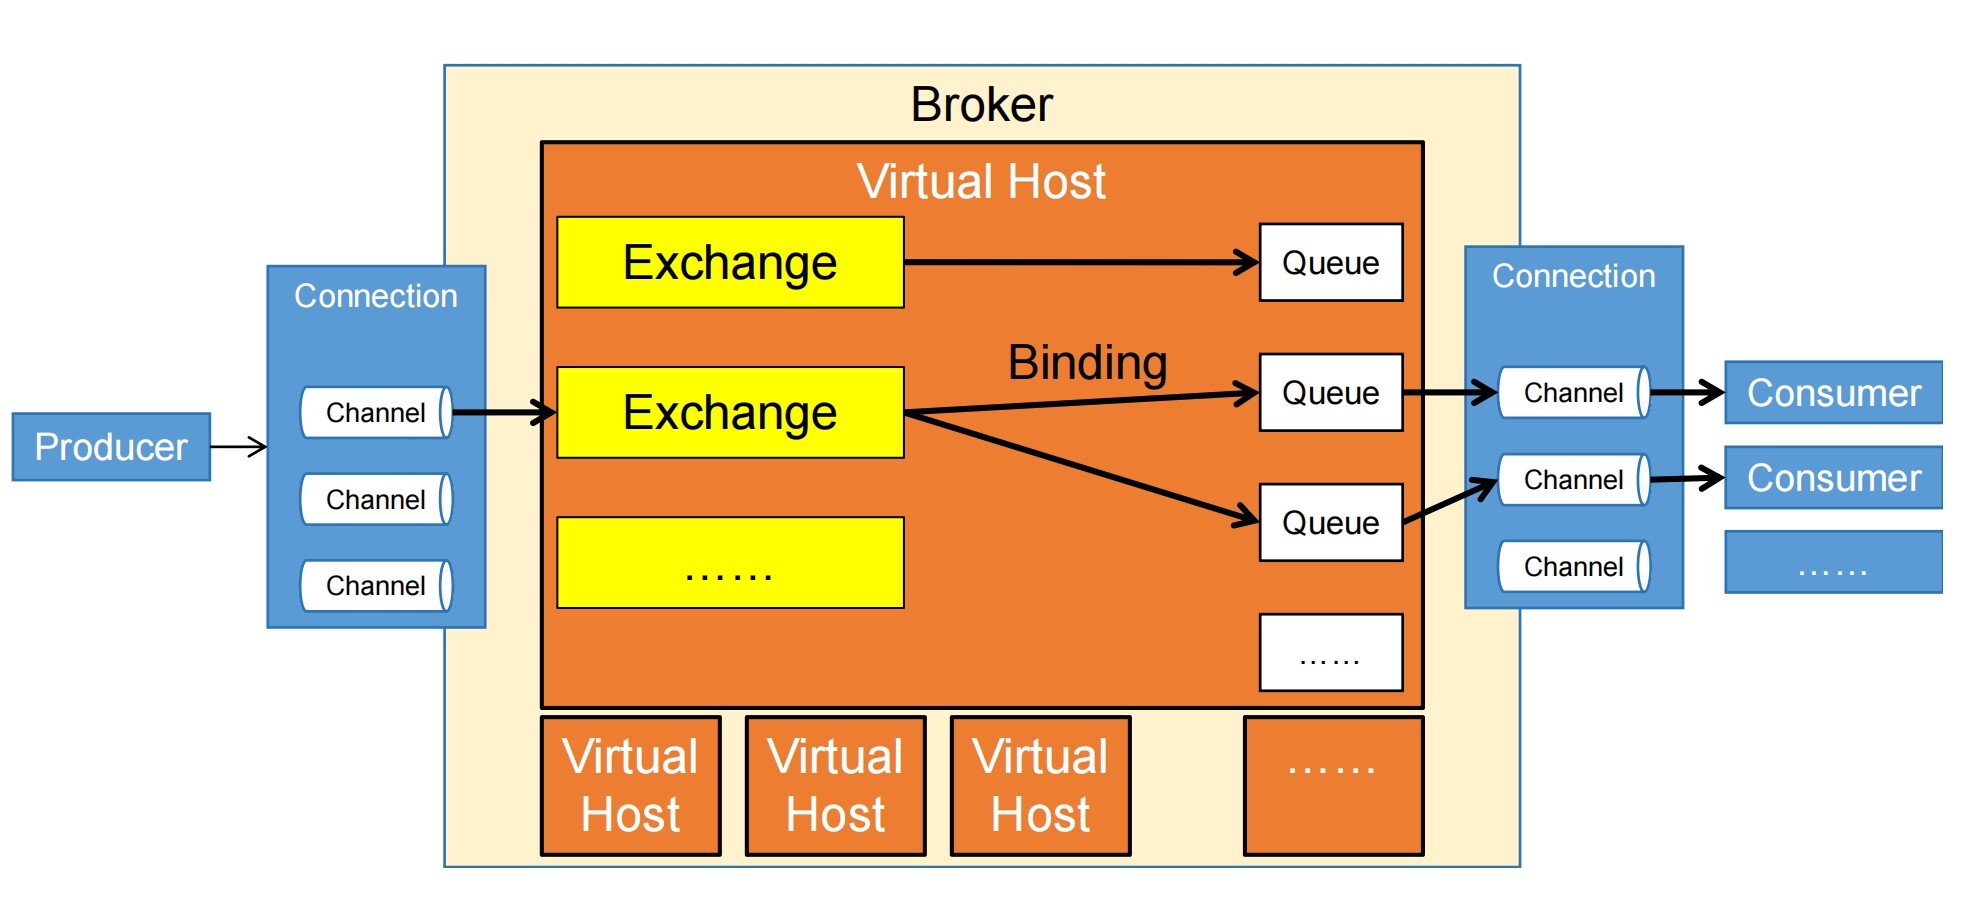
RabbitMQ体系结构
Producer:消息的发送端,也可以称为消息的生产者。
Consumer:消息的接收端,也可以称为消息的消费者。
Connection:消息发送端或消息消费端到消息队列主体服务器之间的TCP连接。
Channel:已经建立的Connection中建立的逻辑连接。
Broker:RabbitMQ的主体服务器本身,负责接收和分发消息。在搭建集群的时候,一个集群中会有多个Broker。
Virtual Host:虚拟分组。
Exchange,交换机,是消息达到Broker的第一站。
Queue,队列,是消息的容器,消息放在这里等待被消费端取走。
我们发送消息的时候,消息先被发送到Exchange上,再通过Exchange发送到Queue上。
那么,交换机怎么知道消息要被发送到哪一个队列呢?
安装
本文讨论的是在CentOS7上安装RabbitMQ,在其他版本上安装,可能存在部分差异。
版本对应
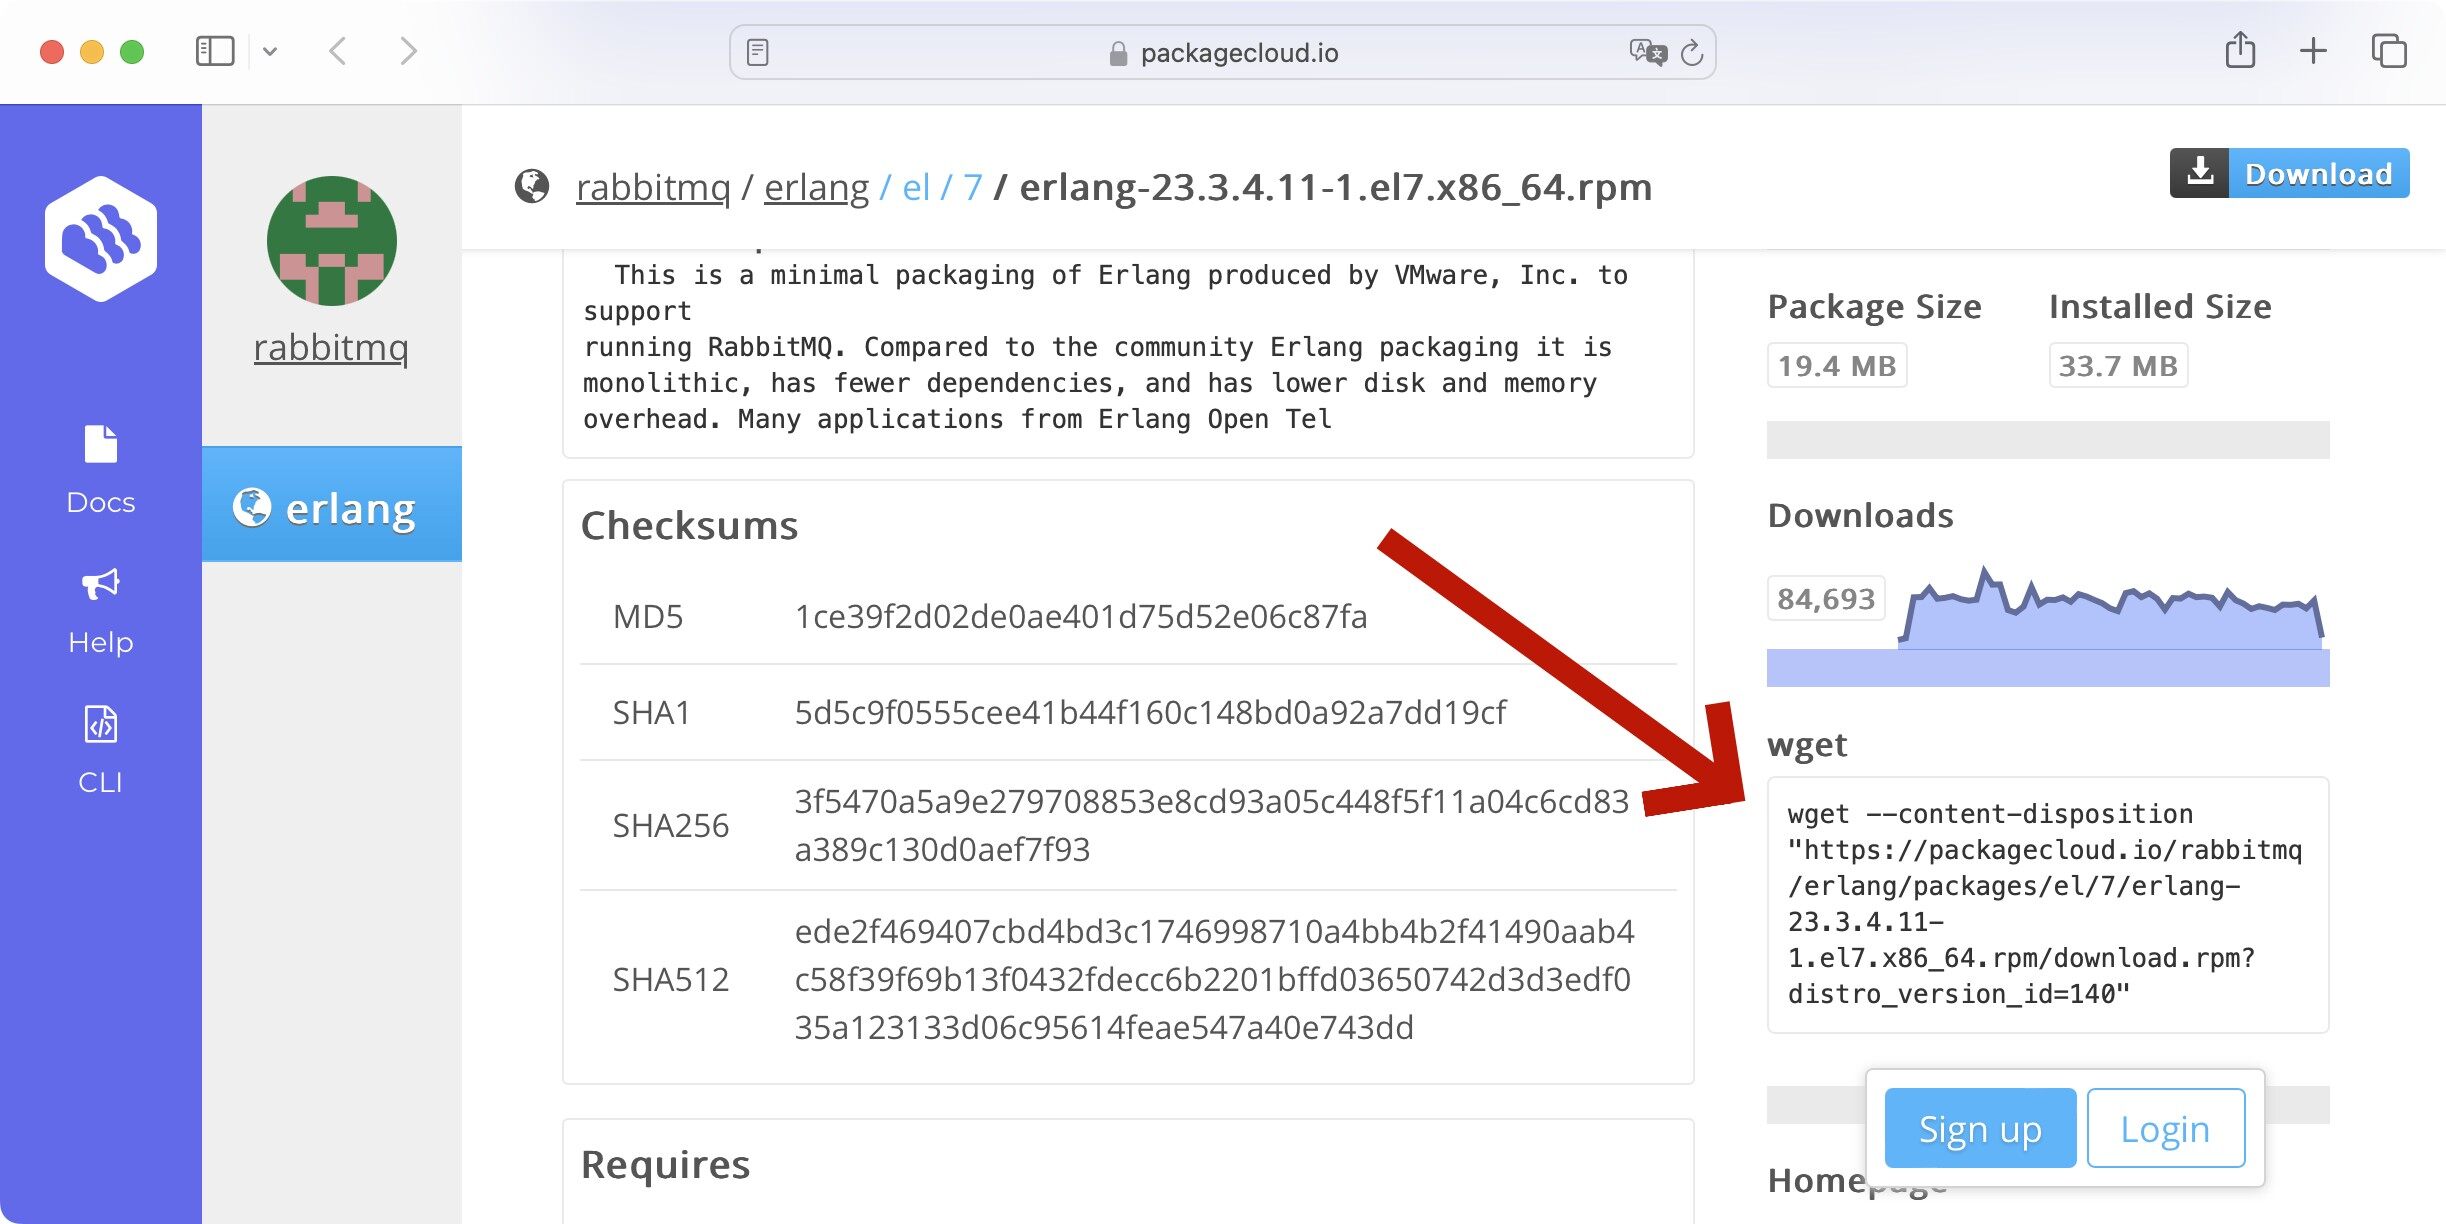
在安装RabbitMQ之前需要安装Erlang环境。https://www.rabbitmq.com/docs/which-erlang
本文以rabbitmq-server-3.9.16-1.el7.noarch.rpm和erlang-23.3.4.11-1.el7.x86_64.rpm为例。
Erlang
下载Erlang,示例代码:
1 wget --content-disposition "https://packagecloud.io/rabbitmq/erlang/packages/el/7/erlang-23.3.4.11-1.el7.x86_64.rpm/download.rpm?distro_version_id=140"
下载命令,可以直接复制
安装Erlang,示例代码:
1 rpm -ivh erlang-23.3.4.11-1.el7.x86_64.rpm
运行结果:
1
2
3
4
warning: erlang-23.3.4.11-1.el7.x86_64.rpm: Header V4 RSA/SHA1 Signature, key ID 6026dfca: NOKEY Preparing... ################################# [100%] Updating / installing... 1:erlang-23.3.4.11-1.el7 ################################# [100%]
安装完成后,可以通过命令erl -version检查一下。示例代码:
运行结果:
1 Erlang (SMP,ASYNC_THREADS,HIPE) (BEAM) emulator version 11.2.2.10
RabbitMQ
下载RabbitMQ,示例代码:
1 wget --content-disposition "https://packagecloud.io/rabbitmq/rabbitmq-server/packages/el/7/rabbitmq-server-3.9.16-1.el7.noarch.rpm/download.rpm?distro_version_id=140"
安装RabbitMQ,示例代码:
1 rpm -ivh rabbitmq-server-3.9.16-1.el7.noarch.rpm
运行结果:
1
2
3
4
5
[root@centos-linux ~]# rpm -ivh rabbitmq-server-3.9.16-1.el7.noarch.rpm warning: rabbitmq-server-3.9.16-1.el7.noarch.rpm: Header V4 RSA/SHA512 Signature, key ID 6026dfca: NOKEY Preparing... ################################# [100%] Updating / installing... 1:rabbitmq-server-3.9.16-1.el7 ################################# [100%]
安装完成后,可以通过如下的命令rabbitmqctl version检查一下。示例代码:
运行结果:
配置
添加开机启动RabbitMQ服务
通过命令chkconfig rabbitmq-server on,添加开机启动RabbitMQ服务。
示例代码:
1 chkconfig rabbitmq-server on
运行结果:
1
2
Note: Forwarding request to 'systemctl enable rabbitmq-server.service'. Created symlink from /etc/systemd/system/multi-user.target.wants/rabbitmq-server.service to /usr/lib/systemd/system/rabbitmq-server.service.
设置的时候会自动建立到systemctl的软链接。
启动RabbitMQ
启动RabbitMQ,命令如下:
1 systemctl start rabbitmq-server
查看服务器状态
查看服务器状态,命令如下:
1 systemctl status rabbitmq-server
示例代码:
1 systemctl status rabbitmq-server
运行结果:
1
2
3
4
5
6
7
8
9
10
11
12
13
14
15
16
17
18
19
20
21
● rabbitmq-server.service - RabbitMQ broker Loaded: loaded (/usr/lib/systemd/system/rabbitmq-server.service; enabled; vendor preset: disabled) Active: active (running) since Thu 2024-06-20 09:04:03 CST; 6s ago Main PID: 15027 (beam.smp) Tasks: 23 CGroup: /system.slice/rabbitmq-server.service ├─15027 /usr/lib64/erlang/erts-11.2.2.10/bin/beam.smp -W w -MBas ageffcbf -MHas ageffcbf -MBlmbcs 512 -MHlmbcs 512 -MMmcs 30 -P 1048576 -t 5000000 -stbt db -zdbbl 128000 -sbwt none -sbwtdcpu none -... ├─15046 erl_child_setup 32768 ├─15093 inet_gethost 4 └─15094 inet_gethost 4 Jun 20 09:04:00 centos-linux.shared rabbitmq-server[15027]: Doc guides: https://rabbitmq.com/documentation.html Jun 20 09:04:00 centos-linux.shared rabbitmq-server[15027]: Support: https://rabbitmq.com/contact.html Jun 20 09:04:00 centos-linux.shared rabbitmq-server[15027]: Tutorials: https://rabbitmq.com/getstarted.html Jun 20 09:04:00 centos-linux.shared rabbitmq-server[15027]: Monitoring: https://rabbitmq.com/monitoring.html Jun 20 09:04:00 centos-linux.shared rabbitmq-server[15027]: Logs: /var/log/rabbitmq/rabbit@centos-linux.log Jun 20 09:04:00 centos-linux.shared rabbitmq-server[15027]: /var/log/rabbitmq/rabbit@centos-linux_upgrade.log Jun 20 09:04:00 centos-linux.shared rabbitmq-server[15027]: <stdout> Jun 20 09:04:00 centos-linux.shared rabbitmq-server[15027]: Config file(s): (none) Jun 20 09:04:03 centos-linux.shared rabbitmq-server[15027]: Starting broker... completed with 0 plugins. Jun 20 09:04:03 centos-linux.shared systemd[1]: Started RabbitMQ broker.
停止RabbitMQ
停止RabbitMQ,命令如下:
1 systemctl stop rabbitmq-server
启用WEB插件
RabbitMQ默认提供了WEB插件,方便通过页面进行RabbitMQ管理,需要执行如下命令启用WEB插件。
1 rabbitmq-plugins enable rabbitmq_management
示例代码:
1 rabbitmq-plugins enable rabbitmq_management
运行结果:
1
2
3
4
5
6
7
8
9
10
11
12
13
14
Enabling plugins on node rabbit@centos-linux: rabbitmq_management The following plugins have been configured: rabbitmq_management rabbitmq_management_agent rabbitmq_web_dispatch Applying plugin configuration to rabbit@centos-linux... The following plugins have been enabled: rabbitmq_management rabbitmq_management_agent rabbitmq_web_dispatch set 3 plugins. Offline change; changes will take effect at broker restart.
重新启动RabbitMQ服务,通过端口15672,可以访问RabbitMQ的管理页面。
注意!RabbitMQ默认提供了一个guest账户,默认的账户没有权限登录不了,因此接下来我们需要创建用户。
用户管理
创建账号
创建账号,命令如下:
1 rabbitmqctl add_user admin 123456
示例代码:
1 rabbitmqctl add_user admin 123456
运行结果:
1
2
Adding user "admin" ... Done. Don't forget to grant the user permissions to some virtual hosts! See 'rabbitmqctl help set_permissions' to learn more.
设置用户角色
设置用户角色,命令如下:
1 rabbitmqctl set_user_tags admin administrator
示例代码:
1 rabbitmqctl set_user_tags admin administrator
运行结果:
1 Setting tags for user "admin" to [administrator] ...
设置用户权限
设置用户权限,命令格式:
1 rabbitmqctl set_permissions [-p <vhostpath>] <user> <conf> <write> <read>
示例代码:
1 rabbitmqctl set_permissions -p "/" admin ".*" ".*" ".*"
运行结果:
1 Setting permissions for user "admin" in vhost "/" ...
解释说明:上述命令表示用户具有/vhost这个virtual host中的所有资源配置、读、写权限
查看用户和角色
查看用户和角色,命令如下:
示例代码:
运行结果:
1
2
3
4
Listing users ... user tags admin [administrator] guest [administrator]
我们可以看到用户已经添加成功并设置了角色,现在就可以使用用户登录RabbitMQ了。
删除用户
删除用户,命令如下:
1 rabbitmqctl delete_user guest
入门案例
案例目标
生产者发送消息,消费者接收消息,用最简单的方式实现。
代码实现
amqp-client
创建一个基于Maven的项目。
添加依赖:
1
2
3
4
5
6
<!-- https://mvnrepository.com/artifact/com.rabbitmq/amqp-client --> <dependency> <groupId>com.rabbitmq</groupId> <artifactId>amqp-client</artifactId> <version>5.21.0</version> </dependency>
消息发送端(生产者)
示例代码:
1
2
3
4
5
6
7
8
9
10
11
12
13
14
15
16
17
18
19
20
21
22
23
24
25
26
27
28
29
30
31
32
33
34
35
36
37
38
39
40
41
42
43
44
45
46
47
48
49
50
51
52
53
54
55
56
57
58
59
60
package com.kakawanyifan.demo;import com.rabbitmq.client.Channel;import com.rabbitmq.client.Connection;import com.rabbitmq.client.ConnectionFactory;public class Producer public static void main (String[] args) throws Exception ConnectionFactory connectionFactory = new ConnectionFactory(); connectionFactory.setHost("10.211.55.17" ); connectionFactory.setPort(5672 ); connectionFactory.setVirtualHost("/" ); connectionFactory.setUsername("admin" ); connectionFactory.setPassword("123456" ); Connection connection = connectionFactory.newConnection(); Channel channel = connection.createChannel(); channel.queueDeclare("simple_queue" , true , false , false , null ); String message = "你好;小兔子!" ; channel.basicPublish("" , "simple_queue" , null , message.getBytes()); System.out.println("已发送消息:" + message); channel.close(); connection.close(); } }
运行结果:
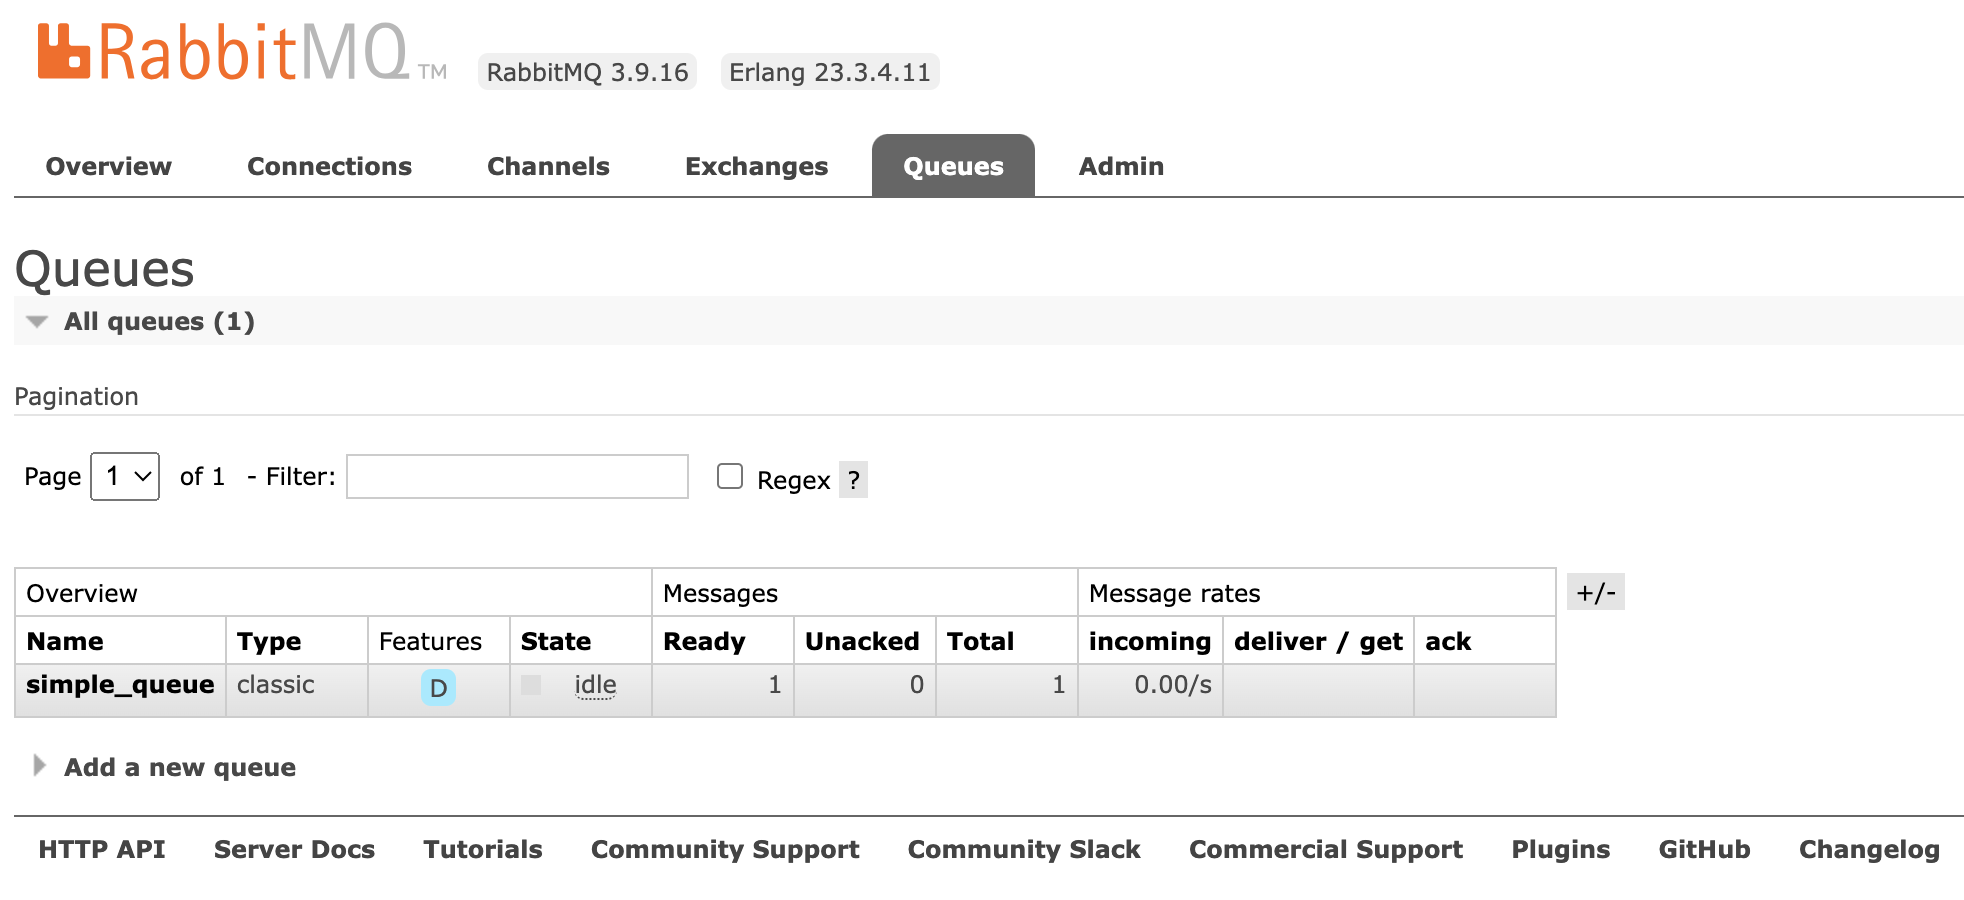
通过管理页面可以看到,Messages的Ready是1,Total是1。
消息接收端(消费者)
示例代码:
1
2
3
4
5
6
7
8
9
10
11
12
13
14
15
16
17
18
19
20
21
22
23
24
25
26
27
28
29
30
31
32
33
34
35
36
37
38
39
40
41
42
43
44
45
46
47
48
49
50
51
52
53
54
55
56
57
58
59
60
61
62
63
64
65
package com.kakawanyifan.demo;import com.rabbitmq.client.*;import java.io.IOException;public class Consumer public static void main (String[] args) throws Exception ConnectionFactory factory = new ConnectionFactory(); factory.setHost("10.211.55.17" ); factory.setPort(5672 ); factory.setVirtualHost("/" ); factory.setUsername("admin" ); factory.setPassword("123456" ); Connection connection = factory.newConnection(); Channel channel = connection.createChannel(); DefaultConsumer consumer = new DefaultConsumer(channel){ @Override public void handleDelivery (String consumerTag, Envelope envelope, AMQP.BasicProperties properties, byte [] body) throws IOException System.out.println("consumerTag:" +consumerTag); System.out.println("Exchange:" +envelope.getExchange()); System.out.println("RoutingKey:" +envelope.getRoutingKey()); System.out.println("properties:" +properties); System.out.println("body:" +new String(body)); } }; channel.basicConsume("simple_queue" ,true ,consumer); } }
运行结果:
1
2
3
4
5
consumerTag:amq.ctag-bY8aIFeijhE8tkIQYGiUcw Exchange: RoutingKey:simple_queue properties:#contentHeader<basic>(content-type=null, content-encoding=null, headers=null, delivery-mode=null, priority=null, correlation-id=null, reply-to=null, expiration=null, message-id=null, timestamp=null, type=null, user-id=null, app-id=null, cluster-id=null) body:你好;小兔子!
解释说明:
在生产者端已经创建了队列,channel.queueDeclare("simple_queue",true,false,false,null);不需要。
消费者端是被动接收的模式,所以对于接收消息的代码,略有不同,是一种监听模式。
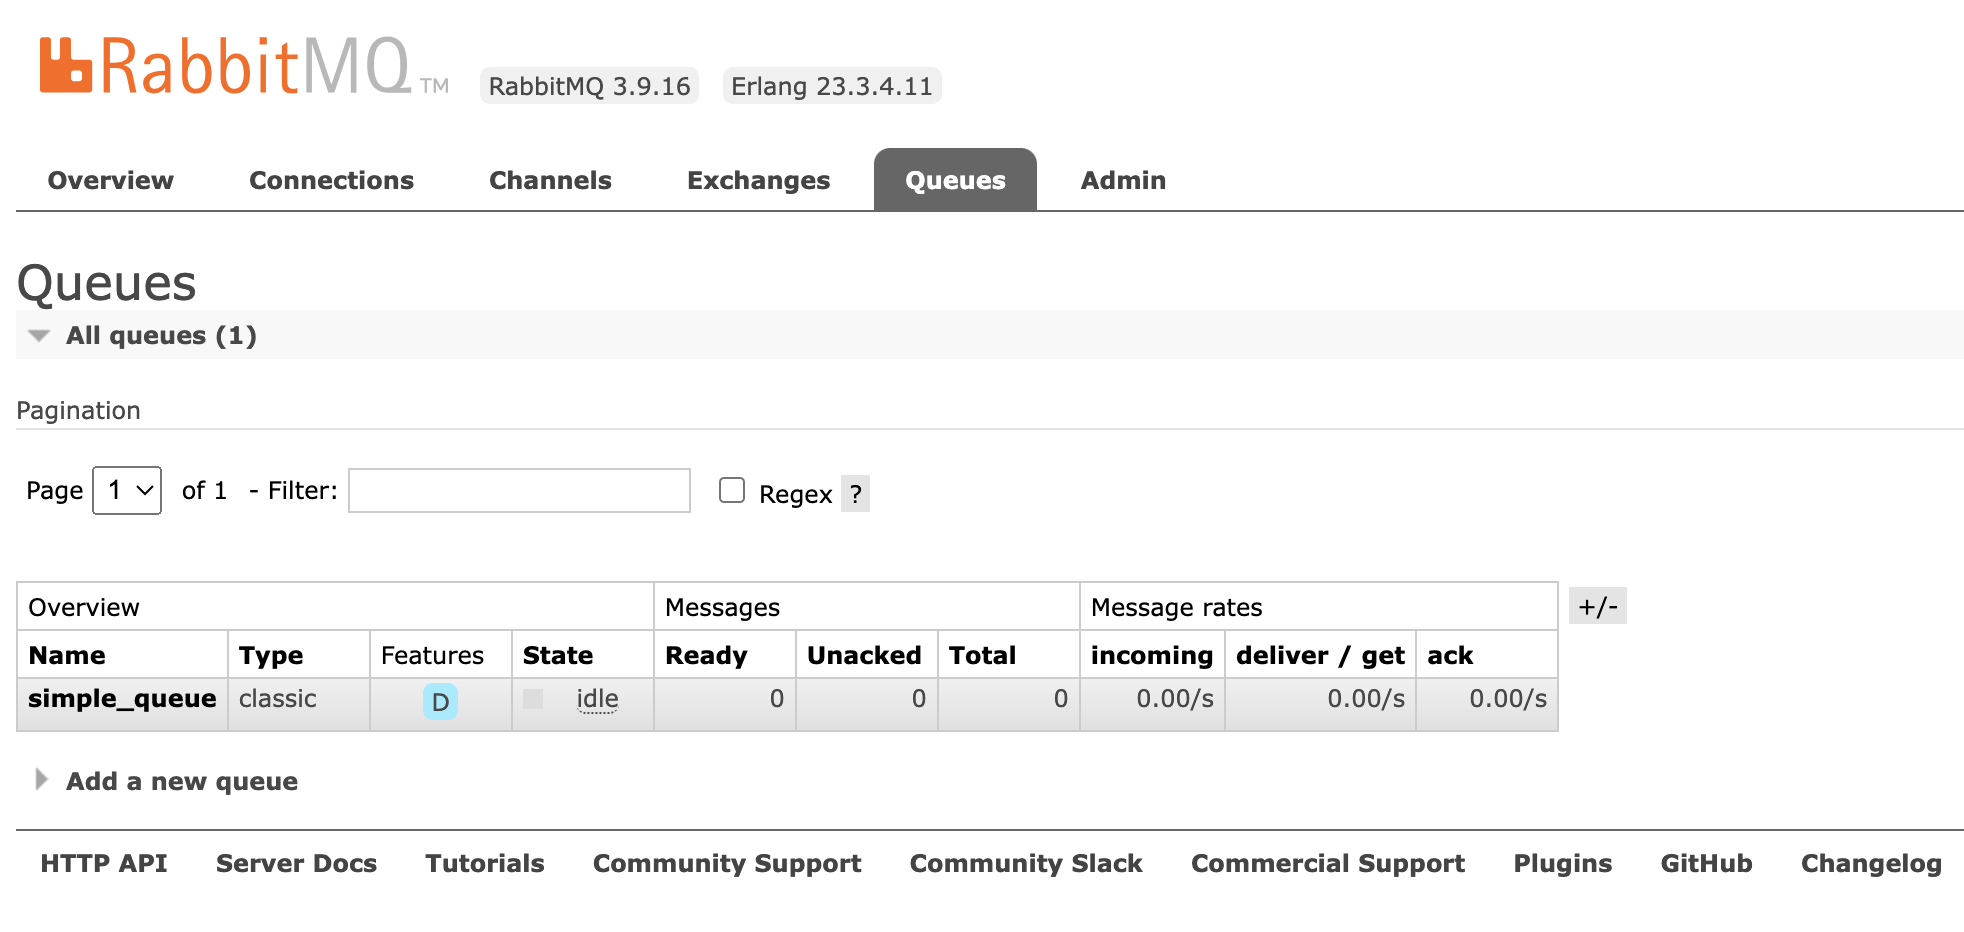
因为消息被消费掉了,所以RabbitMQ服务器上没有了。
数据隔离
用户管理
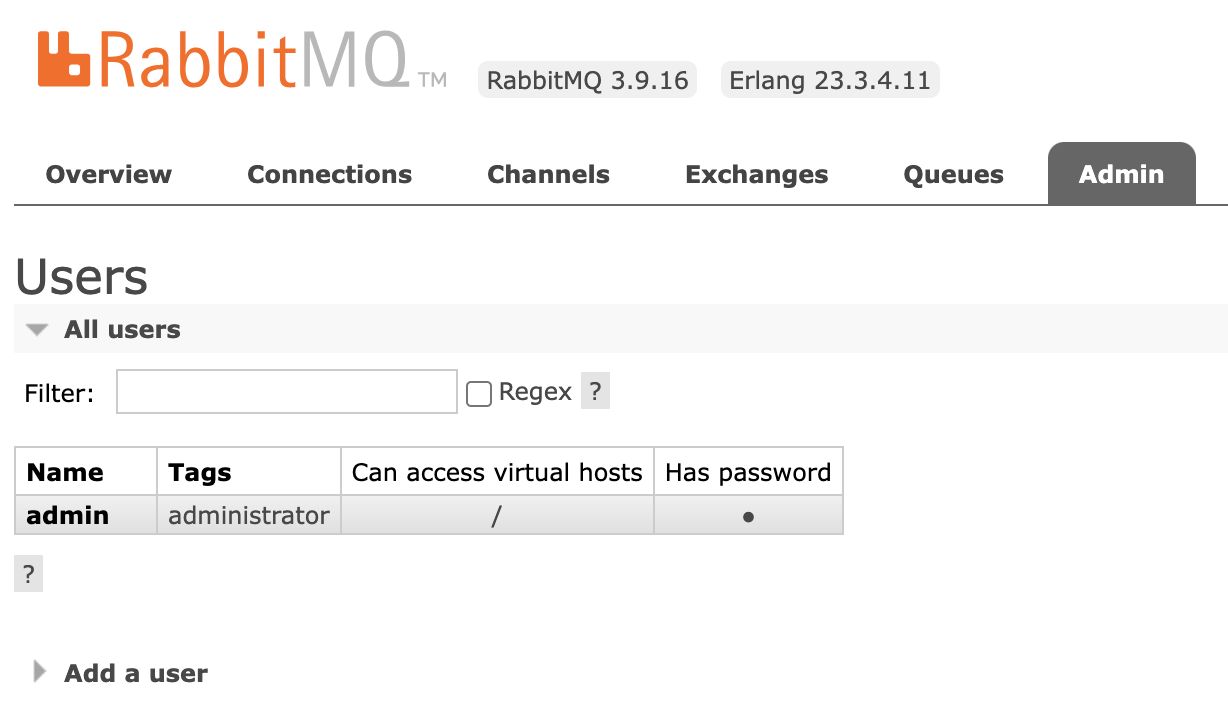
点击Admin选项卡,会看到RabbitMQ控制台的用户管理界面:
这里的用户都是RabbitMQ的管理或运维人员。目前只有admin一个。
表格中各字段的含义如下:
Name:admin,用户名。Tags:administrator,说明admin用户是超级管理员,拥有所有权限。Can access virtual host:/,可以访问的virtual host,这里的/是默认的virtual host。
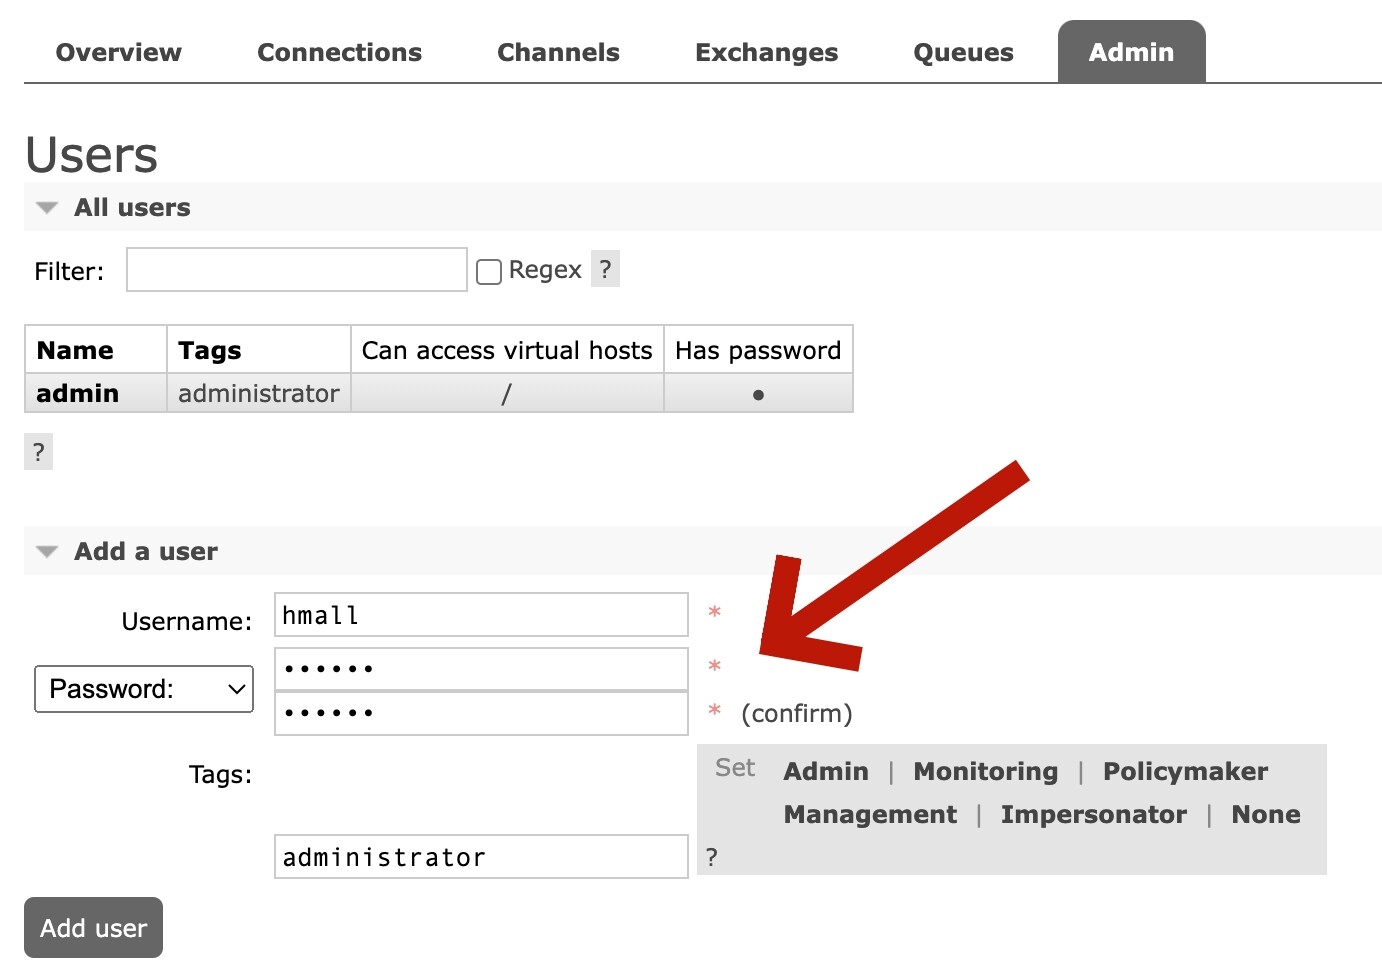
对于小型企业而言,出于成本考虑,我们通常只会搭建一套MQ集群,公司内的多个不同项目同时使用。这个时候为了避免互相干扰,我们会利用virtual host的隔离特性,将不同项目隔离。一般会做两件事情:
给每个项目创建独立的运维账号,将管理权限分离。
给每个项目创建不同的virtual host,将每个项目的数据隔离。
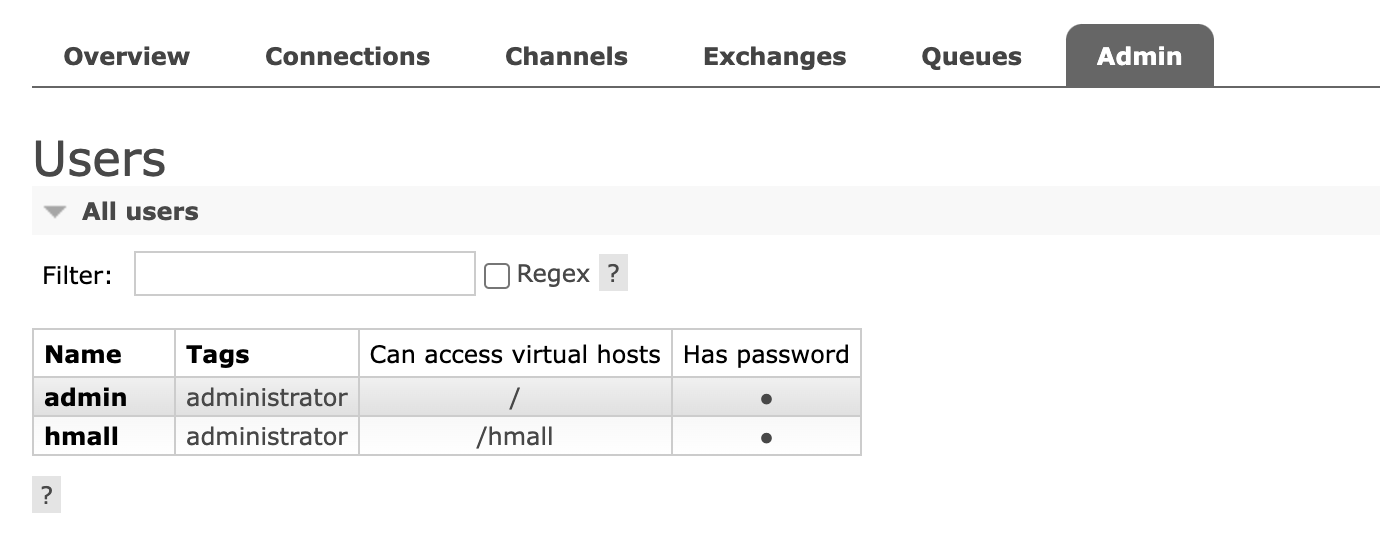
例如,我们创建一个新的用户,命名为hmall:
此时"hmall"用户没有任何virtual host的访问权限:
接下来我们就来授权。
virtual host
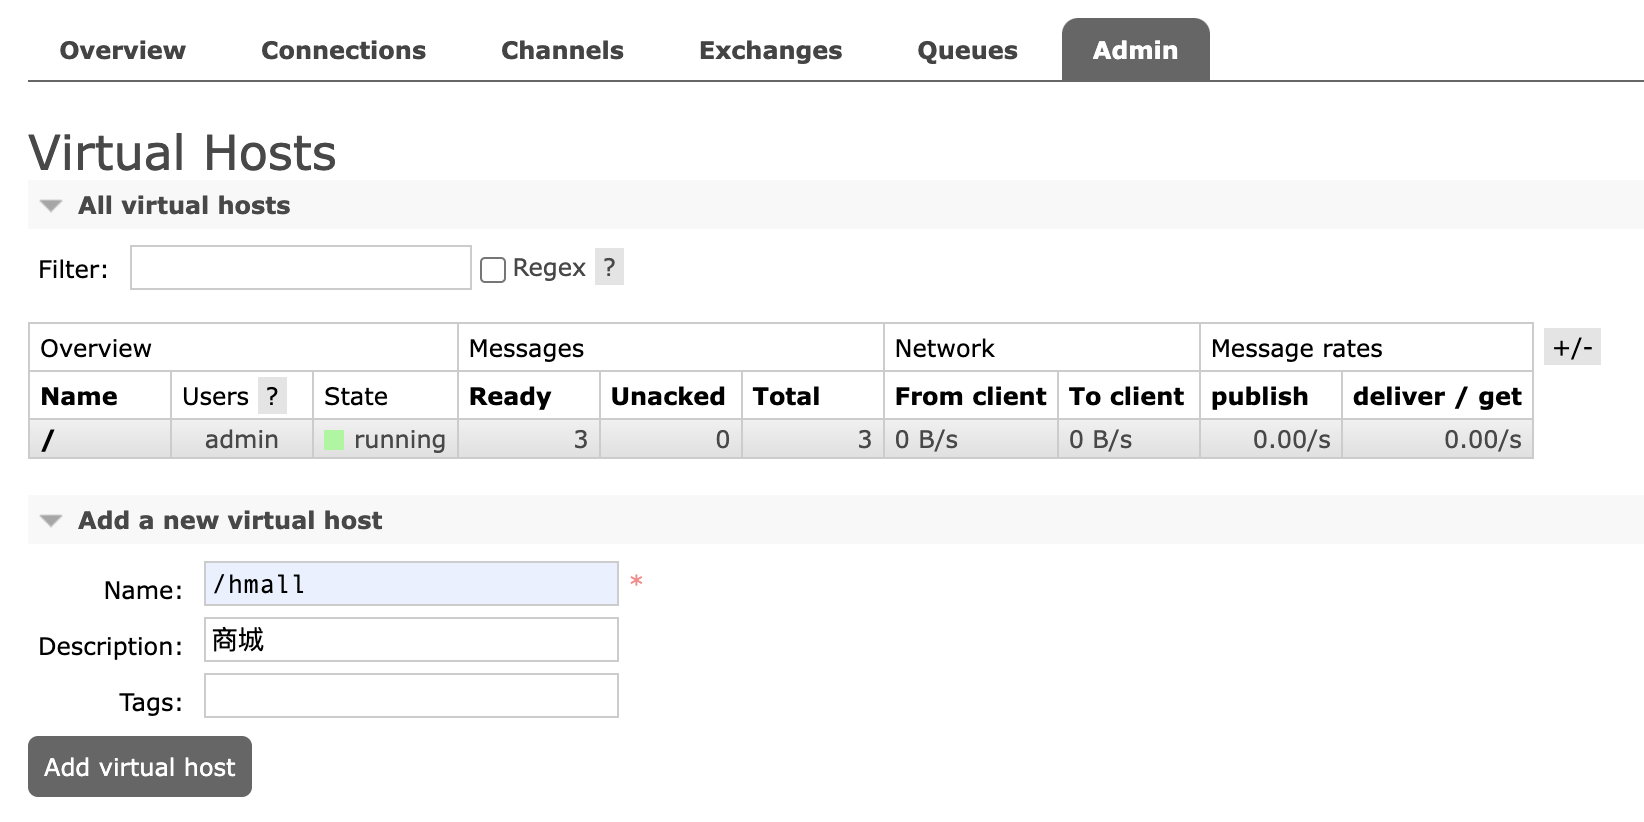
点击右上方的"Log out",退出登录,切换到刚刚创建的"hmall"用户登录,然后点击Virtual Hosts菜单,进入virtual host管理页,我们会看到只有一个默认的virtual host,名字为 /。接下来,我们创建一个新的virtual host。
因为我们是登录hmall账户后创建的virtual host,因此回到users菜单,你会发现当前用户已经具备了对/hmall这个virtual host的访问权限了。
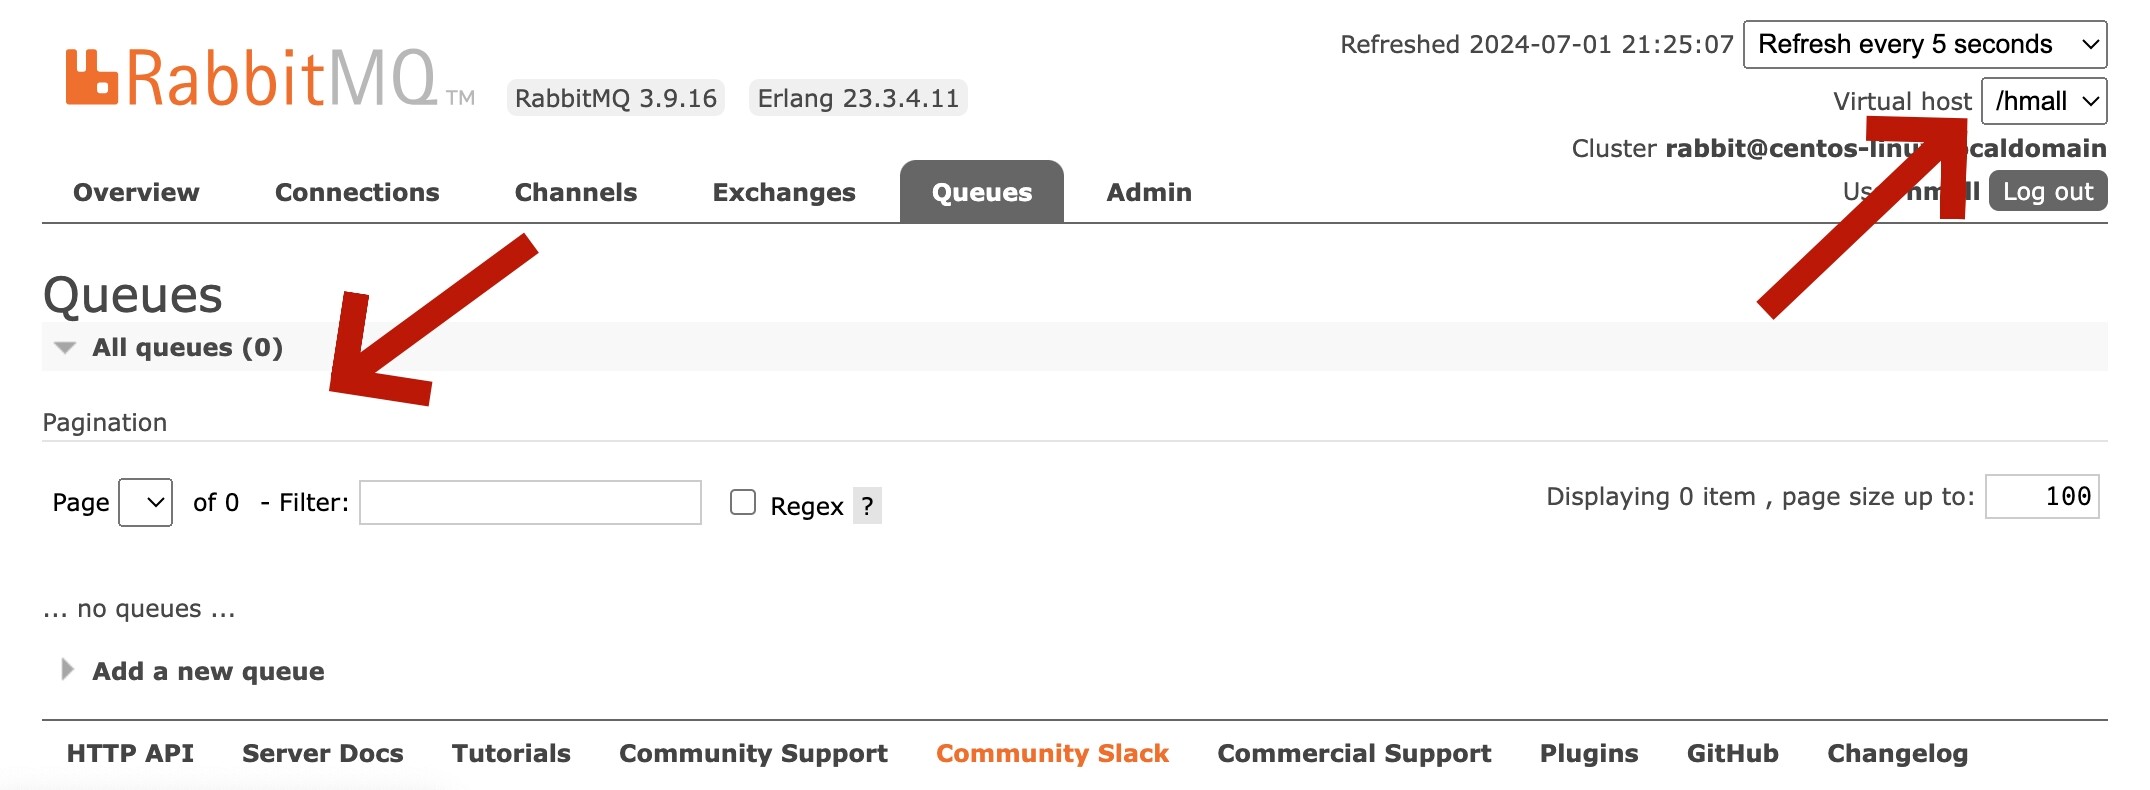
此时,点击页面右上角的virtual host下拉菜单,切换virtual host为 /hmall,然后再次查看queues选项卡,会发现之前的队列已经看不到了:
这就是基于virtual host的隔离效果。
七种工作模式
在RabbitMQ的官方文档上,一共列举了7种RabbitMQ的七种工作模式。
Hello World!是Work Queues的一种简化特殊情况,特指只有一个消费者。Work Queues是说,生产者可以直接把消息发送到队列上,队列可以被多个消费者监听。Publish/Subscribe,发布订阅模式。Routing,路由。Topic,主题。RPC,Remote Procedure Call,本质是一种同步调用。Publisher Confirms,消息可靠性投递。
接下来我们会重点讨论Work Queues 工作队列、Publish/Subscribe 发布订阅、Routing 路由和Topic 主题。RPC本质是一种同步调用,不讨论。Publisher Confirms,消息可靠性投递,会在下一章重点讨论。RPC本质是一种同步调用,所以也有资料认为,RabbitMQ中一共有六种工作模式。
工作队列
特点
在Work Queues(工作队列)中,多个消费者监听同一个队列,各消费者之间对同一个消息是竞争的关系。
代码实现
封装工具类
示例代码:
1
2
3
4
5
6
7
8
9
10
11
12
13
14
15
16
17
18
19
20
21
22
23
24
25
26
27
28
29
30
31
32
33
34
35
36
37
38
39
40
41
42
43
44
package com.kakawanyifan.demo;import com.rabbitmq.client.Connection;import com.rabbitmq.client.ConnectionFactory;public class ConnectionUtil public static final String HOST_ADDRESS = "10.211.55.17" ; public static Connection getConnection () throws Exception ConnectionFactory factory = new ConnectionFactory(); factory.setHost(HOST_ADDRESS); factory.setPort(5672 ); factory.setVirtualHost("/" ); factory.setUsername("admin" ); factory.setPassword("123456" ); Connection connection = factory.newConnection(); return connection; } public static void main (String[] args) throws Exception Connection con = ConnectionUtil.getConnection(); System.out.println(con); con.close(); } }
运行结果:
1 amqp://admin@10.211.55.17:5672/
生产者
示例代码:
1
2
3
4
5
6
7
8
9
10
11
12
13
14
15
16
17
18
19
20
21
22
23
24
25
26
27
28
29
package com.kakawanyifan.demo;import com.rabbitmq.client.Channel;import com.rabbitmq.client.Connection;public class Producer public static final String QUEUE_NAME = "work_queue" ; public static void main (String[] args) throws Exception Connection connection = ConnectionUtil.getConnection(); Channel channel = connection.createChannel(); channel.queueDeclare(QUEUE_NAME,true ,false ,false ,null ); for (int i = 1 ; i <= 10 ; i++) { String body = i+"hello rabbitmq" ; channel.basicPublish("" ,QUEUE_NAME,null ,body.getBytes()); } channel.close(); connection.close(); } }
消费者
创建Consumer1和Consumer2。Consumer2只是类名和打印提示不同,代码完全一样。
示例代码:
1
2
3
4
5
6
7
8
9
10
11
12
13
14
15
16
17
18
19
20
21
22
23
24
25
26
27
28
29
30
31
32
package com.kakawanyifan.demo;import com.rabbitmq.client.*;import java.io.IOException;public class Consumer1 static final String QUEUE_NAME = "work_queue" ; public static void main (String[] args) throws Exception Connection connection = ConnectionUtil.getConnection(); Channel channel = connection.createChannel(); channel.queueDeclare(QUEUE_NAME,true ,false ,false ,null ); Consumer consumer = new DefaultConsumer(channel){ @Override public void handleDelivery (String consumerTag, Envelope envelope, AMQP.BasicProperties properties, byte [] body) throws IOException System.out.println("Consumer1 body:" +new String(body)); } }; channel.basicConsume(QUEUE_NAME,true ,consumer); } }
效果
为了更好的展示两个消费者端的竞争关系,我们先启动两个消费端程序,然后再启动生产者端程序。
Consumer1的输出:
1
2
3
4
5
Consumer1 body:1hello rabbitmq Consumer1 body:3hello rabbitmq Consumer1 body:5hello rabbitmq Consumer1 body:7hello rabbitmq Consumer1 body:9hello rabbitmq
Consumer2的输出:
1
2
3
4
5
Consumer2 body:2hello rabbitmq Consumer2 body:4hello rabbitmq Consumer2 body:6hello rabbitmq Consumer2 body:8hello rabbitmq Consumer2 body:10hello rabbitmq
发布订阅
概述
与工作队列的区别
工作队列模式:生产者把消息直接发送到队列上(其实经过了一个默认交换机,但效果差不多)。
即:
工作队列模式本质上是绑定默认交换机。
监听同一个队列的消费端程序彼此之间是竞争关系。
交换机
生产者不是把消息直接发送到队列,而是发送到交换机。
交换机接收消息,而如何处理消息取决于交换机的类型,交换机有如下3种常见类型:
Fanout:广播,将消息发送给所有绑定到交换机的队列。
Direct:定向,把消息交给符合指定routing key的队列。
Topic:通配符,把消息交给符合routing pattern(路由模式)的队列。
注意:Exchange(交换机)只负责转发消息,不具备存储消息的能力,因此如果没有任何队列与Exchange绑定,或者没有符合路由规则的队列,那么消息会丢失!
特点
组件之间关系:
生产者把消息发送到交换机。
队列直接和交换机绑定。
工作机制:消息发送到交换机上,就会以广播 的形式发送给所有已绑定队列。
理解概念:
Publish:发布,这里就是把消息发送到交换机上。
Subscribe:订阅,这里只要把队列和交换机绑定,事实上就形成了一种订阅关系。
代码实现
生产者
示例代码:
1
2
3
4
5
6
7
8
9
10
11
12
13
14
15
16
17
18
19
20
21
22
23
24
25
26
27
28
29
30
31
32
33
34
35
36
37
38
39
40
41
42
43
44
45
46
47
48
49
50
51
52
53
54
55
56
57
58
package com.kakawanyifan.demo;import com.rabbitmq.client.BuiltinExchangeType;import com.rabbitmq.client.Channel;import com.rabbitmq.client.Connection;public class Producer public static void main (String[] args) throws Exception Connection connection = ConnectionUtil.getConnection(); Channel channel = connection.createChannel(); String exchangeName = "test_fanout" ; channel.exchangeDeclare(exchangeName, BuiltinExchangeType.FANOUT,true ,false ,false ,null ); String queue1Name = "test_fanout_queue1" ; String queue2Name = "test_fanout_queue2" ; channel.queueDeclare(queue1Name,true ,false ,false ,null ); channel.queueDeclare(queue2Name,true ,false ,false ,null ); channel.queueBind(queue1Name,exchangeName,"" ); channel.queueBind(queue2Name,exchangeName,"" ); String body = "日志信息:张三调用了findAll方法...日志级别:info..." ; channel.basicPublish(exchangeName,"" ,null ,body.getBytes()); channel.close(); connection.close(); } }
消费者
消费者1号
示例代码:
1
2
3
4
5
6
7
8
9
10
11
12
13
14
15
16
17
18
19
20
21
22
23
24
25
26
27
28
29
30
31
32
33
34
35
package com.kakawanyifan.demo;import com.rabbitmq.client.*;import java.io.IOException;public class Consumer1 public static void main (String[] args) throws Exception Connection connection = ConnectionUtil.getConnection(); Channel channel = connection.createChannel(); String queue1Name = "test_fanout_queue1" ; channel.queueDeclare(queue1Name,true ,false ,false ,null ); Consumer consumer = new DefaultConsumer(channel){ @Override public void handleDelivery (String consumerTag, Envelope envelope, AMQP.BasicProperties properties, byte [] body) throws IOException System.out.println("body:" +new String(body)); System.out.println("队列 1 消费者 1 将日志信息打印到控制台....." ); } }; channel.basicConsume(queue1Name,true ,consumer); } }
消费者2号
示例代码:
1
2
3
4
5
6
7
8
9
10
11
12
13
14
15
16
17
18
19
20
21
22
23
24
25
26
27
28
29
30
31
32
33
34
35
package com.kakawanyifan.demo;import com.rabbitmq.client.*;import java.io.IOException;public class Consumer2 public static void main (String[] args) throws Exception Connection connection = ConnectionUtil.getConnection(); Channel channel = connection.createChannel(); String queue2Name = "test_fanout_queue2" ; channel.queueDeclare(queue2Name,true ,false ,false ,null ); Consumer consumer = new DefaultConsumer(channel){ @Override public void handleDelivery (String consumerTag, Envelope envelope, AMQP.BasicProperties properties, byte [] body) throws IOException System.out.println("body:" +new String(body)); System.out.println("队列 2 消费者 2 将日志信息打印到控制台....." ); } }; channel.basicConsume(queue2Name,true ,consumer); } }
运行结果:
1
2
body:日志信息:张三调用了findAll方法...日志级别:info... 队列 2 消费者 2 将日志信息打印到控制台.....
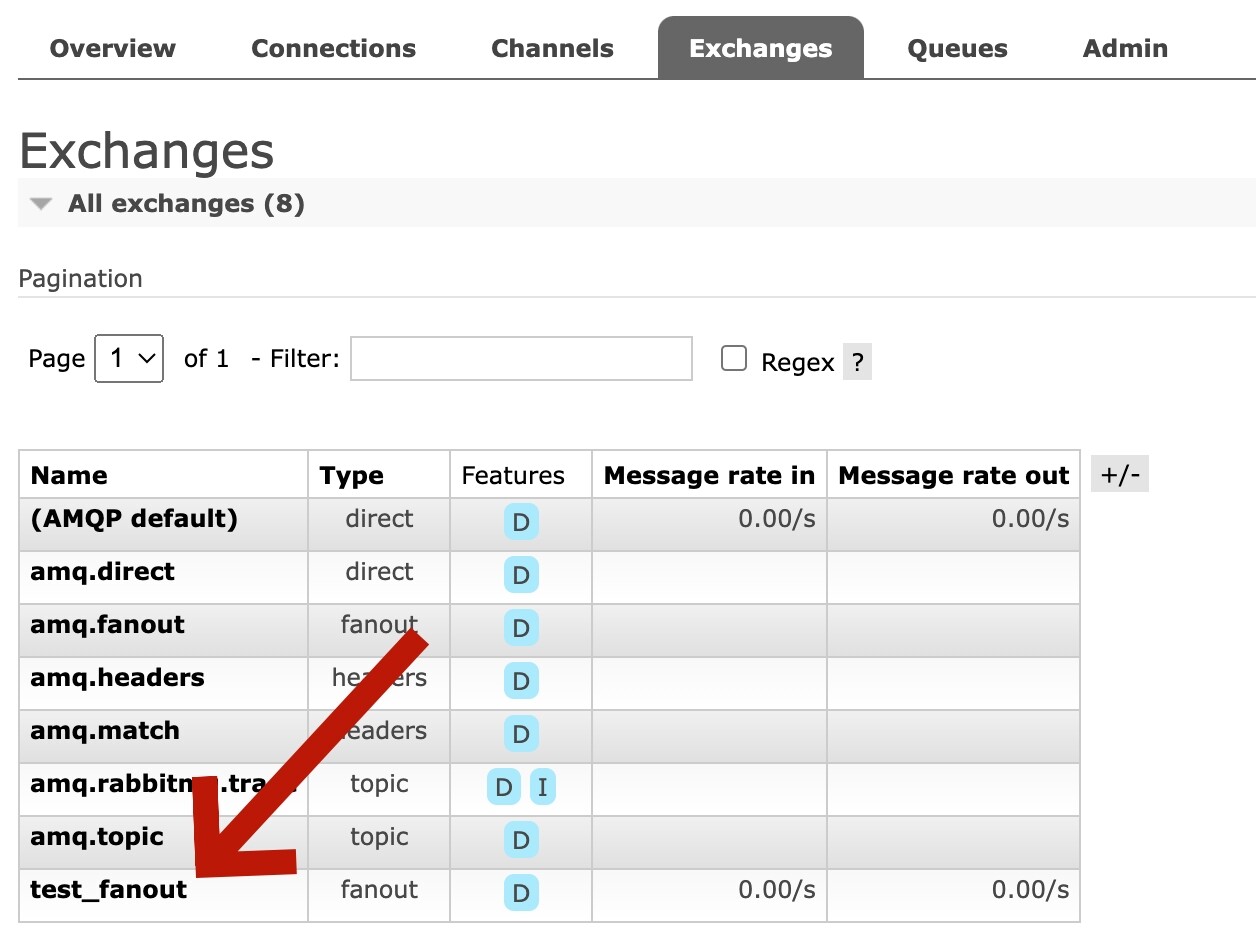
管理页面-Exchanges
通过管理页面的Exchanges,我们会看到我们新建的交换机test_fanout。
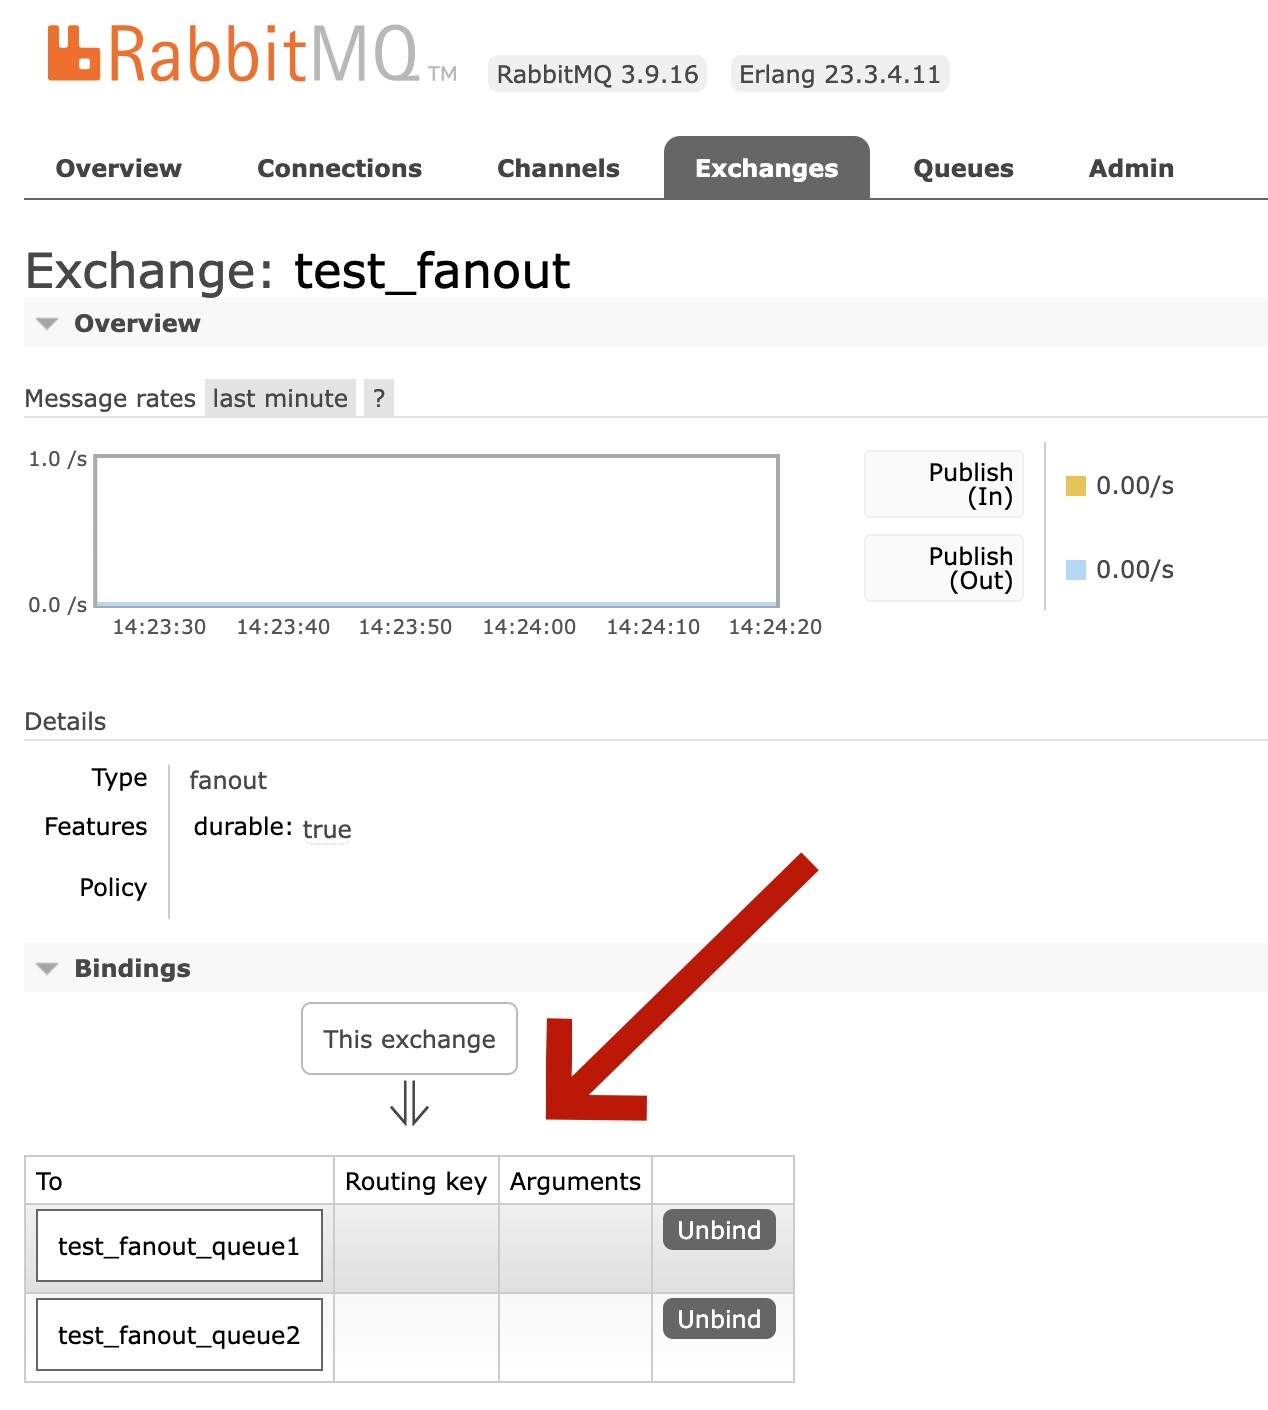
点进test_fanout,还可以看到这个交换机的绑定关系:
路由模式
特点
通过路由绑定 的方式,把交换机和队列关联起来
交换机和队列通过路由键进行绑定。
生产者发送消息时不仅要指定交换机,还要指定路由键。
交换机接收到消息会发送到路由键绑定的队列。
在编码上与Publish/Subscribe发布与订阅模式的区别:
交换机的类型为:Direct
队列绑定交换机的时候需要指定routing key。
代码实现
生产者
示例代码:
1
2
3
4
5
6
7
8
9
10
11
12
13
14
15
16
17
18
19
20
21
22
23
24
25
26
27
28
29
30
31
32
33
34
35
36
37
38
39
40
41
42
43
44
45
46
47
48
49
package com.kakawanyifan.demo;import com.rabbitmq.client.BuiltinExchangeType;import com.rabbitmq.client.Channel;import com.rabbitmq.client.Connection;public class Producer public static void main (String[] args) throws Exception Connection connection = ConnectionUtil.getConnection(); Channel channel = connection.createChannel(); String exchangeName = "test_direct" ; channel.exchangeDeclare(exchangeName,BuiltinExchangeType.DIRECT,true ,false ,false ,null ); String queue1Name = "test_direct_queue1" ; String queue2Name = "test_direct_queue2" ; channel.queueDeclare(queue1Name,true ,false ,false ,null ); channel.queueDeclare(queue2Name,true ,false ,false ,null ); channel.queueBind(queue1Name,exchangeName,"error" ); channel.queueBind(queue2Name,exchangeName,"info" ); channel.queueBind(queue2Name,exchangeName,"error" ); channel.queueBind(queue2Name,exchangeName,"warning" ); String message = "日志信息:张三调用了delete方法,发生了错误,日志级别warning。" ; channel.basicPublish(exchangeName,"warning" ,null ,message.getBytes()); System.out.println(message); channel.close(); connection.close(); } }
运行结果:
1 日志信息:张三调用了delete方法,发生了错误,日志级别warning。
消费者
消费者1号
示例代码:
1
2
3
4
5
6
7
8
9
10
11
12
13
14
15
16
17
18
19
20
21
22
23
24
25
26
27
28
29
30
31
32
33
package com.kakawanyifan.demo;import com.rabbitmq.client.*;public class Consumer1 public static void main (String[] args) throws Exception Connection connection = ConnectionUtil.getConnection(); Channel channel = connection.createChannel(); String queue1Name = "test_direct_queue1" ; channel.queueDeclare(queue1Name,true ,false ,false ,null ); Consumer consumer = new DefaultConsumer(channel){ @Override public void handleDelivery (String consumerTag, Envelope envelope, AMQP.BasicProperties properties, byte [] body) System.out.println("body:" +new String(body)); System.out.println("Consumer1 将日志信息打印到控制台....." ); } }; channel.basicConsume(queue1Name,true ,consumer); } }
不会输出任何内容。
消费者2号
示例代码:
1
2
3
4
5
6
7
8
9
10
11
12
13
14
15
16
17
18
19
20
21
22
23
24
25
26
27
28
29
30
31
32
33
package com.kakawanyifan.demo;import com.rabbitmq.client.*;public class Consumer2 public static void main (String[] args) throws Exception Connection connection = ConnectionUtil.getConnection(); Channel channel = connection.createChannel(); String queue2Name = "test_direct_queue2" ; channel.queueDeclare(queue2Name,true ,false ,false ,null ); Consumer consumer = new DefaultConsumer(channel){ @Override public void handleDelivery (String consumerTag, Envelope envelope, AMQP.BasicProperties properties, byte [] body) System.out.println("body:" +new String(body)); System.out.println("Consumer2 将日志信息存储到数据库....." ); } }; channel.basicConsume(queue2Name,true ,consumer); } }
运行结果:
1
2
body:日志信息:张三调用了delete方法,发生了错误,日志级别warning。 Consumer2 将日志信息存储到数据库.....
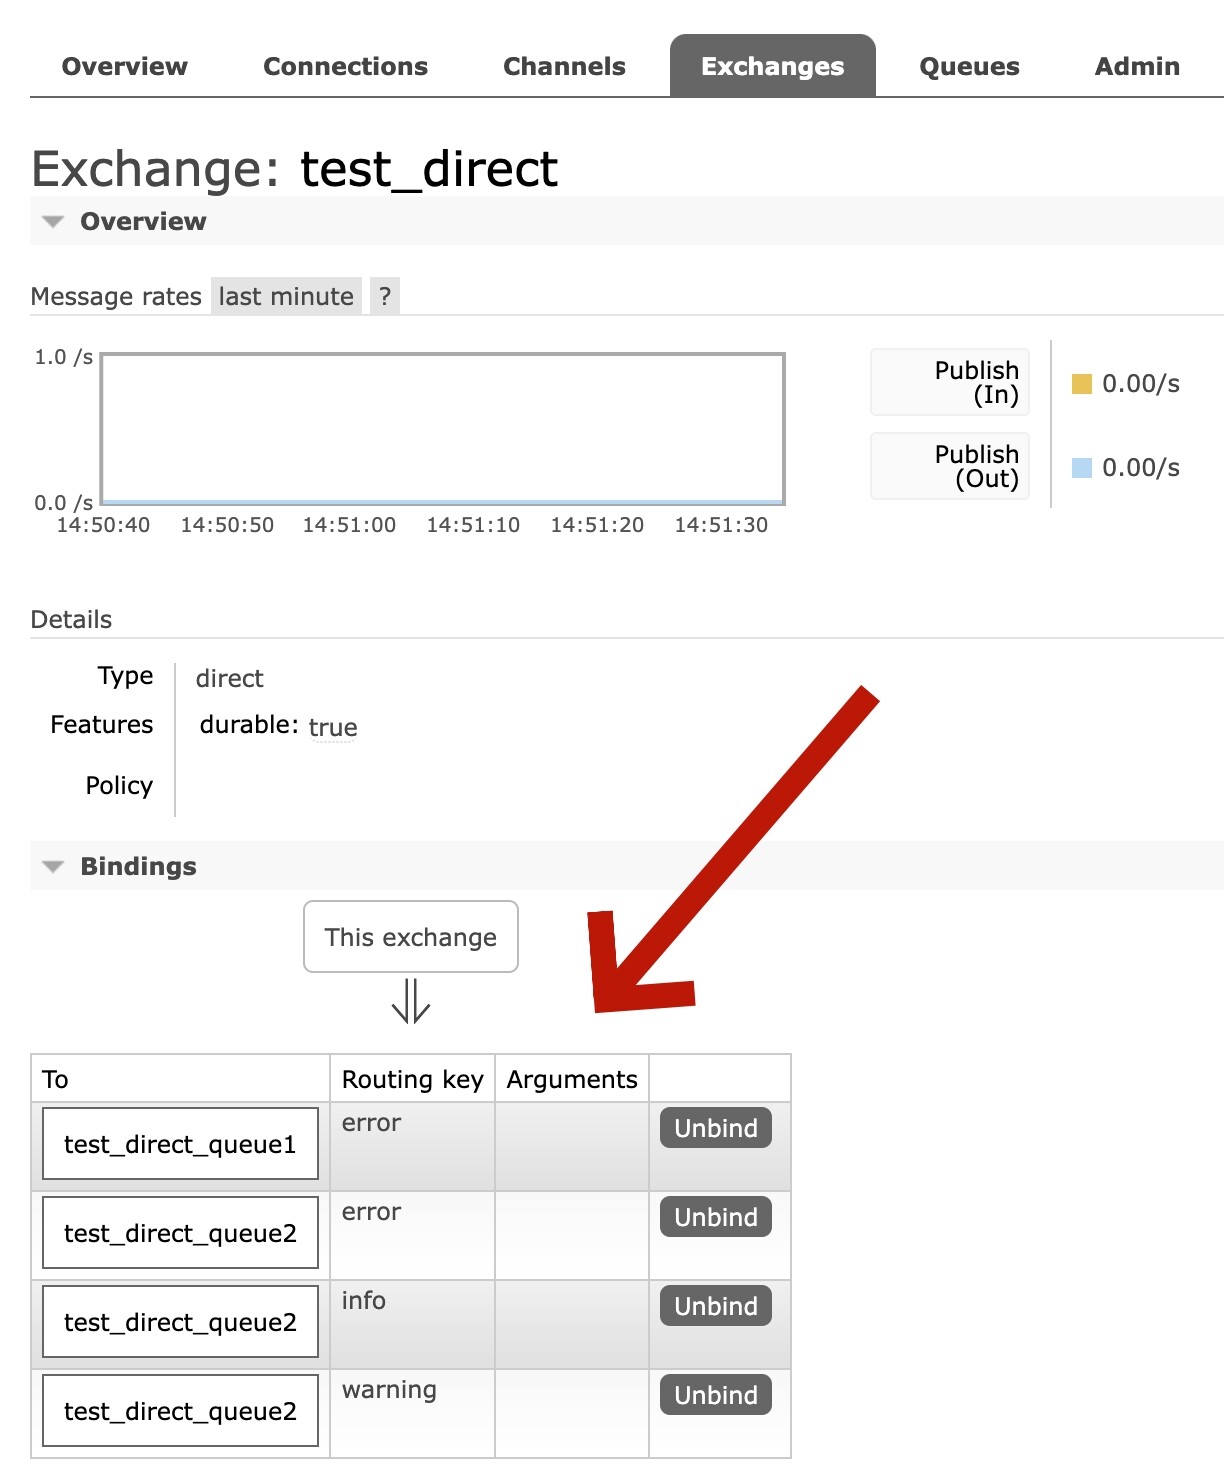
绑定关系
在我们的绑定关系中,RoutingKey的值"error"同时绑定了两个队列,这个也会有广播效果。
即:如果一个交换机通过相同的RoutingKey绑定了多个队列,就会有广播效果。
主题模式
匹配规则
路由模式是指定固定的路由键RoutingKey,而主题模式是可以模糊匹配路由键RoutingKey,类似于SQL中=和like的关系。
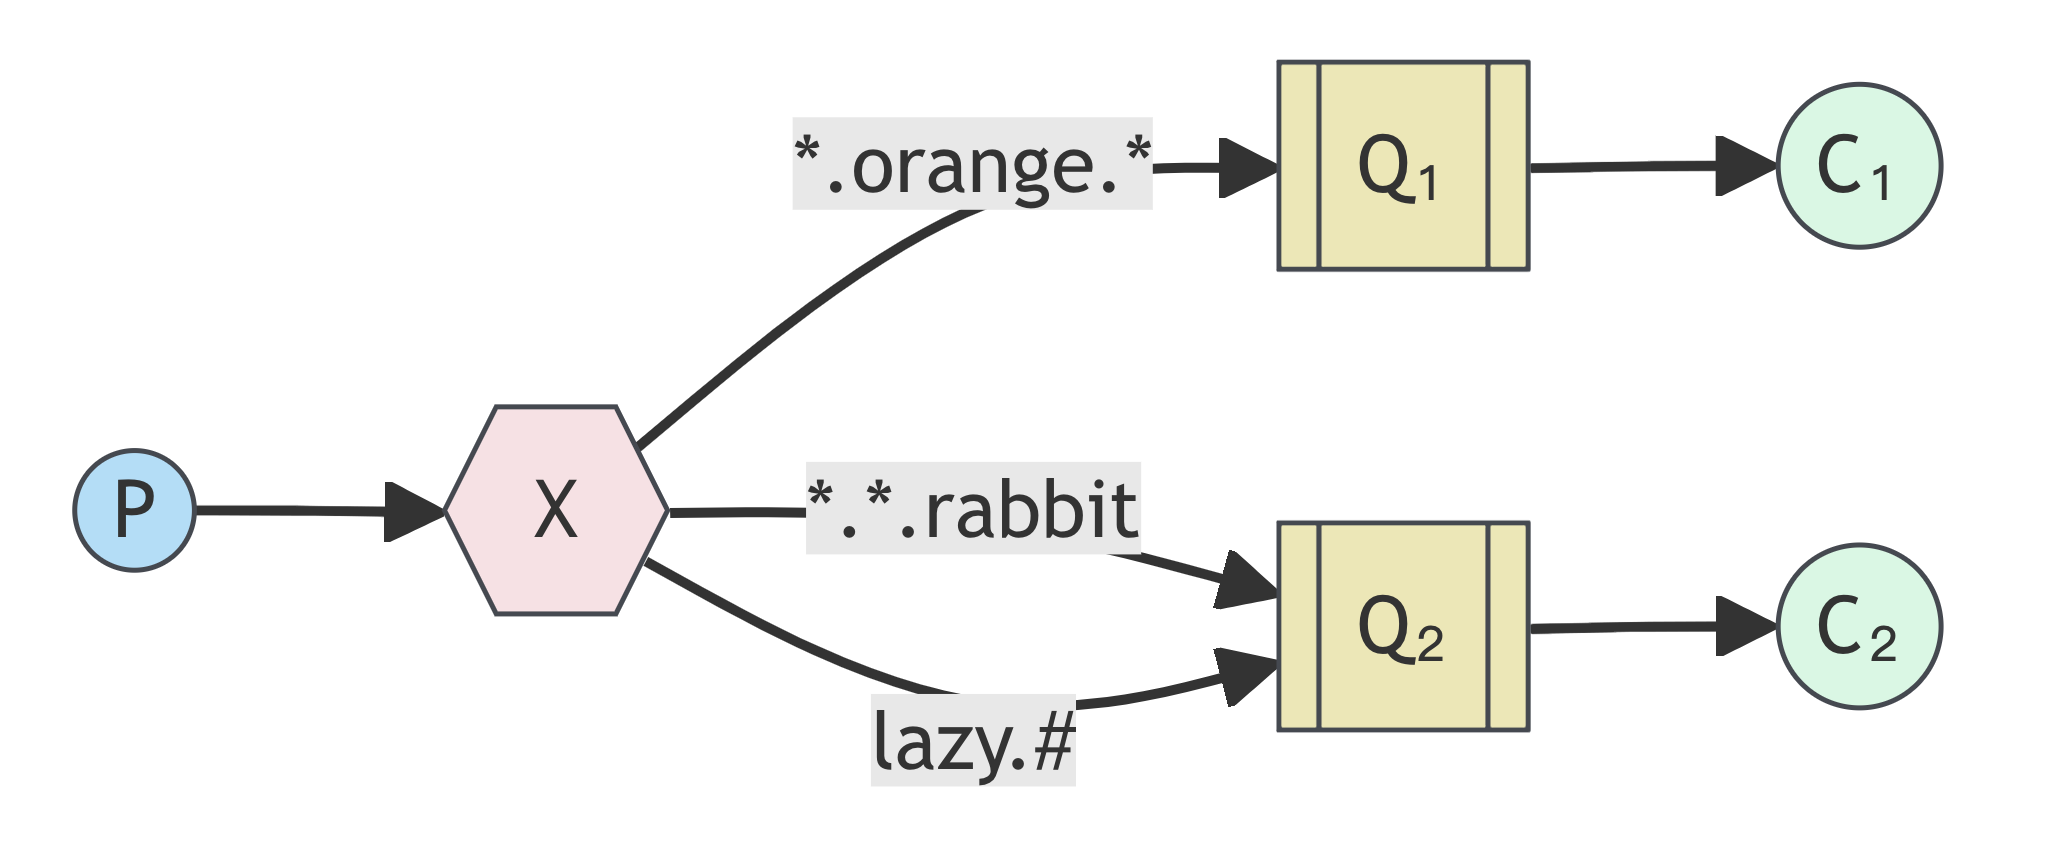
我们将被句点号“.”分隔开的每一段独立的字符串称为一个单词。*和#:
*:表示有且只有1个单词。#:表示0或1个单词。
以上图中的配置为例:"xxx.orange.rabbit"会同时路由到Q1与Q2,"lazy.orange.fox”会路由到Q1与Q2;"lazy.brown.fox"会路由到Q2;"lazy.pink.rabbit"会路由到Q2(只会投递给Q2一次,虽然与Q2的两个BindingKey都匹配);“quick.brown.fox”、“orange”、"quick.orange.male.rabbit"会被丢弃,因为没有匹配任何BindingKey。
代码实现
生产者
示例代码:
1
2
3
4
5
6
7
8
9
10
11
12
13
14
15
16
17
18
19
20
21
22
23
24
25
26
27
28
29
30
31
32
33
34
35
36
37
38
39
40
41
42
43
44
45
46
47
48
49
50
51
package com.kakawanyifan.demo;import com.rabbitmq.client.BuiltinExchangeType;import com.rabbitmq.client.Channel;import com.rabbitmq.client.Connection;public class Producer public static void main (String[] args) throws Exception Connection connection = ConnectionUtil.getConnection(); Channel channel = connection.createChannel(); String exchangeName = "test_topic" ; channel.exchangeDeclare(exchangeName, BuiltinExchangeType.TOPIC,true ,false ,false ,null ); String queue1Name = "test_topic_queue1" ; String queue2Name = "test_topic_queue2" ; channel.queueDeclare(queue1Name,true ,false ,false ,null ); channel.queueDeclare(queue2Name,true ,false ,false ,null ); channel.queueBind(queue1Name,exchangeName,"#.error" ); channel.queueBind(queue1Name,exchangeName,"order.*" ); channel.queueBind(queue2Name,exchangeName,"*.*" ); String body = "[所在系统:order][日志级别:info][日志内容:订单生成,保存成功]" ; channel.basicPublish(exchangeName,"order.info" ,null ,body.getBytes()); body = "[所在系统:goods][日志级别:info][日志内容:商品发布成功]" ; channel.basicPublish(exchangeName,"goods.info" ,null ,body.getBytes()); body = "[所在系统:goods][日志级别:error][日志内容:商品发布失败]" ; channel.basicPublish(exchangeName,"goods.error" ,null ,body.getBytes()); channel.close(); connection.close(); } }
消费者代码
消费者1号
示例代码:
1
2
3
4
5
6
7
8
9
10
11
12
13
14
15
16
17
18
19
20
21
22
23
24
25
26
27
28
29
30
31
32
package com.kakawanyifan.demo;import com.rabbitmq.client.*;public class Consumer1 public static void main (String[] args) throws Exception Connection connection = ConnectionUtil.getConnection(); Channel channel = connection.createChannel(); String QUEUE_NAME = "test_topic_queue1" ; channel.queueDeclare(QUEUE_NAME,true ,false ,false ,null ); Consumer consumer = new DefaultConsumer(channel){ @Override public void handleDelivery (String consumerTag, Envelope envelope, AMQP.BasicProperties properties, byte [] body) System.out.println("body:" +new String(body)); } }; channel.basicConsume(QUEUE_NAME,true ,consumer); } }
运行结果:
1
2
body:[所在系统:order][日志级别:info][日志内容:订单生成,保存成功] body:[所在系统:goods][日志级别:error][日志内容:商品发布失败]
消费者2号
示例代码:
1
2
3
4
5
6
7
8
9
10
11
12
13
14
15
16
17
18
19
20
21
22
23
24
25
26
27
28
29
30
31
32
package com.kakawanyifan.demo;import com.rabbitmq.client.*;public class Consumer2 public static void main (String[] args) throws Exception Connection connection = ConnectionUtil.getConnection(); Channel channel = connection.createChannel(); String QUEUE_NAME = "test_topic_queue2" ; channel.queueDeclare(QUEUE_NAME,true ,false ,false ,null ); Consumer consumer = new DefaultConsumer(channel){ @Override public void handleDelivery (String consumerTag, Envelope envelope, AMQP.BasicProperties properties, byte [] body) System.out.println("body:" +new String(body)); } }; channel.basicConsume(QUEUE_NAME,true ,consumer); } }
运行结果:
1
2
3
body:[所在系统:order][日志级别:info][日志内容:订单生成,保存成功] body:[所在系统:goods][日志级别:info][日志内容:商品发布成功] body:[所在系统:goods][日志级别:error][日志内容:商品发布失败]
Spring整合
生产者
pom.xml
新建一个maven项目,pom.xml的内容如下:
1
2
3
4
5
6
7
8
9
10
11
12
13
14
15
16
17
18
19
20
21
22
23
24
25
26
27
28
29
30
31
32
33
34
35
36
37
38
39
40
41
42
43
44
45
46
47
48
49
50
51
52
53
54
55
56
57
58
<?xml version="1.0" encoding="UTF-8"?> <project xmlns ="http://maven.apache.org/POM/4.0.0" xmlns:xsi ="http://www.w3.org/2001/XMLSchema-instance" xsi:schemaLocation ="http://maven.apache.org/POM/4.0.0 http://maven.apache.org/xsd/maven-4.0.0.xsd" > <modelVersion > 4.0.0</modelVersion > <groupId > com.kakawanyifan</groupId > <artifactId > srqp</artifactId > <version > 1.0-SNAPSHOT</version > <dependencies > <dependency > <groupId > org.springframework</groupId > <artifactId > spring-context</artifactId > <version > 5.1.7.RELEASE</version > </dependency > <dependency > <groupId > org.springframework.amqp</groupId > <artifactId > spring-rabbit</artifactId > <version > 2.1.8.RELEASE</version > </dependency > <dependency > <groupId > junit</groupId > <artifactId > junit</artifactId > <version > 4.12</version > </dependency > <dependency > <groupId > org.springframework</groupId > <artifactId > spring-test</artifactId > <version > 5.1.7.RELEASE</version > </dependency > </dependencies > <build > <plugins > <plugin > <groupId > org.apache.maven.plugins</groupId > <artifactId > maven-compiler-plugin</artifactId > <version > 3.8.0</version > <configuration > <source > 1.8</source > <target > 1.8</target > </configuration > </plugin > </plugins > </build > <properties > <maven.compiler.source > 8</maven.compiler.source > <maven.compiler.target > 8</maven.compiler.target > <project.build.sourceEncoding > UTF-8</project.build.sourceEncoding > </properties > </project >
其中,org.springframework.amqp.spring-rabbit的作用是整合RabbitMQ。
1 2 3 4 5 <dependency > <groupId > org.springframework.amqp</groupId > <artifactId > spring-rabbit</artifactId > <version > 2.1.8.RELEASE</version > </dependency >
rabbitmq.properties
在src/main/resources目录下,新建文件rabbitmq.properties,内容如下:
1
2
3
4
5
rabbitmq.host =10.211.55.17 rabbitmq.port =5672 rabbitmq.username =admin rabbitmq.password =123456 rabbitmq.virtual-host =/
spring-rabbitmq-producer.xml
配置文件内容
在src/main/resources目录下,新建文件spring-rabbitmq-producer.xml,内容如下:
1
2
3
4
5
6
7
8
9
10
11
12
13
14
15
16
17
18
19
20
21
22
23
24
25
26
27
28
29
30
31
32
33
34
35
36
37
38
39
40
41
42
43
44
45
46
47
48
49
50
51
52
53
54
55
56
57
58
59
60
61
62
<?xml version="1.0" encoding="UTF-8"?> <beans xmlns ="http://www.springframework.org/schema/beans" xmlns:xsi ="http://www.w3.org/2001/XMLSchema-instance" xmlns:context ="http://www.springframework.org/schema/context" xmlns:rabbit ="http://www.springframework.org/schema/rabbit" xsi:schemaLocation ="http://www.springframework.org/schema/beans http://www.springframework.org/schema/beans/spring-beans.xsd http://www.springframework.org/schema/context https://www.springframework.org/schema/context/spring-context.xsd http://www.springframework.org/schema/rabbit http://www.springframework.org/schema/rabbit/spring-rabbit.xsd" > <context:property-placeholder location ="classpath:rabbitmq.properties" /> <rabbit:connection-factory id ="connectionFactory" host ="${rabbitmq.host}" port ="${rabbitmq.port}" username ="${rabbitmq.username}" password ="${rabbitmq.password}" virtual-host ="${rabbitmq.virtual-host}" /> <rabbit:admin connection-factory ="connectionFactory" /> <rabbit:queue id ="spring_queue" name ="spring_queue" auto-declare ="true" /> <rabbit:queue id ="spring_fanout_queue_1" name ="spring_fanout_queue_1" auto-declare ="true" /> <rabbit:queue id ="spring_fanout_queue_2" name ="spring_fanout_queue_2" auto-declare ="true" /> <rabbit:fanout-exchange id ="spring_fanout_exchange" name ="spring_fanout_exchange" auto-declare ="true" > <rabbit:bindings > <rabbit:binding queue ="spring_fanout_queue_1" /> <rabbit:binding queue ="spring_fanout_queue_2" /> </rabbit:bindings > </rabbit:fanout-exchange > <rabbit:queue id ="spring_topic_queue_star" name ="spring_topic_queue_star" auto-declare ="true" /> <rabbit:queue id ="spring_topic_queue_well" name ="spring_topic_queue_well" auto-declare ="true" /> <rabbit:queue id ="spring_topic_queue_well2" name ="spring_topic_queue_well2" auto-declare ="true" /> <rabbit:topic-exchange id ="spring_topic_exchange" name ="spring_topic_exchange" auto-declare ="true" > <rabbit:bindings > <rabbit:binding pattern ="wan.*" queue ="spring_topic_queue_star" /> <rabbit:binding pattern ="wan.#" queue ="spring_topic_queue_well" /> <rabbit:binding pattern ="kaka.#" queue ="spring_topic_queue_well2" /> </rabbit:bindings > </rabbit:topic-exchange > <rabbit:template id ="rabbitTemplate" connection-factory ="connectionFactory" /> </beans >
因为rabbitmq.properties在src/main/resources目录下,所以是:
1 <context:property-placeholder location ="classpath:rabbitmq.properties" />
如果rabbitmq.properties在src/main/resources/properties目录下,则是
1 <context:property-placeholder location ="classpath:properties/rabbitmq.properties" />
队列相关配置
我们通过如下的配置文件,定义队列。
1 <rabbit:queue id ="spring_queue" name ="spring_queue" auto-declare ="true" />
id:bean的名称
name:queue的名称
auto-declare:自动创建
auto-delete:自动删除,最后一个消费者和该队列断开连接后,自动删除队列
exclusive:是否独占
durable:是否持久化
交换机相关配置
在上文的例子中,我们定义了发布订阅交换机和主题交换机,定义路由模式的交换机及其绑定方式,如下:
1 2 3 4 5 <rabbit:direct-exchange id = "xx" name ="xx" > <rabbit:bindings > <rabbit:binding queue ="spring_direct_queue_1" key ="xxx" > </rabbit:binding > </rabbit:bindings > </rabbit:direct-exchange >
ProducerTest
编写测试类,示例代码:
1
2
3
4
5
6
7
8
9
10
11
12
13
14
15
16
17
18
19
20
21
22
23
24
25
26
27
28
29
30
31
32
33
34
35
36
37
38
39
40
41
42
43
44
package com.kakawanyifan;import org.junit.Test;import org.junit.runner.RunWith;import org.springframework.amqp.rabbit.core.RabbitTemplate;import org.springframework.beans.factory.annotation.Autowired;import org.springframework.test.context.ContextConfiguration;import org.springframework.test.context.junit4.SpringJUnit4ClassRunner;@RunWith (SpringJUnit4ClassRunner.class ) @ContextConfiguration (locations = "classpath:spring-rabbitmq-producer.xml" )public class ProducerTest @Autowired private RabbitTemplate rabbitTemplate; @Test public void testHelloWorld () rabbitTemplate.convertAndSend("spring_queue" ,"hello world spring...." ); } @Test public void testFanout () rabbitTemplate.convertAndSend("spring_fanout_exchange" ,"" ,"spring fanout...." ); } @Test public void testTopics () rabbitTemplate.convertAndSend("spring_topic_exchange" ,"wan.hehe.haha" ,"spring topic...." ); } }
执行之后,我们通过控制台会看到如下内容。
消费者
spring-rabbitmq-consumer.xml
对于pom.xml和rabbitmq.properties的内容一样,spring-rabbitmq-consumer.xml的内容如下:
1
2
3
4
5
6
7
8
9
10
11
12
13
14
15
16
17
18
19
20
21
22
23
24
25
26
27
28
29
30
31
32
33
34
35
36
37
<?xml version="1.0" encoding="UTF-8"?> <beans xmlns ="http://www.springframework.org/schema/beans" xmlns:xsi ="http://www.w3.org/2001/XMLSchema-instance" xmlns:context ="http://www.springframework.org/schema/context" xmlns:rabbit ="http://www.springframework.org/schema/rabbit" xsi:schemaLocation ="http://www.springframework.org/schema/beans http://www.springframework.org/schema/beans/spring-beans.xsd http://www.springframework.org/schema/context https://www.springframework.org/schema/context/spring-context.xsd http://www.springframework.org/schema/rabbit http://www.springframework.org/schema/rabbit/spring-rabbit.xsd" > <context:property-placeholder location ="classpath:rabbitmq.properties" /> <rabbit:connection-factory id ="connectionFactory" host ="${rabbitmq.host}" port ="${rabbitmq.port}" username ="${rabbitmq.username}" password ="${rabbitmq.password}" virtual-host ="${rabbitmq.virtual-host}" /> <bean id ="springQueueListener" class ="com.kakawanyifan.listener.SpringQueueListener" /> <bean id ="fanoutListener1" class ="com.kakawanyifan.listener.FanoutListener1" /> <bean id ="fanoutListener2" class ="com.kakawanyifan.listener.FanoutListener2" /> <bean id ="topicListenerStar" class ="com.kakawanyifan.listener.TopicListenerStar" /> <bean id ="topicListenerWell" class ="com.kakawanyifan.listener.TopicListenerWell" /> <bean id ="topicListenerWell2" class ="com.kakawanyifan.listener.TopicListenerWell2" /> <rabbit:listener-container connection-factory ="connectionFactory" auto-declare ="true" > <rabbit:listener ref ="springQueueListener" queue-names ="spring_queue" /> <rabbit:listener ref ="fanoutListener1" queue-names ="spring_fanout_queue_1" /> <rabbit:listener ref ="fanoutListener2" queue-names ="spring_fanout_queue_2" /> <rabbit:listener ref ="topicListenerStar" queue-names ="spring_topic_queue_star" /> <rabbit:listener ref ="topicListenerWell" queue-names ="spring_topic_queue_well" /> <rabbit:listener ref ="topicListenerWell2" queue-names ="spring_topic_queue_well2" /> </rabbit:listener-container > </beans >
SpringQueueListener
需要实现MessageListener。
以SpringQueueListener为例,其他的监听者类似。
示例代码:
1
2
3
4
5
6
7
8
9
10
11
12
package com.kakawanyifan.listener;import org.springframework.amqp.core.Message;import org.springframework.amqp.core.MessageListener;public class SpringQueueListener implements MessageListener @Override public void onMessage (Message message) System.out.println(new String(message.getBody())); } }
SpringBoot整合
生产者
添加依赖
新建一个SpringBoot项目,添加SpringBoot整合RabbitMQ的依赖。
1 2 3 4 <dependency > <groupId > org.springframework.boot</groupId > <artifactId > spring-boot-starter-amqp</artifactId > </dependency >
application.yml
配置RabbitMQ的基本信息:
1 2 3 4 5 6 7 8 spring: rabbitmq: host: 10.211 .55 .17 port: 5672 username: admin password: 123456 virtual-host: /
定义队列、交换机及其绑定关系
新建一个配置类,定义队列、交换机及其绑定关系。本文以主题交换机为例。示例代码:
1
2
3
4
5
6
7
8
9
10
11
12
13
14
15
16
17
18
19
20
21
22
23
24
25
26
27
28
29
30
31
32
33
34
35
36
37
38
package com.kakawanyifan.rabbitmq.config;import org.springframework.amqp.core.*;import org.springframework.beans.factory.annotation.Qualifier;import org.springframework.context.annotation.Bean;import org.springframework.context.annotation.Configuration;@Configuration public class Config public static final String EXCHANGE_NAME = "boot_topic_exchange" ; public static final String QUEUE_NAME = "boot_queue_exchange" ; @Bean ("bootExchange" ) public Exchange BootExchange () return ExchangeBuilder.topicExchange(EXCHANGE_NAME).durable(true ).build(); } @Bean ("bootQueue" ) public Queue BootQueue () return QueueBuilder.durable(QUEUE_NAME).build(); } @Bean public Binding bindQueueExchange (@Qualifier("bootQueue" ) Queue queue,@Qualifier ("bootExchange" ) Exchange exchange) return BindingBuilder.bind(queue).to(exchange).with("boot.#" ).noargs(); } }
解释说明:除了用XxxBuilder构建,我们也可以用new方法直接构建对象。
发送消息
新建一个测试类,发送消息。示例代码:
1
2
3
4
5
6
7
8
9
10
11
12
13
14
15
16
17
18
19
20
21
22
23
package com.kakawanyifan;import com.kakawanyifan.rabbitmq.config.Config;import org.junit.Test;import org.junit.runner.RunWith;import org.springframework.amqp.rabbit.core.RabbitTemplate;import org.springframework.beans.factory.annotation.Autowired;import org.springframework.boot.test.context.SpringBootTest;import org.springframework.test.context.junit4.SpringRunner;@SpringBootTest @RunWith (SpringRunner.class ) public class Producers @Autowired private RabbitTemplate rabbitTemplate; @Test public void testSend () rabbitTemplate.convertAndSend(Config.EXCHANGE_NAME,"boot.haha" ,"boot mq hello" ); } }
消费者
定义监听类
对于新建SpringBoot项目,添加SpringBoot整合RabbitMQ的依赖,以及"application.yml"等,与上文生产者部分,没有区别,不赘述。
主要讨论定义监听类。
示例代码:
1
2
3
4
5
6
7
8
9
10
11
12
13
14
package com.kakawanyifan.rabbitmq;import org.springframework.amqp.core.Message;import org.springframework.amqp.rabbit.annotation.RabbitListener;import org.springframework.stereotype.Component;@Component public class Listener @RabbitListener (queues = "boot_queue_exchange" ) public void onMessage (Message message) System.out.println(message); } }
运行结果:
1 (Body:'boot mq hello' MessageProperties [headers={}, contentType=text/plain, contentEncoding=UTF-8, contentLength=0, receivedDeliveryMode=PERSISTENT, priority=0, redelivered=true, receivedExchange=boot_topic_exchange, receivedRoutingKey=boot.haha, deliveryTag=1, consumerTag=amq.ctag-1RQyQZGXrprsWKoXvh4CTg, consumerQueue=boot_queue_exchange])
在消费者端绑定
我还可以通@RabbitListener在消费者端绑定交换机和队列的关系。
这种其实对应RabbitMQ的两种开发模式。一种认为应该生产者绑定交换机和队列,消费者只管消费队列;一种认为应该消费者绑定交换机和队列,生产者只管往交换机发。
示例代码:
1
2
3
4
5
6
7
8
9
10
11
12
13
14
15
16
17
18
19
20
21
package com.kakawanyifan.rabbitmq.config;import org.springframework.amqp.core.ExchangeTypes;import org.springframework.amqp.core.Message;import org.springframework.amqp.rabbit.annotation.Exchange;import org.springframework.amqp.rabbit.annotation.Queue;import org.springframework.amqp.rabbit.annotation.QueueBinding;import org.springframework.amqp.rabbit.annotation.RabbitListener;import org.springframework.stereotype.Component;@Component public class Listener @RabbitListener (bindings = @QueueBinding ( value = @Queue (name = "direct.queue" ), exchange = @Exchange (name = "kaka.direct" , type = ExchangeTypes.DIRECT), key = {"red" , "blue" } )) public void onMessage (Message message) System.out.println(message); } }
消息转换器
测试默认转换器
我们试着发一个HashMap类型的对象,示例代码:
1
2
3
4
5
6
7
8
9
10
11
12
13
14
15
16
17
18
19
20
21
22
23
24
25
26
27
28
29
30
31
package com.kakawanyifan;import com.kakawanyifan.rabbitmq.config.Config;import org.junit.Test;import org.junit.runner.RunWith;import org.springframework.amqp.rabbit.core.RabbitTemplate;import org.springframework.beans.factory.annotation.Autowired;import org.springframework.boot.test.context.SpringBootTest;import org.springframework.test.context.junit4.SpringRunner;import java.util.HashMap;import java.util.Map;@SpringBootTest @RunWith (SpringRunner.class ) public class Producers @Autowired private RabbitTemplate rabbitTemplate; @Test public void testSend () Map<String,Object> msg = new HashMap<>(); msg.put("name" , "姓名" ); msg.put("age" , 21 ); rabbitTemplate.convertAndSend(Config.EXCHANGE_NAME,"boot.haha" ,msg); } }
发送消息后查看控制台:
可以看到消息格式可读性不高,而且体积偏大。
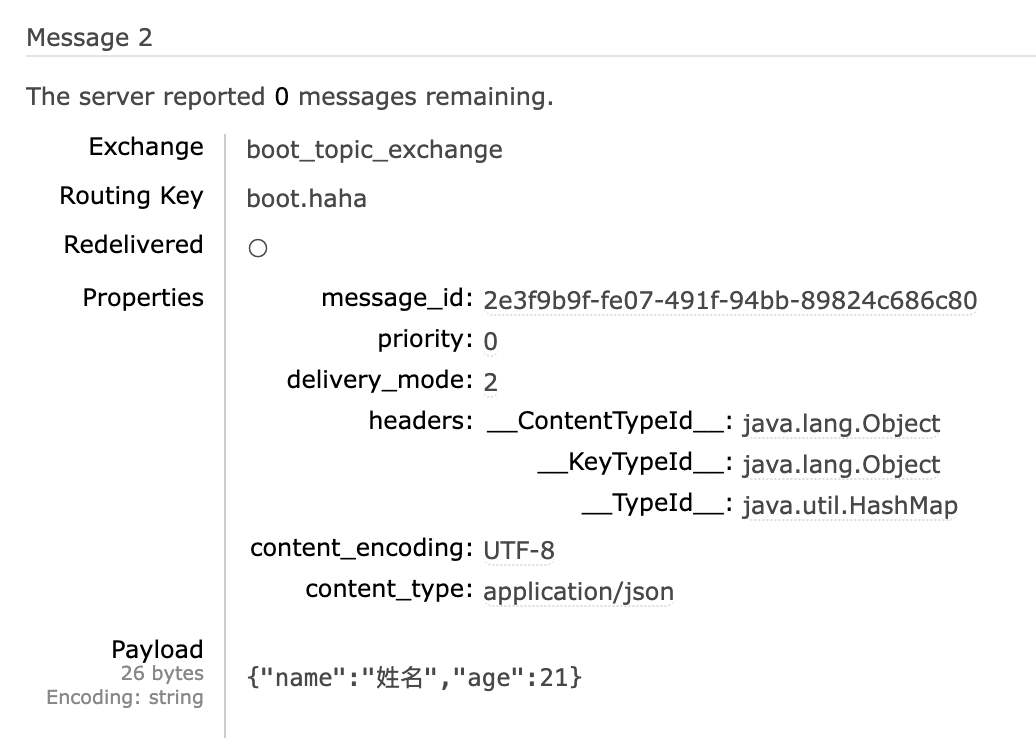
配置JSON转换器
我们考虑用JSON方式来做序列化和反序列化。
引入依赖:
1 2 3 4 5 <dependency > <groupId > com.fasterxml.jackson.dataformat</groupId > <artifactId > jackson-dataformat-xml</artifactId > <version > 2.9.10</version > </dependency >
注意,如果项目中引入了spring-boot-starter-web依赖,则无需再次引入Jackson依赖。
配置消息转换器,在SpringBoot项目的启动类中添加一个BeanmessageConverter。
示例代码:
1
2
3
4
5
6
7
8
9
10
11
12
13
14
15
16
17
18
19
20
21
22
23
24
package com.kakawanyifan;import org.springframework.amqp.support.converter.Jackson2JsonMessageConverter;import org.springframework.amqp.support.converter.MessageConverter;import org.springframework.boot.SpringApplication;import org.springframework.boot.autoconfigure.SpringBootApplication;import org.springframework.context.annotation.Bean;@SpringBootApplication public class Application public static void main (String[] args) SpringApplication.run(Application.class , args ) ; } @Bean public MessageConverter messageConverter () Jackson2JsonMessageConverter jackson2JsonMessageConverter = new Jackson2JsonMessageConverter(); jackson2JsonMessageConverter.setCreateMessageIds(true ); return jackson2JsonMessageConverter; } }
解释说明:消息转换器中添加的messageId可以便于我们将来做幂等性判断。
再发一次,然后在控制台可以看到已经是JSON格式的了。
消费者接收
因为生产者是用Map发送的,所以消费者也要用Map接收。
示例代码:
1
2
3
4
5
6
7
8
9
10
11
12
13
14
15
package com.kakawanyifan.rabbitmq;import org.springframework.amqp.rabbit.annotation.RabbitListener;import org.springframework.stereotype.Component;import java.util.Map;@Component public class Listener @RabbitListener (queues = "boot_queue_exchanage" ) public void onMessage (Map<String, Object> message) System.out.println(message); } }
运行结果:
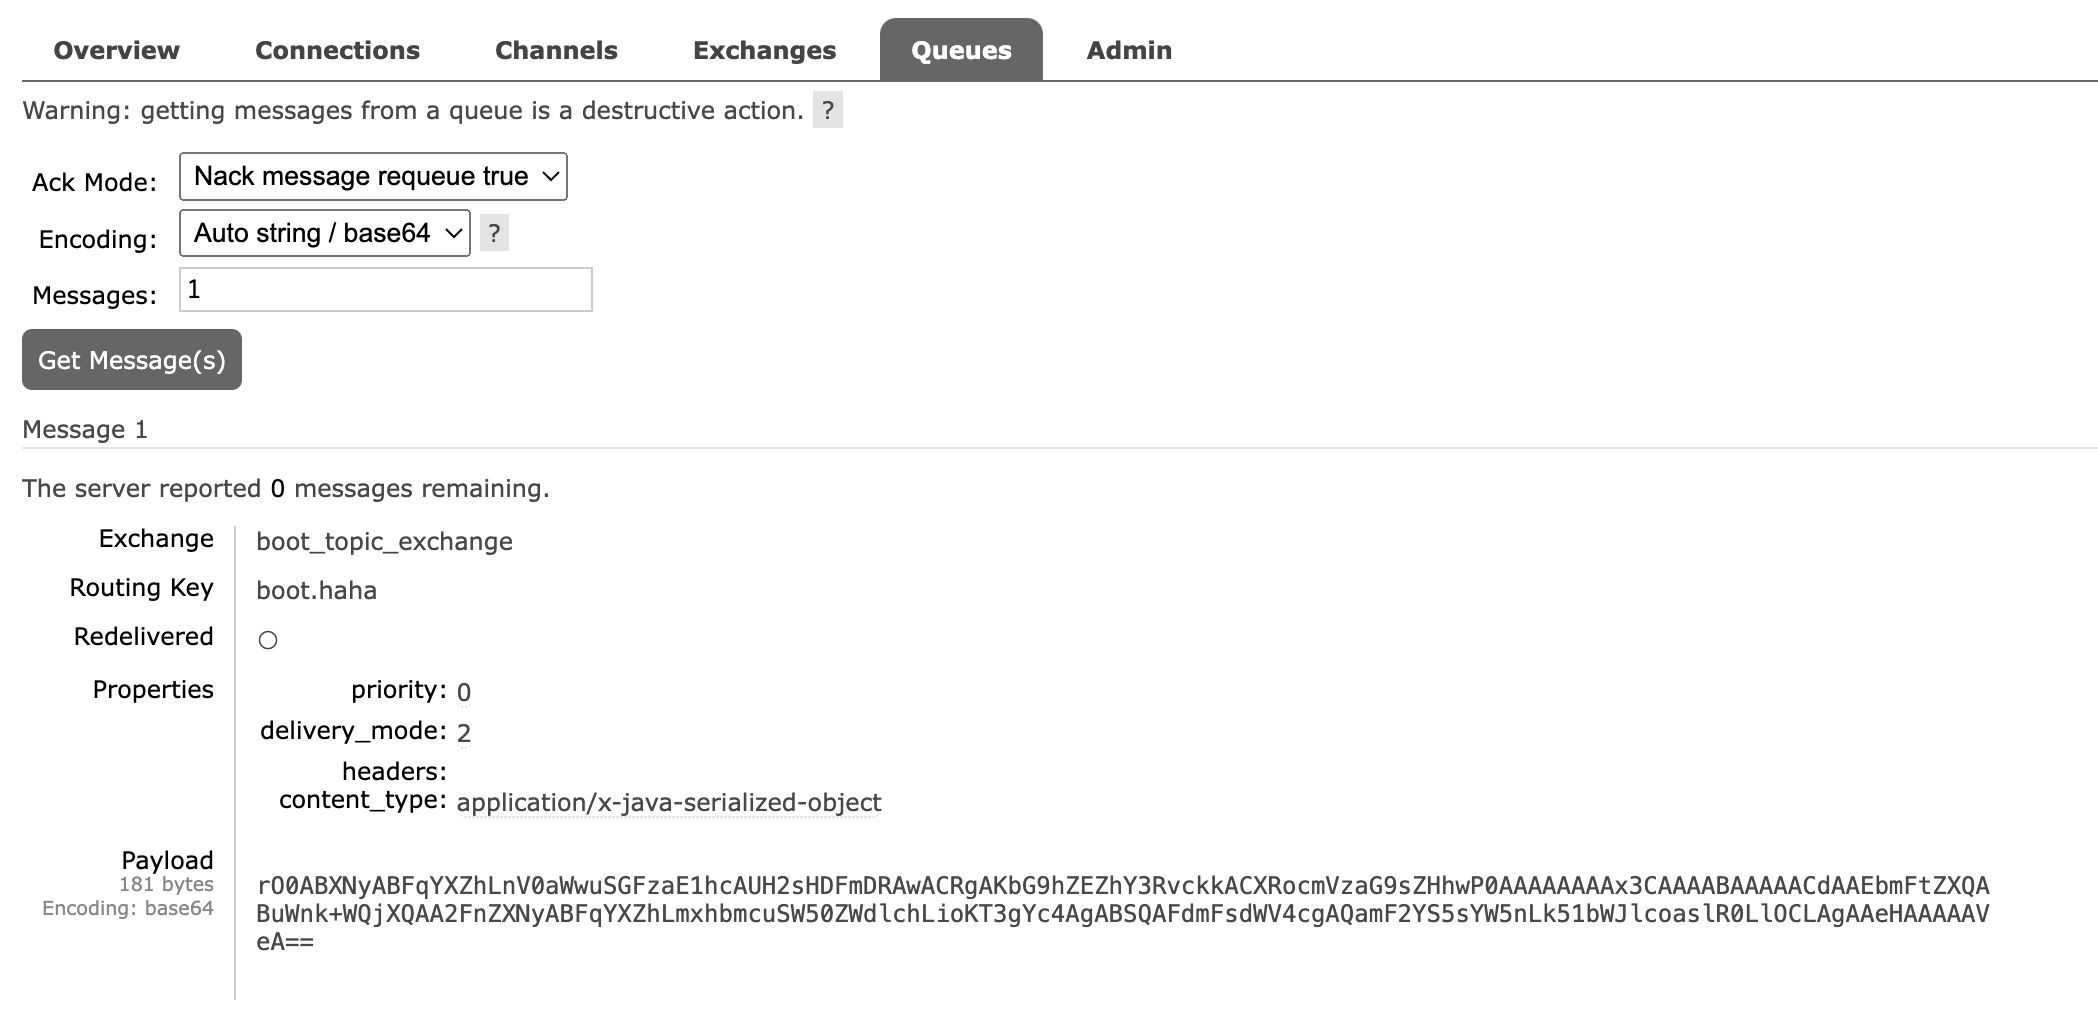
1
2
3
4
5
6
7
8
9
10
11
12
13
14
15
16
2024-07-02 09:56:20.905 WARN 6268 --- [ntContainer#0-1] o.s.a.s.c.Jackson2JsonMessageConverter : Could not convert incoming message with content-type [application/x-java-serialized-object], 'json' keyword missing. org.springframework.amqp.rabbit.support.ListenerExecutionFailedException: Listener method could not be invoked with the incoming message Endpoint handler details: Method [public void com.kakawanyifan.rabbitmq.Listener.onMessage(java.util.Map<java.lang.String, java.lang.Object>)] Bean [com.kakawanyifan.rabbitmq.Listener@6cc90643] 【部分代码略】 Caused by: org.springframework.messaging.converter.MessageConversionException: Cannot convert from [[B] to [java.util.Map] for GenericMessage [payload=byte[181], headers={amqp_receivedDeliveryMode=PERSISTENT, amqp_receivedRoutingKey=boot.haha, amqp_receivedExchange=boot_topic_exchange, amqp_deliveryTag=1, amqp_consumerQueue=boot_queue_exchange, amqp_redelivered=true, id=4adba810-2df1-9ca0-bb42-4c8624da36ee, amqp_consumerTag=amq.ctag-GsyQ7YD7OqJF-3fumdicdA, amqp_lastInBatch=false, contentType=application/x-java-serialized-object, timestamp=1719885380907}] 【部分代码略】 2024-07-02 09:56:20.912 WARN 6268 --- [ntContainer#0-1] ingErrorHandler$DefaultExceptionStrategy : Fatal message conversion error; message rejected; it will be dropped or routed to a dead letter exchange, if so configured: (Body:'[serialized object]' MessageProperties [headers={}, contentType=application/x-java-serialized-object, contentLength=0, receivedDeliveryMode=PERSISTENT, priority=0, redelivered=true, receivedExchange=boot_topic_exchange, receivedRoutingKey=boot.haha, deliveryTag=1, consumerTag=amq.ctag-GsyQ7YD7OqJF-3fumdicdA, consumerQueue=boot_queue_exchange]) {name=姓名, age=21}
我们看到,对于第一个消息,处理失败了。
但是,在控制台显示,两个消息都被处理了。
关于这个问题,我们会在下一章《RabbitMQ-2.可靠性》 进行讨论。