nginx,和我们在《基于Java的后端开发入门:13.Servlet、Filter和Listener》讨论的Tomcat一样,都是Web服务器。
这不是我们第一次讨论nginx。
在《未分类【计算机】:一种基于nginx的反向代理策略》和《基于Java的后端开发入门:24.RuoYi(若依)快速上手》,我们都有提到nginx。
这一系列的文章,我们会更系统的讨论nginx。
安装
安装nginx有两种方法:
- YUM安装
- 源码安装
我们分别讨论。
YUM安装
YUM安装的步骤如下:
- 安装
yum-utils,示例代码:1
yum install -y yum-utils
- 添加YUM源文件,示例代码:内容如下:
1
vim /etc/yum.repos.d/nginx.repo
1
2
3
4
5
6
7
8
9
10
11
12
13
14
15
[nginx-stable]
name=nginx stable repo
baseurl=http://nginx.org/packages/centos/$releasever/$basearch/
gpgcheck=1
enabled=1
gpgkey=https://nginx.org/keys/nginx_signing.key
module_hotfixes=true
[nginx-mainline]
name=nginx mainline repo
baseurl=http://nginx.org/packages/mainline/centos/$releasever/$basearch/
gpgcheck=1
enabled=0
gpgkey=https://nginx.org/keys/nginx_signing.key
module_hotfixes=true - 检查是否添加成功,示例代码:运行结果:
1
yum list | grep nginx
1
2
3
4
5
6
7
8
9
10
11
12
13
14
15
16
nginx.x86_64 1:1.22.0-1.el7.ngx @nginx-stable
nginx-debug.x86_64 1:1.8.0-1.el7.ngx nginx-stable
nginx-debuginfo.x86_64 1:1.22.0-1.el7.ngx nginx-stable
nginx-module-geoip.x86_64 1:1.22.0-1.el7.ngx nginx-stable
nginx-module-geoip-debuginfo.x86_64 1:1.22.0-1.el7.ngx nginx-stable
nginx-module-image-filter.x86_64 1:1.22.0-1.el7.ngx nginx-stable
nginx-module-image-filter-debuginfo.x86_64
1:1.22.0-1.el7.ngx nginx-stable
nginx-module-njs.x86_64 1:1.22.0+0.7.6-1.el7.ngx nginx-stable
nginx-module-njs-debuginfo.x86_64 1:1.22.0+0.7.6-1.el7.ngx nginx-stable
nginx-module-perl.x86_64 1:1.22.0-1.el7.ngx nginx-stable
nginx-module-perl-debuginfo.x86_64 1:1.22.0-1.el7.ngx nginx-stable
nginx-module-xslt.x86_64 1:1.22.0-1.el7.ngx nginx-stable
nginx-module-xslt-debuginfo.x86_64 1:1.22.0-1.el7.ngx nginx-stable
nginx-nr-agent.noarch 2.0.0-12.el7.ngx nginx-stable
pcp-pmda-nginx.x86_64 4.3.2-13.el7_9 updates - 使用YUM进行安装,示例代码:
1
yum install -y nginx
- 查看nginx的安装位置,示例代码:运行结果:
1
whereis nginx
1
nginx: /usr/sbin/nginx /usr/lib64/nginx /etc/nginx /usr/share/nginx /usr/share/man/man8/nginx.8.gz
- 使用
nginx -V,检查是否安装成功。示例代码:运行结果:1
nginx -V
1
2
3
4
5
nginx version: nginx/1.22.0
built by gcc 4.8.5 20150623 (Red Hat 4.8.5-44) (GCC)
built with OpenSSL 1.0.2k-fips 26 Jan 2017
TLS SNI support enabled
configure arguments: --prefix=/etc/nginx --sbin-path=/usr/sbin/nginx --modules-path=/usr/lib64/nginx/modules --conf-path=/etc/nginx/nginx.conf --error-log-path=/var/log/nginx/error.log --http-log-path=/var/log/nginx/access.log --pid-path=/var/run/nginx.pid --lock-path=/var/run/nginx.lock --http-client-body-temp-path=/var/cache/nginx/client_temp --http-proxy-temp-path=/var/cache/nginx/proxy_temp --http-fastcgi-temp-path=/var/cache/nginx/fastcgi_temp --http-uwsgi-temp-path=/var/cache/nginx/uwsgi_temp --http-scgi-temp-path=/var/cache/nginx/scgi_temp --user=nginx --group=nginx --with-compat --with-file-aio --with-threads --with-http_addition_module --with-http_auth_request_module --with-http_dav_module --with-http_flv_module --with-http_gunzip_module --with-http_gzip_static_module --with-http_mp4_module --with-http_random_index_module --with-http_realip_module --with-http_secure_link_module --with-http_slice_module --with-http_ssl_module --with-http_stub_status_module --with-http_sub_module --with-http_v2_module --with-mail --with-mail_ssl_module --with-stream --with-stream_realip_module --with-stream_ssl_module --with-stream_ssl_preread_module --with-cc-opt='-O2 -g -pipe -Wall -Wp,-D_FORTIFY_SOURCE=2 -fexceptions -fstack-protector-strong --param=ssp-buffer-size=4 -grecord-gcc-switches -m64 -mtune=generic -fPIC' --with-ld-opt='-Wl,-z,relro -Wl,-z,now -pie'
源码安装
准备工作
通过源码进行安装的话,需要在安装之前,自行安装如下内容:
- GCC
- PCRE
- zlib
- OpenSSL
获取源码
访问:https://nginx.org/en/download.html
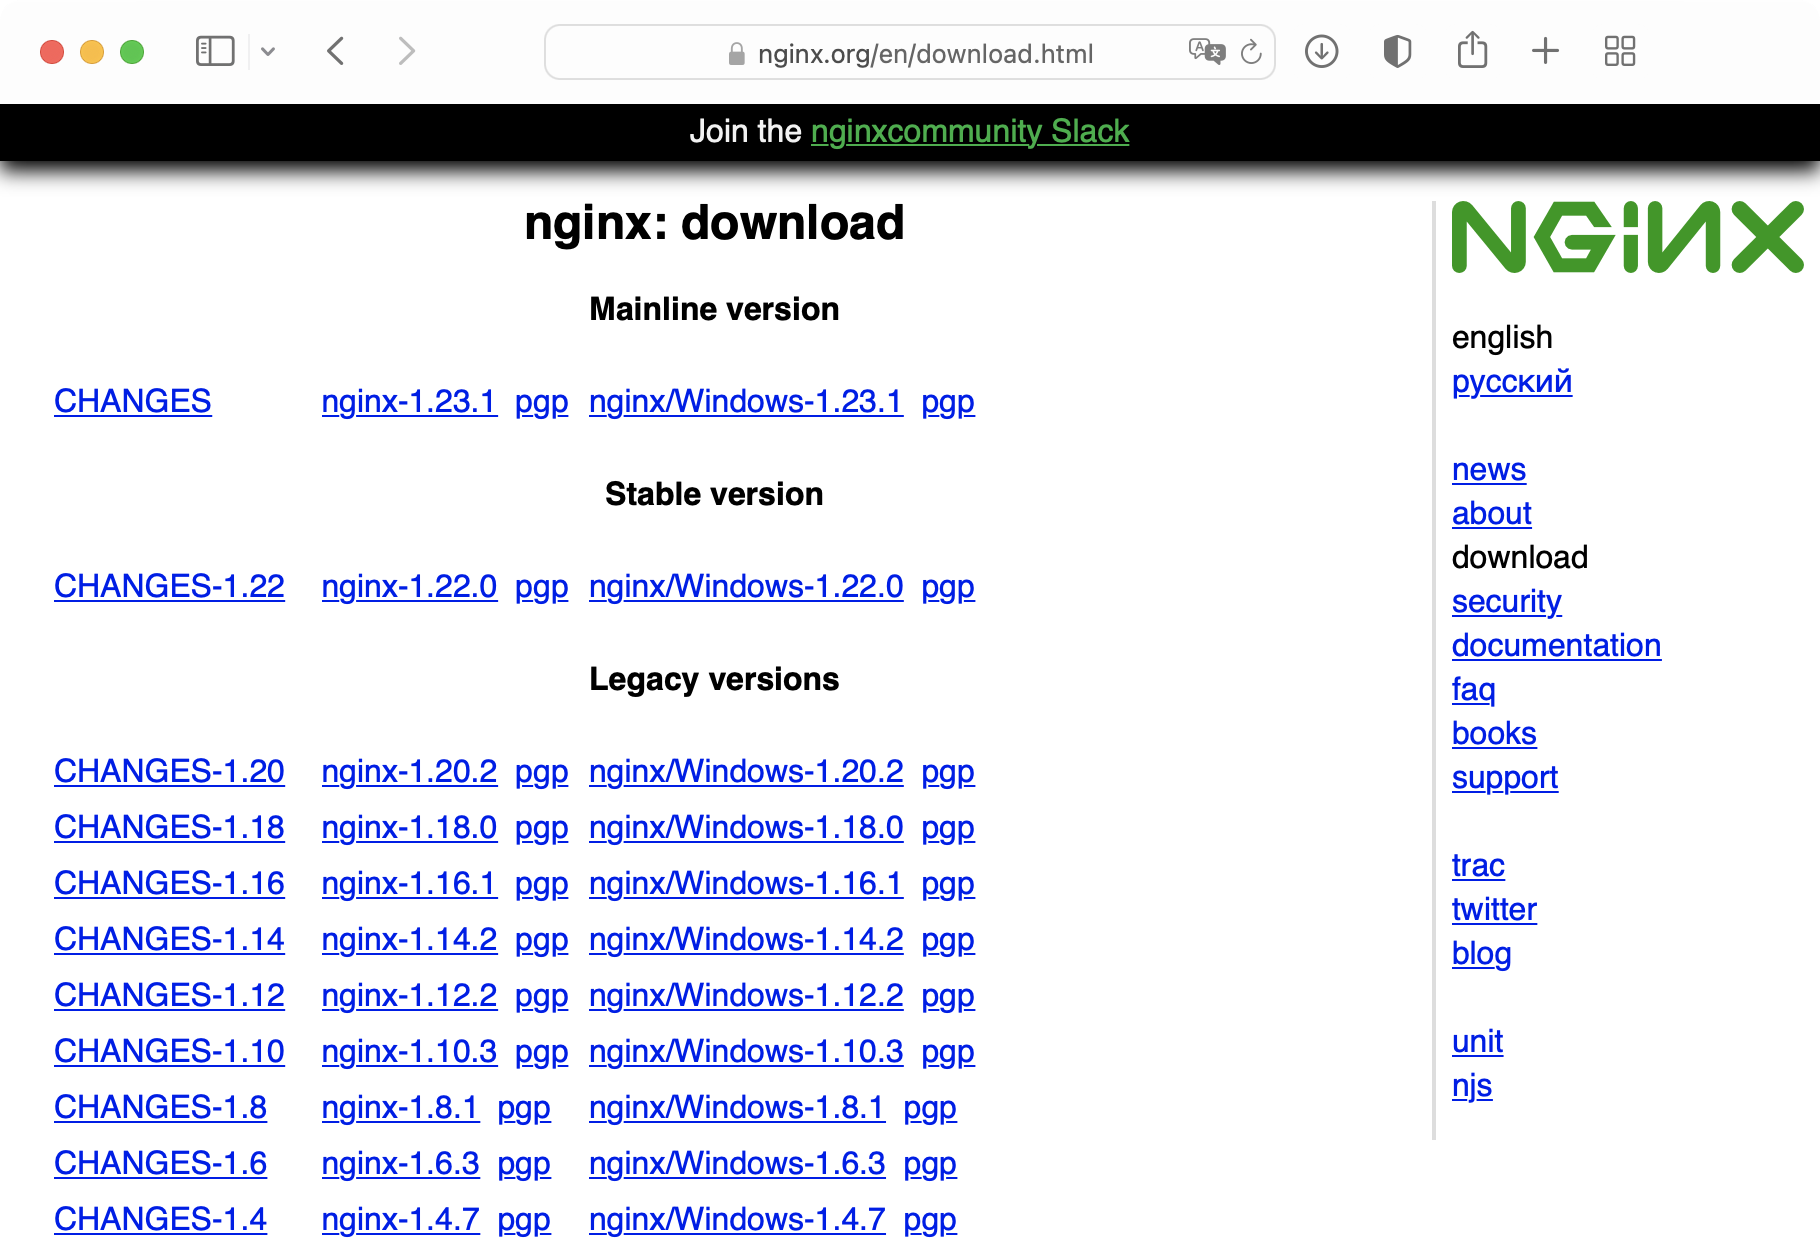
版本:
Mainline version:主线版本,如果我们会对nginx做二次开发或前沿的研究,可以考虑这个版本。Stable version:稳定版本,如果只是使用nginx,一般采用这个版本。Legacy versions:历史版本。
内容:
CHANGES-1.22:变更日志。nginx-1.22.0:Linux版本的下载链接。nginx/Windows-1.22.0:Windows版本的下载链接。pgp:文件签名信息。
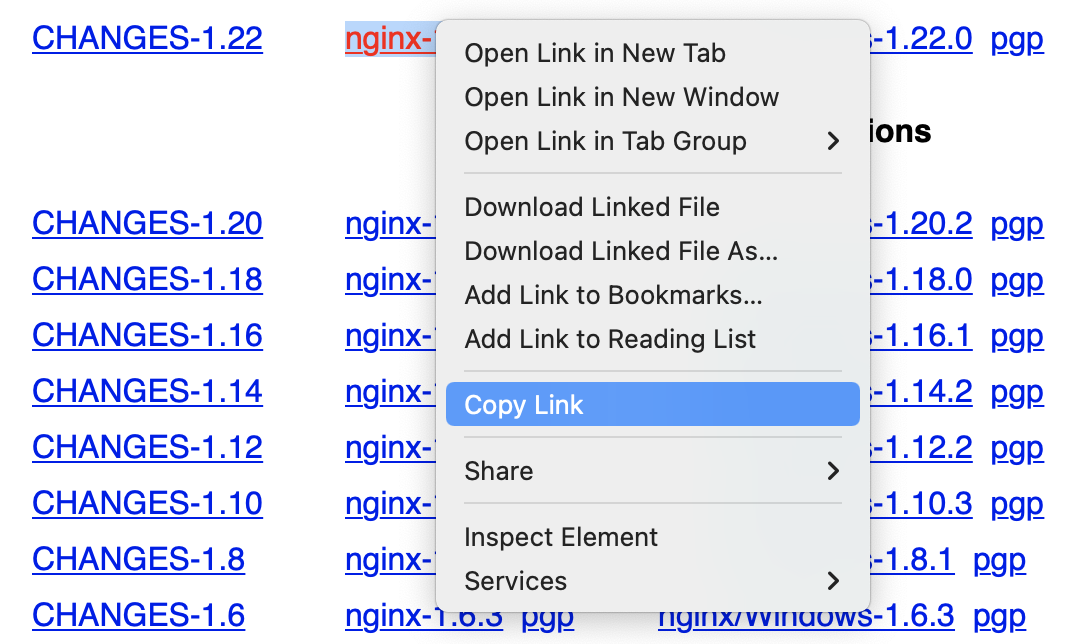
如图所示,我们复制下载链接。内容如下:
1 | https://nginx.org/download/nginx-1.22.0.tar.gz |
在Linux机器上获取,示例代码:
1 | wget https://nginx.org/download/nginx-1.22.0.tar.gz |
解压
解压步骤如下:
- 对下载的资源进行包管理,示例代码:
1
2mkdir -p nginx/core
mv nginx-1.22.0.tar.gz nginx/core - 解压缩,示例代码:
1
2cd nginx/core/
tar -xzf nginx-1.22.0.tar.gz
特别的,我们可以看看nginx-1.22.0的内容,示例代码:
1 | ll nginx-1.22.0 |
运行结果:
1 | total 832 |
目录说明:
auto:存放编译相关的脚本。CHANGES:版本变更记录。CHANGES.ru:俄文版的变更记录。conf:nginx默认的配置文件。configure:nginx的自动脚本程序。contrib:存放特殊的脚本文件,在README中对这部分脚本的说明。html:存放nginx自带的两个html页面(首页和错误页面)。LICENSE:许可证的相关描述文件。man:nginx的man手册。README:nginx的阅读指南。src:源码。
编译安装
- 执行
nginx-1.22.0目录下的./configure,示例代码:1
./configure
- 编译,示例代码:
1
make
- 安装,示例代码:
1
make install
nginx会被安装在/usr/local/nginx目录下。
我们可以通过nginx -V检查是否安装成功,示例代码:
1 | /usr/local/nginx/sbin/nginx -V |
运行结果:
1 | nginx version: nginx/1.22.0 |
解释说明:和上文我们通过YUM安装时,nginx -V所打印的内容不一样,主要在于configure arguments部分,因为通过YUM进行安装,涉及到的配置更多。
个人推荐采取源码安装的方式。
目录结构
安装完成后的目录结构如下:
1 | nginx/ |
目录说明:
conf:nginx所有配置文件目录,这个目录下的文件很多,重点需要关注:nginx.conf,这个是nginx的核心配置文件。nginx.conf.default:nginx.conf的备份文件mime.types:记录的是HTTP协议中的Content-Type的值和文件后缀名的对应关系mime.types.default:mime.types的备份文件
html:存放nginx自带的两个静态的html页面50x.html:访问失败后的失败页面index.html:成功访问的默认首页
logs:存放日志,access.log:访问日志error.log:错误日志nginx.pid:nginx进程的PID
sbin:存放执行程序文件nginx
MacOS安装
安装命令
在MacOS上,是通过brew安装nginx,安装命令如下:
1 | brew install nginx |
在安装之前,最好先更新一下brew,命令如下:
1 | brew update |
查看
示例代码:
1 | brew info nginx |
运行结果:
1 | ==> nginx: stable 1.27.0 (bottled), HEAD |
解释说明:
- nginx安装目录:
1
/usr/local/Cellar/nginx/1.27.0 (27 files, 2.4MB) *
- 根目录:
1
Docroot is: /usr/local/var/www
- 配置文件及默认端口:
1
The default port has been set in /usr/local/etc/nginx/nginx.conf to 8080 so that
常用brew命令
- 启动:
brew services start nginx - 停止:
brew services stop nginx
其他的一些nginx命令,和Linux一样的。例如,重新加载配置文件:nginx -s reload。
基础操作
操作nginx有两种方式:
- 通过信号操作
- 通过nginx的命令操作
通过信号操作
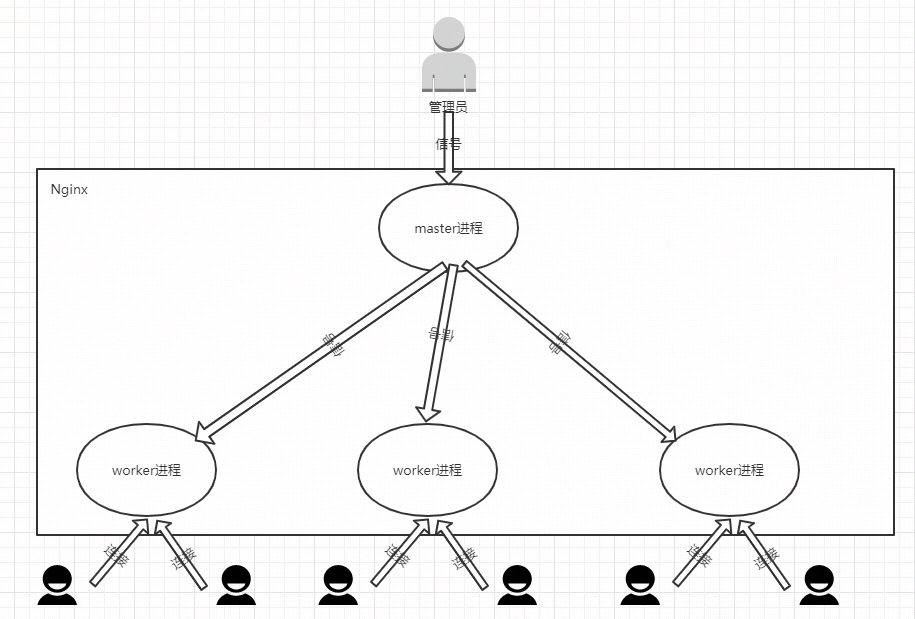
进程模型
在讨论通过信号操作nginx之前,我们先讨论一下nginx的进程模型。
通过nginx命令启动nginx,查看相关进程。示例代码:
1 | nginx |
运行结果:
1 | root 11105 1 0 11:04 ? 00:00:00 nginx: master process ./sbin/nginx |
解释说明
- nginx后台进程中包含一个master进程和多个worker进程。
- master进程主要用来管理worker进程。
master进程接收外界的信号,并将信号发送给各个worker进程,监控worker进程的状态,当worker进程出现异常退出后,会自动重新启动新的worker进程。 - worker进程负责处理用户的请求,各个worker进程之间是平等且相互独立的,处理请求的机会也是一样的。
这就是nginx的进程模型,我们可以通过下图来说明:
信号
现在,我们作为管理员,只需要通过给master进程发送信号就可以控制nginx,但我们需要知道两件事情:
- 怎么发送信号?
发送信号的方法为kill -signal PID。signal信号,PID进程的ID。 - 发送信号给谁?
当然是发送信号给master进程,但更具体呢?"电话号码"多少?通过ps -ef | grep nginx即可获取 - 信号内容是啥?
内容 作用 TERM
INT立即关闭整个服务 QUIT"优雅"地关闭整个服务(worker处理完成请求之后) HUP重读配置文件并使用服务对新配置项生效 USR1开启新的日志文件,可以用来进行日志切割 USR2再开启一个master进程 WINCH所有子进程不在接收处理新连接,相当于给work进程发送QUIT指令
举例:
- 发送
TERM信号给master进程,将nginx服务关闭。
示例代码:运行结果:1
2kill -TERM 27622
ps -ef|grep nginx解释说明:nginx进程已经被关闭。1
root 30493 27583 0 20:43 pts/0 00:00:00 grep --color=auto nginx
- 发送
QUIT信号给master进程,master进程会控制所有的work进程不再接收新的请求,等所有请求处理完后,再把进程都关闭掉。即以一种"优雅"的方式关闭。
示例代码:1
kill -QUIT master进程的ID
- 发送
HUP信号给master进程,master进程会把控制旧的work进程不再接收新的请求,在处理完请求后将旧的work进程关闭掉,然后根据nginx的配置文件重新启动新的work进程,从而完成重新加载配置文件。
示例代码:1
kill -HUP master进程的ID
- 发送
USR1信号给master进程,开启新的日志文件。1
kill -USR1 master进程的ID
- 发送
USR2信号给master进程,再开启一个master进程,常用于nginx的平滑升级,关于如何对nginx进行平滑升级,我们暂时不讨论。
示例代码:1
kill -USR2 master进程的ID
- 发送
WINCH信号给master进程,master进程会控制不让所有的work进程再接收新的请求,请求处理完后关闭work进程。注意master进程不会被关闭掉。
示例代码:1
kill -WINCH master进程的ID
通过nginx的命令操作
通过nginx安装目录下的sbin目录下的可执行文件nginx,来进行nginx状态的控制。
常用参数:
-?、-h:显示帮助信息-v:打印版本号信息并退出-V:打印版本号信息和配置信息并退出-t:测试nginx的配置文件语法是否正确并退出-T:测试nginx的配置文件语法是否正确并列出用到的配置文件信息然后退出-q:在配置测试期间禁止显示非错误消息-s:signal,信号,后面可以跟:stop,快速关闭,类似于TERM、INT。quit,优雅的关闭,类似于QUIT。reopen,重新开启日志文件,类似于USR1。reload,重新加载配置文件,类似于HUP。
个人推荐通过nginx的命令操作。
配置成系统服务
步骤如下:
- 在
/usr/lib/systemd/system目录下添加新建nginx.service,内容如下:1
2
3
4
5
6
7
8
9
10
11
12
13
14
15
16[Unit]
Description=nginx web service
Documentation=http://nginx.org/en/docs/
After=network.target
[Service]
Type=forking
PIDFile=/usr/local/nginx/logs/nginx.pid
ExecStartPre=/usr/local/nginx/sbin/nginx -t -c /usr/local/nginx/conf/nginx.conf
ExecStart=/usr/local/nginx/sbin/nginx
ExecReload=/usr/local/nginx/sbin/nginx -s reload
ExecStop=/usr/local/nginx/sbin/nginx -s stop
PrivateTmp=true
[Install]
WantedBy=default.target - 设置相应的权限,示例代码:
1
chmod 755 /usr/lib/systemd/system/nginx.service
接下来,我们便可以使用系统命令来操作nginx服务了:
- 启动:
systemctl start nginx - 停止:
systemctl stop nginx - 重启:
systemctl restart nginx - 重新加载配置文件:
systemctl reload nginx - 查看nginx状态:
systemctl status nginx - 开机启动:
systemctl enable nginx
注意!通过命令行启动的nginx,无法以系统服务的方式关闭。
配置到系统环境
步骤如下:
- 修改
/etc/profile文件,在最后一行添加:1
export PATH=$PATH:/usr/local/nginx/sbin
- 刷新,使之立即生效,示例代码:
1
source /etc/profile
我们可以通过nginx -V测试一下。
配置
结构
最主要的配置文件是nginx.conf。
- 如果是通过YUM安装的,默认位于
/etc/nginx/nginx.conf。 - 如果是通过源码安装的,默认位于
/usr/local/nginx/conf/nginx.conf。
两种安装方式的nginx.conf的默认内容会有所不同,但是结构是一样的。
通过源码安装的内容如下:
1 | #user nobody; |
整体结构分为三大块:
- 全局块
nginx服务整体运行的相关配置。格式如下:1
指令名 指令值;
- events块
nginx服务与用户的网络连接的相关配置。格式如下:1
2
3events {
指令名 指令值;
} - http块
nginx作为http服务端的相关配置,包括:代理、缓存、日志记录、第三方模块配置等。格式如下:一个http块中可以配置多个server块,每个server块又可以配置多个location块。1
2
3
4
5
6
7
8
9
10
11http {
指令名 指令值;
server { #server块,是Nginx配置和虚拟主机相关的内容
指令名 指令值;
location / {
#location块,基于Nginx服务器接收请求字符串与location后面的值进行匹配,对特定请求进行处理
指令名 指令值;
}
}
...
}
全局块
全局块的常见指令有:
usermaster_processwork_processpiderror_logincludedaemon
user
user:用于配置运行nginx服务器的worker进程的用户和用户组,注意是worker进程。
语法:
1 | user 用户名 |
如果没有指定用户名,默认会使用nobody用户。
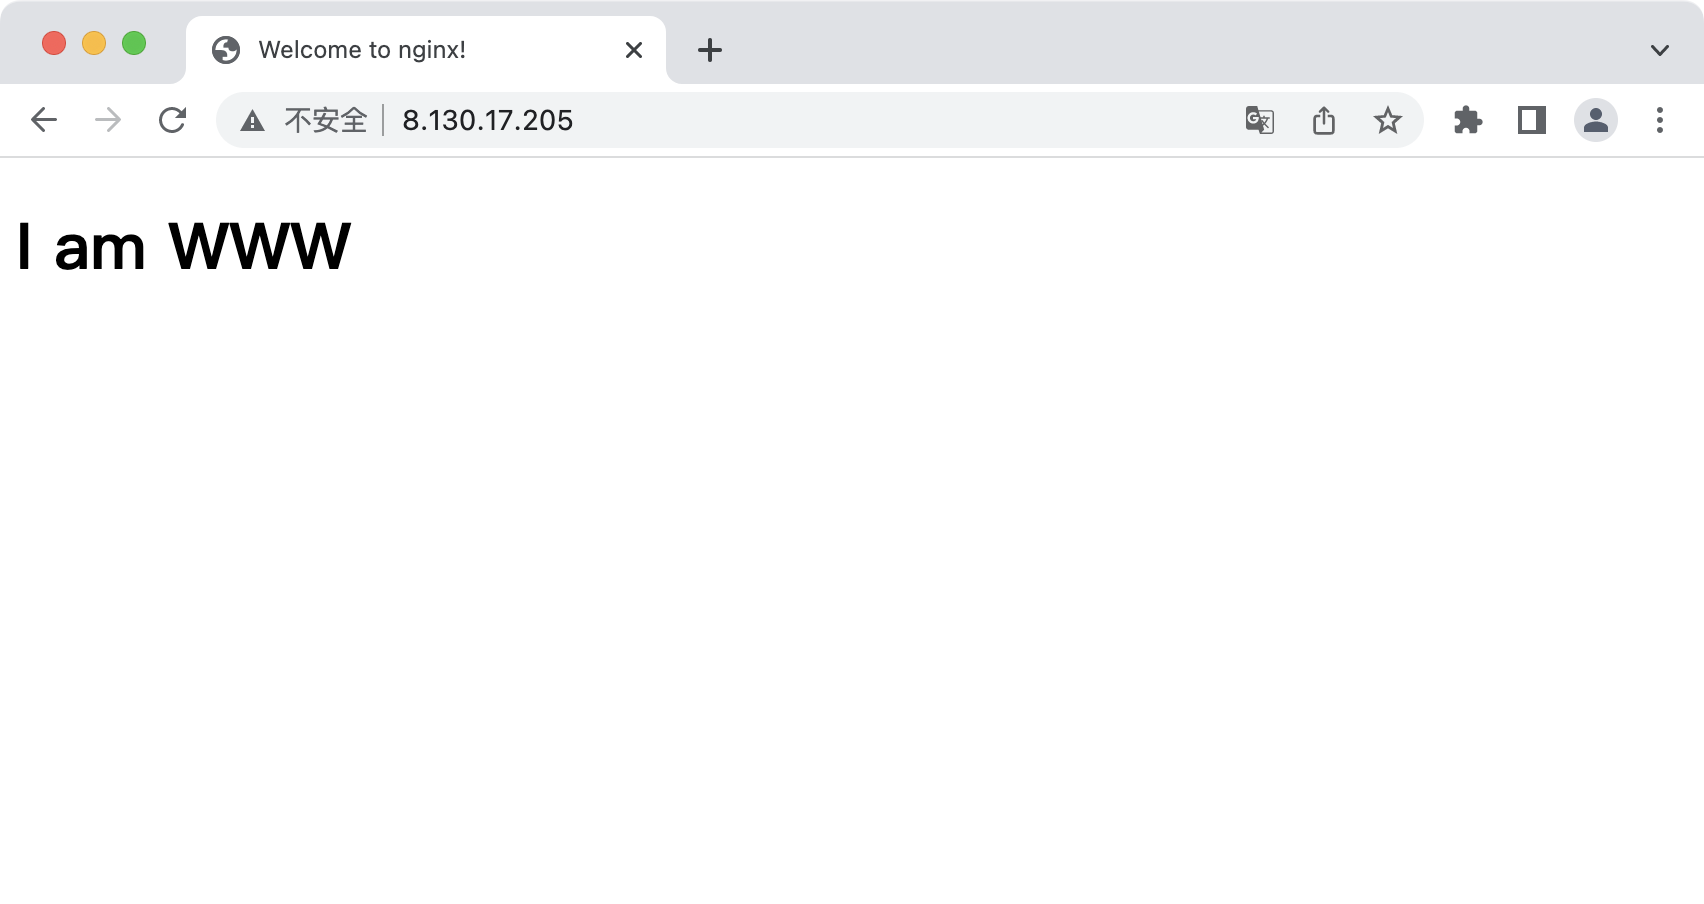
现在,我们就来实验一下
我们通过浏览器访问一下我们的nginx服务器。
这个没有任何问题。
接下来,我们创建文件/root/html/index.html,内容如下:
1 |
|
然后我们修改nginx.conf,让其指向我们创建的文件。
1 | location / { |
再访问一下。
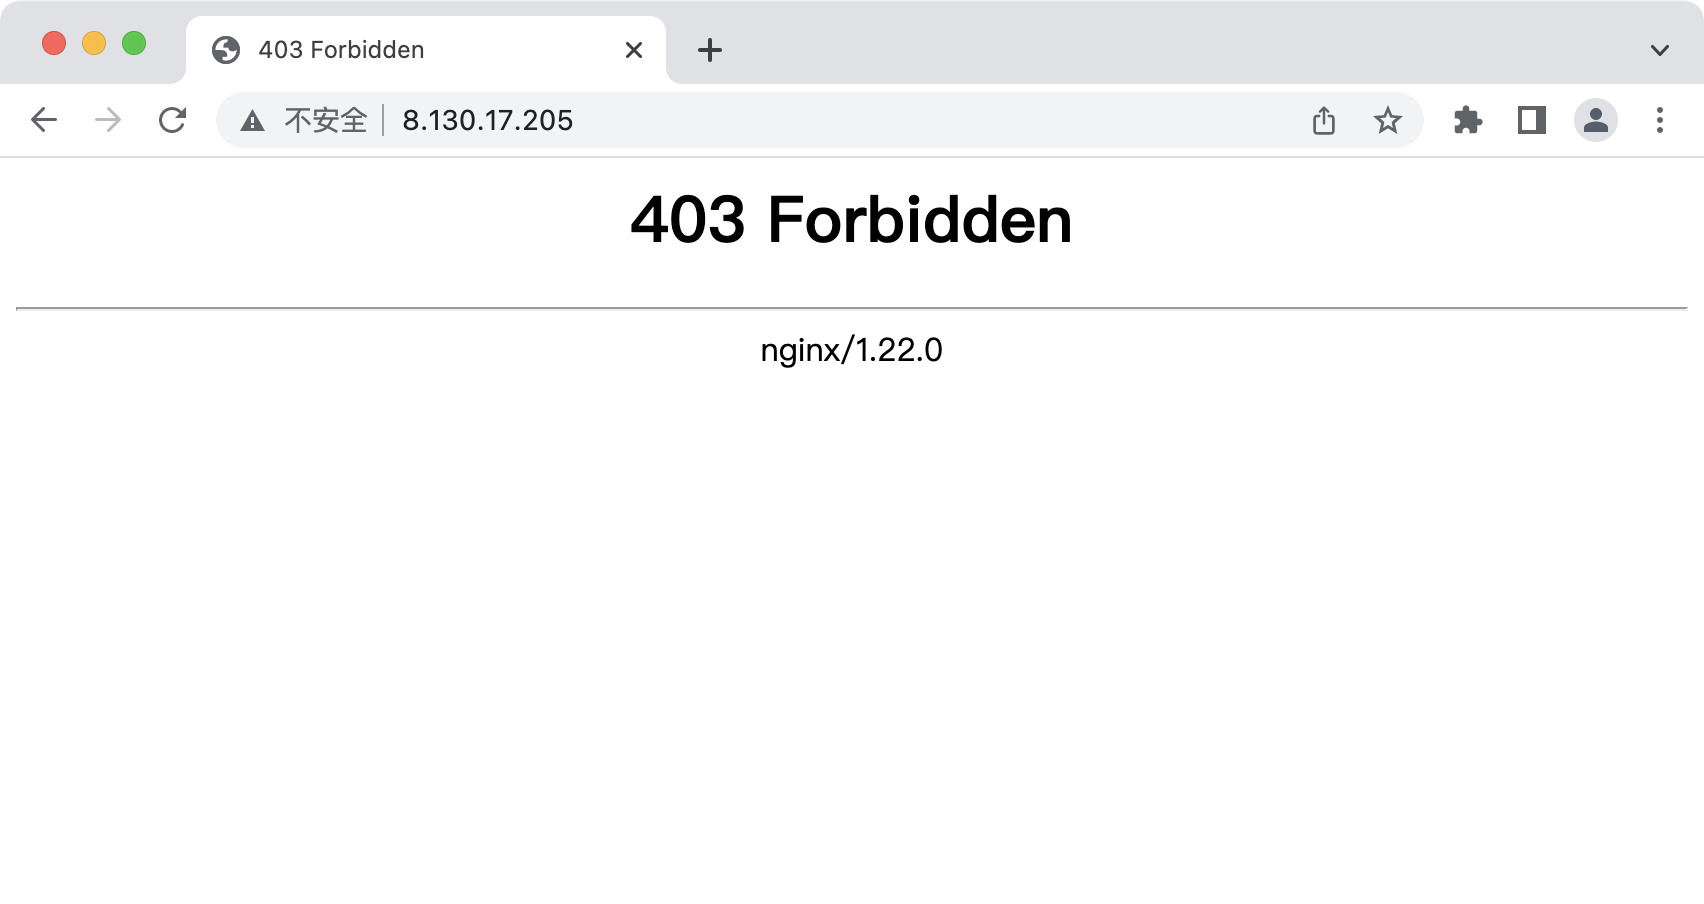
报错了!403,服务器理解客户的请求,但拒绝处理。
原因是当前用户没有访问/root/html目录的权限
如果我们对/root/html/index.html及其各层级目录赋权可以解决,或者,我们可以将文件创建在/home/www/目录下。
master_process
master_process:是否开启主进程。
也资料说该字段的含义是否开启工作进程,这个其实是一样的,开启主进程等同于开启工作进程。
语法:
1 | master_process on 或 off; |
默认:master_process on。
work_process
work_process:配置nginx的工作进程的数量,是nginx实现并发处理服务的关键所在,建议将该值和服务器CPU的内核数保存一致。
语法:
1 | worker_processes 数字 或 auto; |
默认:worker_processes 1。
pid
pid:配置nginx的master进程的进程号存储的文件路径。
语法:
1 | pid 文件路径 |
默认:pid /usr/local/nginx/logs/nginx.pid
error_log
error_log:配置nginx的错误日志存放路径
语法:
1 | error_log 文件路径 日志级别 |
默认:error_log logs/error.log error;
日志级别有:debug调试、info信息、notice通知、warn警告、error错误、crit临界、alert警报、emerg紧急。
建议不要设置成info以下的等级,因为会带来大量的磁盘I/O消耗,影响nginx的性能。
该指令,除了可以位于全局块,还可以位于http、server、location。
include
include:引入其他配置文件。
语法:
1 | include 文件路径; |
该指令没有默认值,可以填写在任意位置。
daemon
daemon:设定nginx是否以守护进程的方式启动(守护式进程是linux后台执行的一种服务进程,特点是独立于控制终端,不会随着终端关闭而停止)。
语法格式:
1 | daemon on 或 off; |
默认值:on
events块
events块的常见指令有:
- accept_mutex
- multi_accept
- worker_connections
- use
accept_mutex
accept_mutex:设置nginx网络连接序列化。
语法:
1 | accept_mutex on 或 off; |
默认:accept_mutex on。
该配置主要用来解决所谓"惊群"问题。
大致意思是在某一个时刻,客户端发来一个请求连接,因为nginx后台是以多进程的工作模式,所以会有多个worker进程会被同时唤醒,但最终又只会有一个进程可以获取到连接。如果每次唤醒的进程数目太多,就会影响nginx的整体性能。将上述值设置为on(开启状态),将会对多个nginx进程接收连接进行序列化,一个个来唤醒接收,就防止了多个进程对连接的争抢。
不过,需要注意的是,并不是说on的性能一定会比off好。如果连接很多,可能off的性能会更好。
multi_accept
multi_accept:设置是否允许同时接收多个网络连接。
语法:
1 | multi_accept on 或 off; |
默认:multi_accept off。
一般建议设置成on,这样一个工作进程可以同时接受多个新连接,效率更高。
worker_connections
worker_connections:用来配置单个worker进程最大的连接数。
语法:
1 | worker_connections 连接数; |
默认:worker_connections 512。
注意:这里的连接数不仅仅包括和前端用户建立的连接数,是所有的连接数;连接数的值不要大于操作系统支持打开的最大文件句柄数量。
use
use:设置nginx服务器选择哪种事件驱动来处理网络消息。
语法:
1 | use 方法; |
方法的可选值有:select、poll、epoll、kqueue。
建议设置成:epoll(该方法要求Linux内核在2.6以上)。
建议配置
综上所述,一般建议的配置如下:
1 | events{ |
http块
http块中的常见指令有:
- default_type
- access.log
- keepalive_timeout
- keepalive_requests
- sendfile
上述5个指令,不仅仅可以出现在http块中,还可以出现在http的子块(server块和location块)中。
default_type
MIME-Type是网络资源的类型。
default_type:用来配置Nginx响应前端请求默认的MIME类型。
语法:
1 | default_type MimeType类型; |
位置:http块、server块、location块。
示例代码:
1 | location /get { |
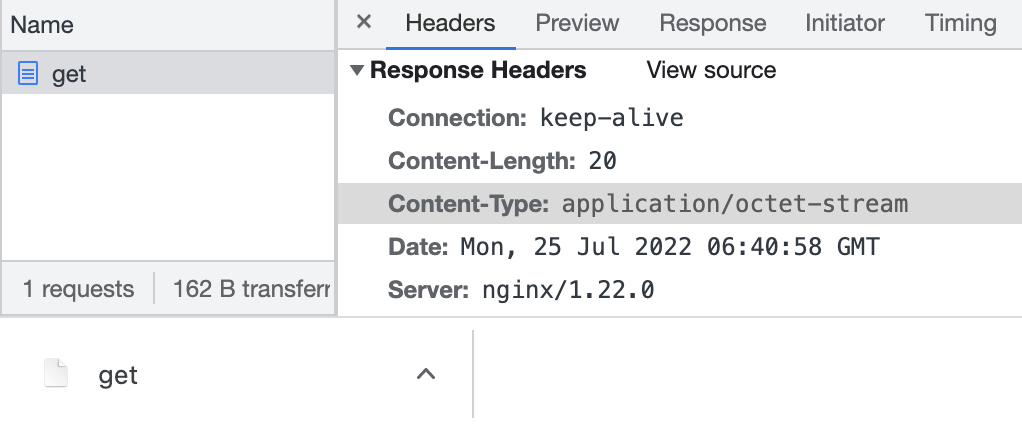
其中第一种方法,会以打开附件的形式,因为以Content-Type: application/octet-stream(二进制流)处理了。
access.log
nginx中日志的类型分为:
access.logerror.log
其中error.log,我们在上文已经讨论过了,这里我们讨论access.log。
语法:
1 | access_log 日志文件路径 [日志格式] 或 off |
off表示不打印日志。默认:access_log logs/access.log combined;。[日志格式],可选,需要和指令log_format配合使用。log_format:- 语法:
log_format 名称 格式。 - 位置:只能位于http模块中。
- 语法:
示例代码:
1 | http { |
我们通过浏览器访问/get_my_log,观察日志,如下:
1 | this is my log format:Mozilla/5.0 (Macintosh; Intel Mac OS X 10_15_7) AppleWebKit/537.36 (KHTML, like Gecko) Chrome/103.0.0.0 Safari/537.36 |
keepalive_timeout
keepalive_timeout:用来设置长连接的超时时间。
语法:
1 | keepalive_timeout 超时时间(单位秒); |
默认:keepalive_timeout 65
keepalive_requests
keepalive_requests:设置一个keep-alive连接使用的次数。
语法:
1 | keepalive_requests 次数; |
默认:keepalive_requests 100;
sendfile
sendfile:设置是否使用sendfile()函数传输文件,该属性可以提高处理静态资源的性能。
语法:
1 | sendfile on 或 off; |
默认:sendfile off;