概述
SpringMVC,Spring技术体系中的一部分。在《13.Servlet、Filter和Listener》 ,我们讨论过Servlet。SpringMVC与Servlet的技术功能等同,均属于Web层(表现层)开发技术。但,SpringMVC与Servlet相比,开发起来更简单快捷,可以用更少的代码完成开发。
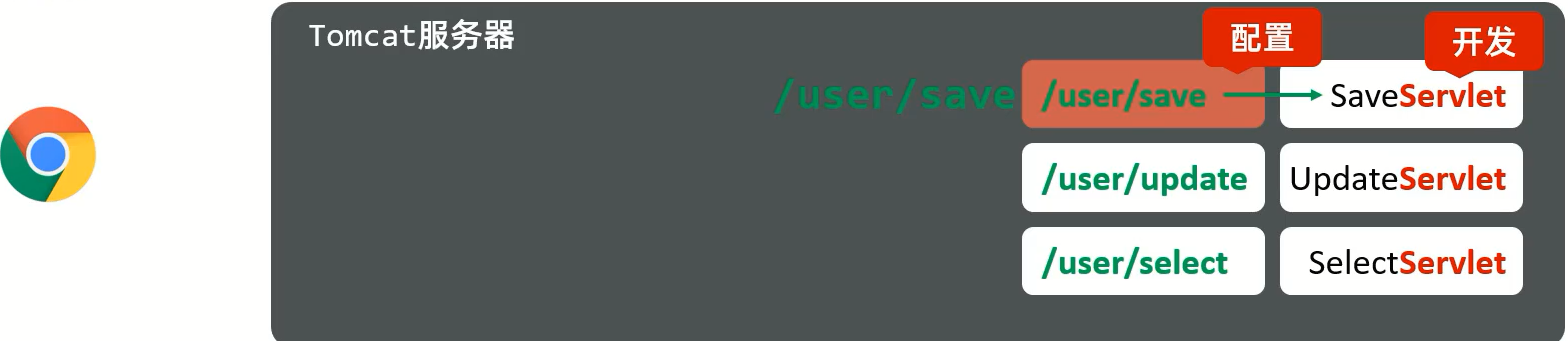
如图,在Servlet模式中,过程如下:
浏览器发送请求到Tomcat服务器
Tomcat服务器接收到请求后,会根据请求路径来匹配对应的Servlet,并将请求交给对应的Servlet来处理。
在SpringMVC模式中,过程如下:
浏览器发送请求到Tomcat服务器。
Tomcat服务器接收到请求后,会根据配置将请求交给SpringMVC中的DispatcherServlet(前端控制器)。
DispatcherServlet不处理请求,只是按照对应的规则将请求分发到对应的Bean对象。
Bean对象是有我们自己编写的,用来处理不同的请求,每个Bean中可以处理一个或多个不同的请求url。
DispatcherServlet和Bean对象都交给Spring容器来进行管理。
也就是说,在SpringMVC的的开发模式中,我们的工作有
Bean对象的编写。
请求url和Bean对象对应关系的配置。
构建Spring容器,将DispatcherServlet和Bean对象交给容器管理。
配置Tomcat服务器,使其能够识别Spring容器,并将请求交给容器中的DispatcherServlet来分发请求。
入门案例
创建Web项目
关于基于Maven创建Web项目,可以参考我们在《13.Servlet、Filter和Listener》 的讨论。
导入对应的jar包
1 2 3 4 5 6 7 8 9 10 11 12 <dependency > <groupId > javax.servlet</groupId > <artifactId > javax.servlet-api</artifactId > <version > 4.0.1</version > <scope > provided</scope > </dependency > <dependency > <groupId > org.springframework</groupId > <artifactId > spring-webmvc</artifactId > <version > 5.3.24</version > </dependency >
关于servlet的坐标为什么需要添加<scope>provided</scope>,我们在《13.Servlet、Filter和Listener》 已经做过讨论。<scope>provided</scope>,表示只在编译和测试过程中有效;这么设置的原因是,Tomcat的lib目录中也有servlet-api这个Jar包,如果在运行时生效,可能会和Tomcat中的Jar包冲突。
控制器类
在创建控制器类中,我们会用到三种注解:
@Controller@RequestMapping@ResponseBody
名称
@Controller
类型
类注解
位置
控制器类
作用
设定SpringMVC的控制器Bean
名称
@RequestMapping
类型
类注解或方法注解
位置
控制器类或方法
作用
设置当前控制器方法请求访问路径
相关属性
value(默认),请求访问路径
名称
@ResponseBody
类型
类注解或方法注解
位置
控制器类或方法
作用
设置当前控制器方法响应内容为当前返回值
示例代码:
1
2
3
4
5
6
7
8
9
10
11
12
13
14
15
package com.kakawanyifan.controller;import org.springframework.stereotype.Controller;import org.springframework.web.bind.annotation.RequestMapping;import org.springframework.web.bind.annotation.ResponseBody;@Controller public class UserController @RequestMapping ("/save" ) @ResponseBody public String save () System.out.println("user save ..." ); return "{\"module\":\"springmvc\"}" ; } }
配置类
示例代码:
1
2
3
4
5
6
7
8
9
package com.kakawanyifan.config;import org.springframework.context.annotation.ComponentScan;import org.springframework.context.annotation.Configuration;@Configuration @ComponentScan ("com.kakawanyifan.controller" )public class SpringMvcConfig }
Tomcat的Servlet容器配置类
示例代码:
1
2
3
4
5
6
7
8
9
10
11
12
13
14
15
16
17
18
19
20
21
22
23
24
25
26
27
28
29
package com.kakawanyifan.config;import org.springframework.web.context.WebApplicationContext;import org.springframework.web.context.support.AnnotationConfigWebApplicationContext;import org.springframework.web.servlet.support.AbstractDispatcherServletInitializer;public class ServletContainersInitConfig extends AbstractDispatcherServletInitializer @Override protected WebApplicationContext createServletApplicationContext () AnnotationConfigWebApplicationContext ctx = new AnnotationConfigWebApplicationContext(); ctx.register(SpringMvcConfig.class ) ; return ctx; } @Override protected String[] getServletMappings() { return new String[]{"/" }; } @Override protected WebApplicationContext createRootApplicationContext () return null ; } }
注意,SpringMVC的容器是AnnotationConfigWebApplicationContext,而不是AnnotationConfigApplicationContext。
ServletContainersInitConfig继承了AbstractDispatcherServletInitializer。AbstractDispatcherServletInitializer是SpringMVC提供的快速初始化Web3.0容器的抽象类,该类提供了三个接口方法供用户实现
createServletApplicationContext()方法WebApplicationContext对象范围中。WebApplicationContext的作用范围为ServletContext范围,即整个web容器范围。
getServletMappings()方法/表示拦截所有请求,任意请求都将转入到SpringMVC进行处理。《13.Servlet、Filter和Listener》 的"访问路径"、"匹配方式"有更多的讨论。)
createRootApplicationContext()方法createRootApplicationContext用来加载Spring环境。
该方法还有一种更简洁的方式,我们继承AbstractAnnotationConfigDispatcherServletInitializer,这样只需要返回配置类。
示例代码:
1
2
3
4
5
6
7
8
9
10
11
12
13
14
15
16
17
18
19
20
package com.kakawanyifan.config;import org.springframework.web.servlet.support.AbstractAnnotationConfigDispatcherServletInitializer;public class ServletContainersInitConfig extends AbstractAnnotationConfigDispatcherServletInitializer @Override protected Class<?>[] getRootConfigClasses() { return new Class[0 ]; } @Override protected Class<?>[] getServletConfigClasses() { return new Class[]{SpringMvcConfig.class } ; } @Override protected String[] getServletMappings() { return new String[]{"/" }; } }
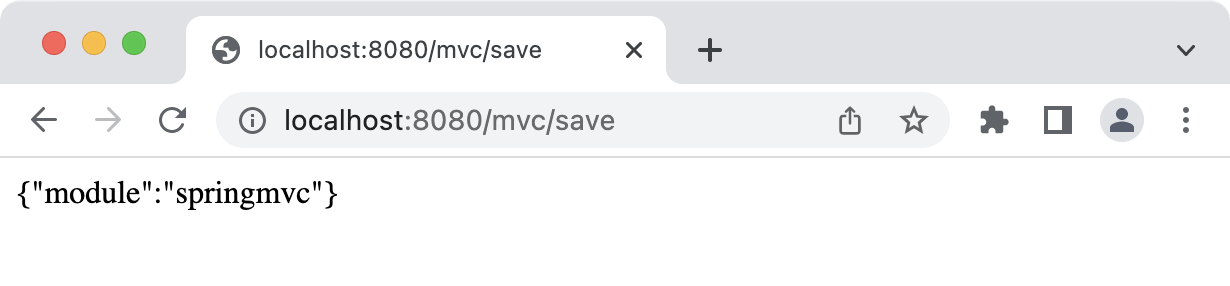
测试
配置Tomcat环境,启动运行项目。http://localhost/save进行访问,可以看得如下内容
(关于如何配置Tomcat环境,可以参考《13.Servlet、Filter和Listener》 的"在IDEA使用Tomcat")
XML方式
配置SpringMVC核心控制器
在web.xml配置SpringMVC核心控制器。
1
2
3
4
5
6
7
8
9
10
11
12
13
14
15
16
17
18
19
20
21
<?xml version="1.0" encoding="UTF-8"?> <web-app xmlns ="http://xmlns.jcp.org/xml/ns/javaee" xmlns:xsi ="http://www.w3.org/2001/XMLSchema-instance" xsi:schemaLocation ="http://xmlns.jcp.org/xml/ns/javaee http://xmlns.jcp.org/xml/ns/javaee/web-app_4_0.xsd" version ="4.0" > <servlet > <servlet-name > DispatcherServlet</servlet-name > <servlet-class > org.springframework.web.servlet.DispatcherServlet</servlet-class > <init-param > <param-name > contextConfigLocation</param-name > <param-value > classpath:spring-mvc.xml</param-value > </init-param > <load-on-startup > 1</load-on-startup > </servlet > <servlet-mapping > <servlet-name > DispatcherServlet</servlet-name > <url-pattern > /</url-pattern > </servlet-mapping > </web-app >
创建spring-mvc.xml
创建spring-mvc.xml,位于src/main/resources目录下。
需要添加context相关。
xmlns:context="http://www.springframework.org/schema/context"http://www.springframework.org/schema/contexthttp://www.springframework.org/schema/context/spring-context.xsd
mvc相关的,在这个例子中,我们暂时还用不上,但也可以加上。
xmlns:mvc="http://www.springframework.org/schema/mvc"http://www.springframework.org/schema/mvchttp://www.springframework.org/schema/mvc/spring-mvc.xsd
spring-mvc.xml:
1
2
3
4
5
6
7
8
9
10
11
12
13
14
15
16
17
18
<?xml version="1.0" encoding="UTF-8"?> <beans xmlns ="http://www.springframework.org/schema/beans" xmlns:xsi ="http://www.w3.org/2001/XMLSchema-instance" xmlns:mvc ="http://www.springframework.org/schema/mvc" xmlns:context ="http://www.springframework.org/schema/context" xsi:schemaLocation ="http://www.springframework.org/schema/beans http://www.springframework.org/schema/beans/spring-beans.xsd http://www.springframework.org/schema/mvc http://www.springframework.org/schema/mvc/spring-mvc.xsd http://www.springframework.org/schema/context http://www.springframework.org/schema/context/spring-context.xsd" > <context:component-scan base-package ="com.kakawanyifan" /> <mvc:annotation-driven /> </beans >
工作过程
初始化过程
服务器启动,执行ServletContainersInitConfig类,初始化web容器。
执行createServletApplicationContext方法WebApplicationContext对象。1 2 3 4 5 6 7 8 @Override protected WebApplicationContext createServletApplicationContext () AnnotationConfigWebApplicationContext ctx = new AnnotationConfigWebApplicationContext(); ctx.register(SpringMvcConfig.class ) ; return ctx; }
加载SpringMvcConfig配置类,执行@ComponentScan,扫描。1 2 3 4 5 6 7 8 9 package com.kakawanyifan.config;import org.springframework.context.annotation.ComponentScan;import org.springframework.context.annotation.Configuration;@Configuration @ComponentScan ("com.kakawanyifan.controller" )public class SpringMvcConfig }
加载被扫描到的Bean。例如,UserController。@RequestMapping的名称对应一个具体的方法,此时就建立了/save和save方法的对应关系。1 2 3 4 5 6 7 8 9 10 11 12 13 14 15 package com.kakawanyifan.controller;import org.springframework.stereotype.Controller;import org.springframework.web.bind.annotation.RequestMapping;import org.springframework.web.bind.annotation.ResponseBody;@Controller public class UserController @RequestMapping ("/save" ) @ResponseBody public String save () System.out.println("user save ..." ); return "{\"module\":\"springmvc\"}" ; } }
执行getServletMappings方法,定义指定的请求通过SpringMVC。1 2 3 4 5 @Override protected String[] getServletMappings() { return new String[]{"/" }; }
如果用的是配置文件,不是注解的话,整体方式差不多。只是从读取注解改成了读取配置文件。
请求过程
发送请求localhost/save。
web容器发现所有请求都经过SpringMVC,将请求交给SpringMVC处理。
SpringMVC解析请求路径/save,由/save匹配执行对应的方法save(),执行save()。
检测到有@ResponseBody直接将save()方法的返回值作为响应求体返回给请求方。
单例的controller
controller默认是单例的,也正因为单例,所以它也不是线程安全的,所以不要使用非静态的成员变量,否则会发生数据逻辑混乱。
示例代码:
1 2 3 4 5 6 7 8 9 10 11 12 13 14 15 16 17 18 19 20 21 22 23 24 25 26 27 28 package com.kakawanyifan.controller;import org.springframework.stereotype.Controller;import org.springframework.web.bind.annotation.RequestMapping;import org.springframework.web.bind.annotation.ResponseBody;@Controller @RequestMapping ("user" )public class UserController int i = 0 ; @RequestMapping ("t1" ) @ResponseBody public String t1 () i = i + 1 ; System.out.println(i); return "{\"module\":\"springmvc\"}" ; } @RequestMapping ("t2" ) @ResponseBody public String t2 () i = i + 1 ; System.out.println(i); return "{\"module\":\"springmvc\"}" ; } }
我们分别请求/mvc/user/t1和/mvc/user/t2,运行结果:
这也说明了是单例的,是线程不安全的。
Spring这么设计的原因是出于性能考虑。如果一定要解决单例的问题,可以通过@Scope注解,设置组件的作用域。@Scope注解有五种作用域,即:
SINGLETON:单例模式,默认模式,不写的时候默认是SINGLETON。PROTOTYPE:原型模式。REQUEST:同一次请求则只创建一次实例。SESSION:同一个session只创建一次实例。GLOBAL SESSION:全局的web域,类似于servlet中的application。
我们可以设置其为原型模式,示例代码:
1 2 3 4 5 6 7 8 9 10 11 12 13 14 15 16 17 18 19 20 21 22 23 24 25 26 27 28 29 30 package com.kakawanyifan.controller;import org.springframework.context.annotation.Scope;import org.springframework.stereotype.Controller;import org.springframework.web.bind.annotation.RequestMapping;import org.springframework.web.bind.annotation.ResponseBody;@Controller @RequestMapping ("user" )@Scope ("prototype" )public class UserController int i = 0 ; @RequestMapping ("t1" ) @ResponseBody public String t1 () i = i + 1 ; System.out.println(i); return "{\"module\":\"springmvc\"}" ; } @RequestMapping ("t2" ) @ResponseBody public String t2 () i = i + 1 ; System.out.println(i); return "{\"module\":\"springmvc\"}" ; } }
还有一个办法是利用TreadLocal。《8.多线程 [2/2]》 的讨论。
映射请求
示例代码:
1 2 3 4 5 6 7 8 9 10 11 12 13 14 15 16 17 package com.kakawanyifan.controller;import org.springframework.stereotype.Controller;import org.springframework.web.bind.annotation.RequestMapping;import org.springframework.web.bind.annotation.ResponseBody;@Controller @RequestMapping ("user" )public class UserController @RequestMapping ("save" ) @ResponseBody public String save () System.out.println("user save ..." ); return "{\"module\":\"springmvc\"}" ; } }
解释说明:
当类上和方法上都添加了@RequestMapping注解,前端发送请求的时候,要和两个注解的value值相加匹配才能访问到。/user/save匹配。
value属性的值前面可以不加/。
在@RequestMapping注解中,还有很多的设置。
method,指定请求方式,默认所有方法都支持。1 @RequestMapping (value = "save" ,method = {RequestMethod.GET,RequestMethod.POST})
@GetMapping:处理get方式请求的映射。@PostMapping:处理post方式请求的映射。@PutMapping:处理put方式请求的映射。@DeleteMapping:处理delete方式请求的映射
params,通过当前请求的请求参数来匹配请求。1 @RequestMapping (value = "save" ,params = {"orgCode" ,"!userName" ,"id=123" ,"uid!=qwe" })
"param":包含param的请求参数。"!param":不包含param的请求参数。"param=value":包含param的请求参数,且param参数的值必须为value。"param!=value":包含param的请求参数,其值不为value。
headers,通过当前请求的请求头信息来匹配请求。1 @RequestMapping (value = "save" ,headers = "Host = localhost:8081" )
"header":为包含header的请求头信息。"!header":不包含header的请求头信息。"header=value":包含header的请求头信息,并且header的值必须为value。"header!=value":包含header的请求头信息,并且header的值必须不是value。
接收请求参数
普通参数
如果传递的参数名与方法的形参变量名相同,方法的形参可以直接接收参数。
如果传递的参数名与方法的形参变量名不相同,可以利用@RequestParam注解。@RequestParam注解还有一个好处,框架不需要再去解析注入,能提升性能。)
示例代码:
1 2 3 4 5 6 7 8 9 10 11 12 13 14 15 16 17 18 19 package com.kakawanyifan.controller;import org.springframework.stereotype.Controller;import org.springframework.web.bind.annotation.RequestMapping;import org.springframework.web.bind.annotation.RequestParam;import org.springframework.web.bind.annotation.ResponseBody;@Controller @RequestMapping ("user" )public class UserController @RequestMapping ("save" ) @ResponseBody public String save (@RequestParam("name" ) String strVal, @RequestParam ("age" ) Integer intVal) System.out.println("strVal : " + strVal); System.out.println("intVal : " + intVal); return "{\"module\":\"springmvc\"}" ; } }
POJO
首先,请求参数名与形参对象属性名一致,这时定义POJO类型形参才可以接收参数。
示例代码:
1 2 3 4 5 6 7 8 9 10 package com.kakawanyifan.pojo;public class User private String name; private int age; 【Getter和Setter方法略】 }
1 2 3 4 5 6 7 8 9 10 11 12 13 14 15 16 17 18 19 package com.kakawanyifan.controller;import com.kakawanyifan.pojo.User;import org.springframework.stereotype.Controller;import org.springframework.web.bind.annotation.RequestMapping;import org.springframework.web.bind.annotation.ResponseBody;@Controller @RequestMapping ("user" )public class UserController @RequestMapping ("save" ) @ResponseBody public String save (User user) System.out.println(user.getName()); System.out.println(user.getAge()); return "{\"module\":\"springmvc\"}" ; } }
嵌套POJO
请求参数名与形参对象属性名仍需要相同
按照对象层次结构关系可接收嵌套POJO属性参数。
例如,在User类中嵌套了Address类。
示例代码:
1 2 3 4 5 6 7 8 9 10 11 package com.kakawanyifan.pojo;public class User private String name; private int age; private Address address; 【Getter和Setter方法略】 }
1 2 3 4 5 6 7 8 9 10 package com.kakawanyifan.pojo;public class Address private String city; private String province; 【Getter和Setter方法略】 }
请求示例:
1 http://localhost:8080/mvc/user/save?name=张生&age=123&address.city=南昌&address.province=江西
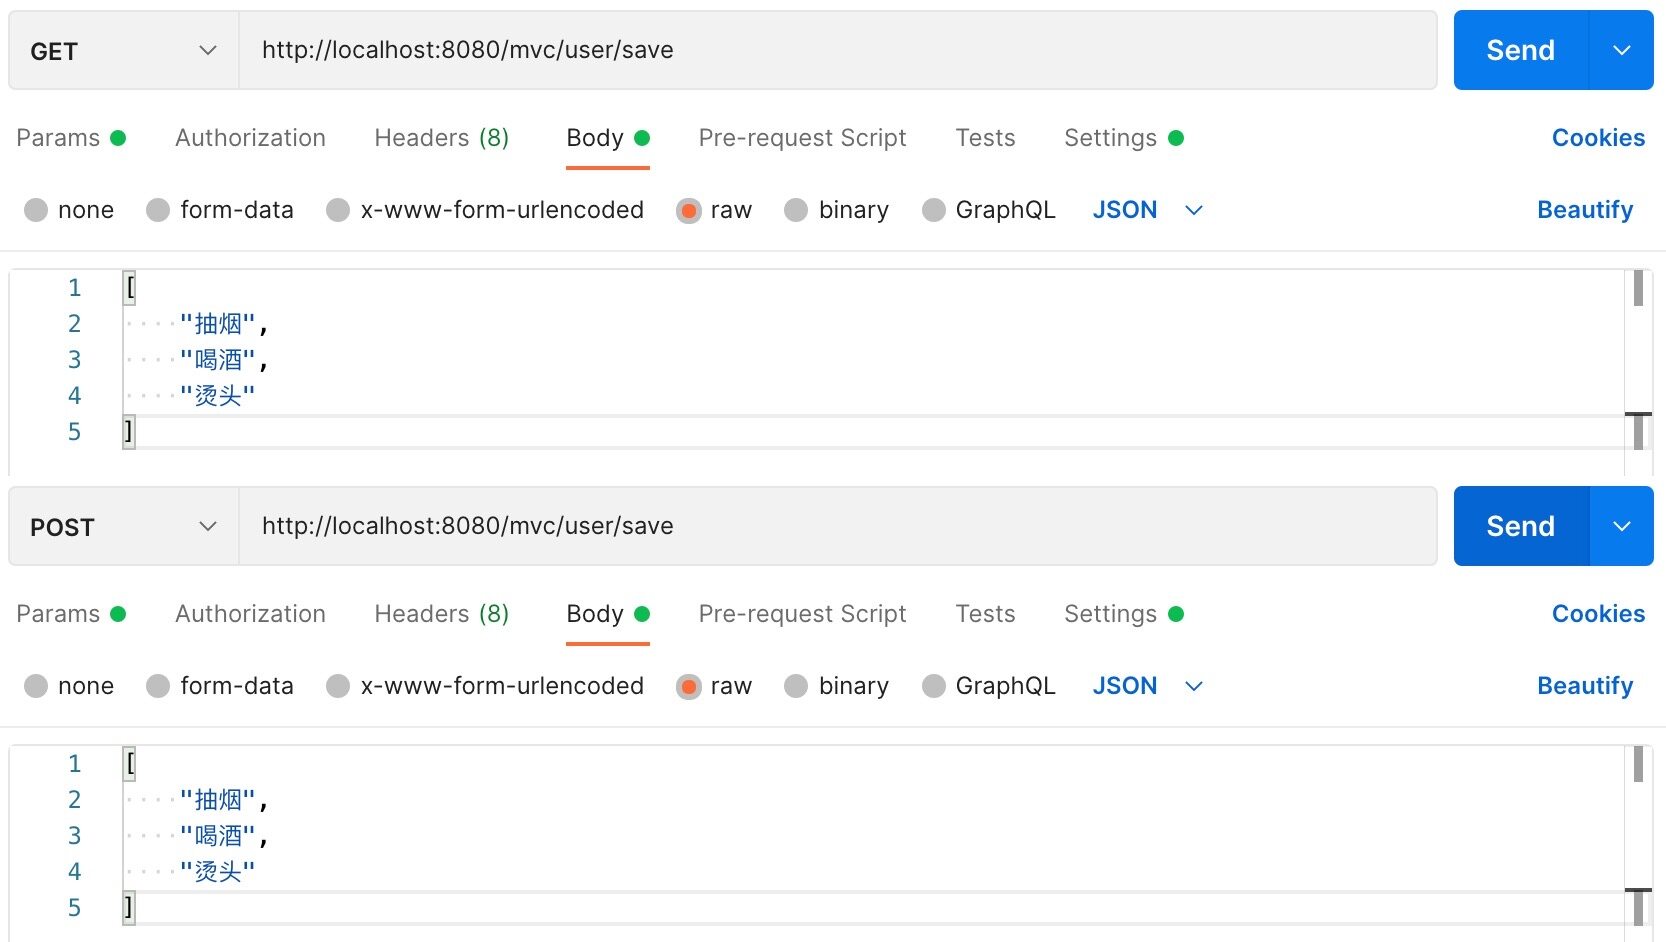
数组
后台接收参数:
1 2 3 4 5 6 7 8 9 10 11 12 13 14 15 16 17 18 19 package com.kakawanyifan.controller;import org.springframework.stereotype.Controller;import org.springframework.web.bind.annotation.RequestMapping;import org.springframework.web.bind.annotation.ResponseBody;@Controller @RequestMapping ("user" )public class UserController @RequestMapping ("save" ) @ResponseBody public String save (String[] hobbies) for (String hobby:hobbies) { System.out.println(hobby); } return "{\"module\":\"springmvc\"}" ; } }
请求方式,定义多个同名的请求参数:
1 http://localhost:8080/mvc/user/save?hobbies=抽烟&hobbies=喝酒&hobbies=烫头
List集合
那么,如果参数不是数组类型,是List集合类型呢?
1 2 3 4 5 6 7 8 9 10 11 12 13 14 15 16 17 18 19 20 21 package com.kakawanyifan.controller;import org.springframework.stereotype.Controller;import org.springframework.web.bind.annotation.RequestMapping;import org.springframework.web.bind.annotation.ResponseBody;import java.util.List;@Controller @RequestMapping ("user" )public class UserController @RequestMapping ("save" ) @ResponseBody public String save (List<String> hobbies) for (String hobby:hobbies) { System.out.println(hobby); } return "{\"module\":\"springmvc\"}" ; } }
请求示例:
1 http://localhost:8080/mvc/user/save?hobbies=抽烟&hobbies=喝酒&hobbies=烫头
此时会报错。
1 2 3 4 5 6 7 8 9 10 11 12 【部分运行结果略】 <p><b>Root Cause</b></p> <pre>java.lang.IllegalStateException: No primary or single unique constructor found for interface java.util.List org.springframework.beans.BeanUtils.getResolvableConstructor(BeanUtils.java:267) org.springframework.web.method.annotation.ModelAttributeMethodProcessor.createAttribute(ModelAttributeMethodProcessor.java:219) org.springframework.web.servlet.mvc.method.annotation.ServletModelAttributeMethodProcessor.createAttribute(ServletModelAttributeMethodProcessor.java:85) org.springframework.web.method.annotation.ModelAttributeMethodProcessor.resolveArgument(ModelAttributeMethodProcessor.java:147) org.springframework.web.method.support.HandlerMethodArgumentResolverComposite.resolveArgument(HandlerMethodArgumentResolverComposite.java:122) 【部分运行结果略】
解决方法:使用@RequestParam注解。
名称
@RequestParam
类型
形参注解
位置
SpringMVC控制器方法形参定义前面
作用
绑定请求参数与处理器方法形参间的关系
相关参数
required:是否为必传参数
1 2 3 4 5 6 7 8 9 10 11 12 13 14 15 16 17 18 19 20 21 22 package com.kakawanyifan.controller;import org.springframework.stereotype.Controller;import org.springframework.web.bind.annotation.RequestMapping;import org.springframework.web.bind.annotation.RequestParam;import org.springframework.web.bind.annotation.ResponseBody;import java.util.List;@Controller @RequestMapping ("user" )public class UserController @RequestMapping ("save" ) @ResponseBody public String save (@RequestParam List<String> hobbies) for (String hobby:hobbies) { System.out.println(hobby); } return "{\"module\":\"springmvc\"}" ; } }
Map集合(获取所有参数)
示例代码:
1 2 3 4 5 6 7 8 9 10 11 12 13 14 15 16 17 18 19 20 21 22 package com.kakawanyifan.controller;import org.springframework.stereotype.Controller;import org.springframework.web.bind.annotation.RequestMapping;import org.springframework.web.bind.annotation.RequestParam;import org.springframework.web.bind.annotation.ResponseBody;import java.util.Map;@Controller @RequestMapping ("user" )public class UserController @RequestMapping ("save" ) @ResponseBody public String save (@RequestParam Map<String, String> params) for (String key:params.keySet()) { System.out.println(key + " : " + params.get(key)); } return "{\"module\":\"springmvc\"}" ; } }
日期
日期的格式有很多种,例如:2022-12-10、2022/12/10、20221210等。yyyy/MM/dd,如果传递的不符合其默认格式,可以利用@DateTimeFormat进行格式转换。
名称
@DateTimeFormat
类型
形参注解
位置
SpringMVC控制器方法形参前面
作用
设定日期时间型数据格式
相关属性
pattern,指定日期时间格式字符串
1 2 3 4 5 6 7 8 9 10 11 12 13 14 15 16 17 18 19 20 21 22 23 24 package com.kakawanyifan.controller;import org.springframework.format.annotation.DateTimeFormat;import org.springframework.stereotype.Controller;import org.springframework.web.bind.annotation.RequestMapping;import org.springframework.web.bind.annotation.ResponseBody;import java.util.Date;@Controller @RequestMapping ("/user" )public class UserController @RequestMapping ("/save" ) @ResponseBody public String save (Date d1, @DateTimeFormat(pattern="yyyy-MM-dd" ) Date d2, @DateTimeFormat (pattern="yyyy-MM-dd HH:mm:ss" ) Date d3) { System.out.println(d1); System.out.println(d2); System.out.println(d3); return "{\"module\":\"springmvc\"}" ; } }
文件
引入fileupload和io
接收文件类型,需要引入两个jar包:
commons-fileuploadcommons-io
1 2 3 4 5 6 7 8 9 10 11 <dependency > <groupId > commons-fileupload</groupId > <artifactId > commons-fileupload</artifactId > <version > 1.4</version > </dependency > <dependency > <groupId > commons-io</groupId > <artifactId > commons-io</artifactId > <version > 2.11.0</version > </dependency >
文件解析器
1 2 3 4 5 6 7 8 9 10 11 12 13 14 15 16 17 18 19 20 21 22 23 24 package com.kakawanyifan.config;import org.springframework.context.annotation.Bean;import org.springframework.context.annotation.ComponentScan;import org.springframework.context.annotation.Configuration;import org.springframework.web.multipart.commons.CommonsMultipartResolver;import org.springframework.web.servlet.config.annotation.EnableWebMvc;import java.nio.charset.StandardCharsets;@Configuration @ComponentScan (value = {"com.kakawanyifan.controller" })@EnableWebMvc public class SpringMvcConfig @Bean ("multipartResolver" ) public CommonsMultipartResolver multipartResolver () CommonsMultipartResolver commonsMultipartResolver = new CommonsMultipartResolver(); commonsMultipartResolver.setMaxUploadSize(5242800 ); commonsMultipartResolver.setMaxUploadSizePerFile(5242800 ); commonsMultipartResolver.setDefaultEncoding(StandardCharsets.UTF_8.name()); return commonsMultipartResolver; } }
接收文件
接收文件,需要用到MultipartFile这个类来表示文件。
该类还提供了一系列方法来获取上传的文件的信息:
String getName():请求参数的名称。String getOriginalFilename():获取文件的原始名称。String getContentType():获取文件类型。long getSize():获取文件大小(byte)。byte[] getBytes():获取文件内容。InputStream getInputStream():获取文件流。void transferTo(File dest):将上传的文件写到"dest"中。
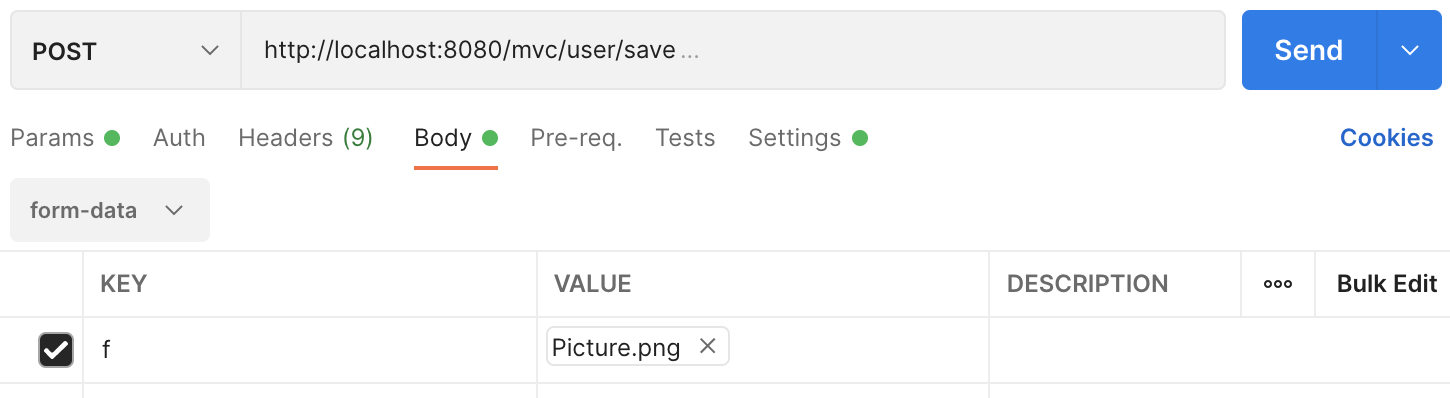
示例代码:
1 2 3 4 5 6 7 8 9 10 11 12 13 14 15 16 17 18 19 20 21 22 23 24 25 26 27 28 29 30 31 32 33 34 35 package com.kakawanyifan.controller;import org.springframework.stereotype.Controller;import org.springframework.web.bind.annotation.RequestMapping;import org.springframework.web.bind.annotation.RequestParam;import org.springframework.web.bind.annotation.ResponseBody;import org.springframework.web.multipart.MultipartFile;@Controller @RequestMapping ("user" )public class UserController @RequestMapping ("save" ) @ResponseBody public String save (@RequestParam("f" ) MultipartFile f) System.out.println(f.getName()); System.out.println(f.getOriginalFilename()); System.out.println(f.getContentType()); System.out.println(f.getSize()); return "{\"module\":\"springmvc\"}" ; } }
我们通过Postman发送文件
运行结果:
1 2 3 4 f Picture.png image/png 116834
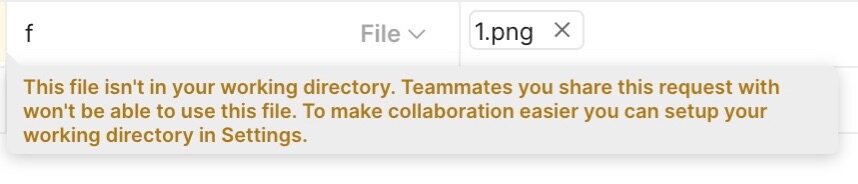
如果出现了如下的提示,是因为需要把文件放在Postman的指定目录下
查看指定目录的方法:
接收请求体(JSON)
接收请求体,即所谓的接收JSON。只是一般JSON数据都在请求体中,在Java代码中,也都是利用"请求体"的注解。所以我们称之为接收请求体(JSON)。
对于JSON数据,常见的有三种:
普通数组1 ["value1","value2","value3",...]
对象1 {key1:value1,key2:value2,...}
对象数组1 [{key1:value1,...},{key2:value2,...}]
普通数组
引入jackson-databind
SpringMVC默认使用的是jackson来处理json的转换,所以需要在pom.xml添加jackson依赖
1 2 3 4 5 <dependency > <groupId > com.fasterxml.jackson.core</groupId > <artifactId > jackson-databind</artifactId > <version > 2.9.0</version > </dependency >
有些资料会说还需要jackson-core和jackson-annotations。在我的实际测试中,这两个JAR包不引入也可以。
开启SpringMVC注解支持
利用@EnableWebMvc,开启JSON数据类型自动转换。
名称
@EnableWebMvc
类型
配置类注解
位置
SpringMVC配置类定义上方
作用
开启SpringMVC多项辅助功能
(@EnableWebMvc的功能很多,不仅仅是JSON数据类型自动转换。在这里,我们利用其JSON数据类型自动转换功能。)
示例代码:
1 2 3 4 5 6 7 8 9 10 11 12 package com.kakawanyifan.config;import org.springframework.context.annotation.ComponentScan;import org.springframework.context.annotation.Configuration;import org.springframework.web.servlet.config.annotation.EnableWebMvc;@Configuration @ComponentScan (value = {"com.kakawanyifan.controller" })@EnableWebMvc public class SpringMvcConfig }
@RequestBody
使用@RequestBody注解将外部传递的JSON数组数据映射到形参的集合对象中作为数据。
名称
@RequestBody
类型
形参注解
位置
SpringMVC控制器方法形参定义前面
作用
将请求中请求体所包含的数据传递给请求参数,此注解一个处理器方法只能使用一次
1 2 3 4 5 6 7 8 9 10 11 12 13 14 15 16 17 18 19 20 21 22 package com.kakawanyifan.controller;import org.springframework.stereotype.Controller;import org.springframework.web.bind.annotation.RequestBody;import org.springframework.web.bind.annotation.RequestMapping;import org.springframework.web.bind.annotation.ResponseBody;import java.util.List;@Controller @RequestMapping ("user" )public class UserController @RequestMapping ("save" ) @ResponseBody public String save (@RequestBody List<String> hobbies) for (String hobby:hobbies) { System.out.println(hobby); } return "{\"module\":\"springmvc\"}" ; } }
发送JSON数据
上述需要注意的是:
我们依次勾选了Body -> raw -> JSON
POST和GET两种方式均可
是的,GET方式也可以通过请求体发送数据。《基于Java的后端开发入门:14.HttpClient》 没有讨论。
其对应的CURL命令如下:
1 2 3 4 5 6 7 curl --location --request GET 'http://localhost:8080/mvc/user/save' \ --header 'Content-Type: application/json' \ --data-raw '[ "抽烟", "喝酒", "烫头" ]'
对象
后端接收数据,示例代码:
1 2 3 4 5 6 7 8 9 10 11 12 13 14 15 16 17 18 19 package com.kakawanyifan.controller;import com.kakawanyifan.pojo.User;import org.springframework.stereotype.Controller;import org.springframework.web.bind.annotation.RequestBody;import org.springframework.web.bind.annotation.RequestMapping;import org.springframework.web.bind.annotation.ResponseBody;@Controller @RequestMapping ("/user" )public class UserController @RequestMapping ("/save" ) @ResponseBody public String save (@RequestBody User user) System.out.println(user); return "{\"module\":\"springmvc\"}" ; } }
发送数据:
对象数组
后端接收数据,示例代码:
1 2 3 4 5 6 7 8 9 10 11 12 13 14 15 16 17 18 19 20 21 package com.kakawanyifan.controller;import com.kakawanyifan.pojo.User;import org.springframework.stereotype.Controller;import org.springframework.web.bind.annotation.RequestBody;import org.springframework.web.bind.annotation.RequestMapping;import org.springframework.web.bind.annotation.ResponseBody;import java.util.List;@Controller @RequestMapping ("/user" )public class UserController @RequestMapping ("/save" ) @ResponseBody public String save (@RequestBody List<User> userList) System.out.println(userList); return "{\"module\":\"springmvc\"}" ; } }
发送数据:
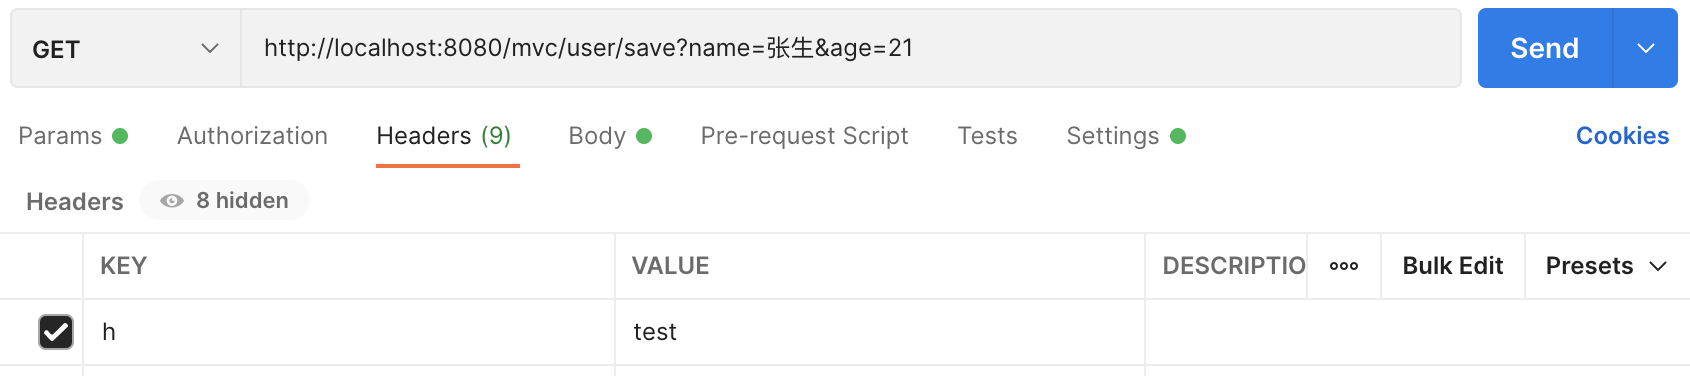
接收请求头
接收请求头有两种方式:
通过@RequestHeader注解获取,在Controller中获取。
通过RequestContextHolder获取,可以任何地方获取。
示例代码:
1 2 3 4 5 6 7 8 9 10 11 12 13 14 15 16 17 18 19 20 21 package com.kakawanyifan.controller;import com.kakawanyifan.pojo.User;import org.springframework.stereotype.Controller;import org.springframework.web.bind.annotation.RequestHeader;import org.springframework.web.bind.annotation.RequestMapping;import org.springframework.web.bind.annotation.ResponseBody;@Controller @RequestMapping ("user" )public class UserController @RequestMapping ("save" ) @ResponseBody public String save (@RequestHeader("h" ) String h, User user) System.out.println(h); System.out.println(user.getName()); System.out.println(user.getAge()); return "{\"module\":\"springmvc\"}" ; } }
运行结果:
获取所有请求头(Map集合)
示例代码:
1 2 3 4 5 6 7 8 9 10 11 12 13 14 15 16 17 18 19 20 21 22 23 24 25 package com.kakawanyifan.controller;import com.kakawanyifan.pojo.User;import org.springframework.stereotype.Controller;import org.springframework.web.bind.annotation.RequestHeader;import org.springframework.web.bind.annotation.RequestMapping;import org.springframework.web.bind.annotation.ResponseBody;import java.util.Map;@Controller @RequestMapping ("user" )public class UserController @RequestMapping ("save" ) @ResponseBody public String save (@RequestHeader Map<String, String> headers, User user) for (String key:headers.keySet()) { System.out.println(key + " : " + headers.get(key)); } System.out.println(user.getName()); System.out.println(user.getAge()); return "{\"module\":\"springmvc\"}" ; } }
RequestContextHolder
通过RequestContextHolder来获取则可以在其它层获取。它先获取Request对象,再获取请求头。
示例代码:
1 2 3 4 5 6 7 8 9 10 11 12 13 14 15 16 17 18 19 20 21 22 23 24 25 26 27 28 29 30 31 32 33 34 35 36 package com.kakawanyifan.controller;import org.springframework.stereotype.Controller;import org.springframework.web.bind.annotation.RequestHeader;import org.springframework.web.bind.annotation.RequestMapping;import org.springframework.web.bind.annotation.RequestParam;import org.springframework.web.bind.annotation.ResponseBody;import org.springframework.web.context.request.RequestContextHolder;import org.springframework.web.context.request.ServletRequestAttributes;import javax.servlet.http.HttpServletRequest;import java.util.Enumeration;import java.util.Map;@Controller @RequestMapping ("user" )public class UserController @RequestMapping ("save" ) @ResponseBody public String save (@RequestHeader Map<String,String> headers) for (String key:headers.keySet()) { System.out.println(key + " : " + headers.get(key)); } ServletRequestAttributes requestAttributes = (ServletRequestAttributes) RequestContextHolder.getRequestAttributes(); HttpServletRequest request = requestAttributes.getRequest(); Enumeration<String> headerNames = request.getHeaderNames(); while (headerNames.hasMoreElements()) { String key = headerNames.nextElement(); System.out.println(key + " : " + request.getHeader(key)); } return "{\"module\":\"springmvc\"}" ; } }
根据我们在《13.Servlet、Filter和Listener》 的讨论。这个方法既然可以拿到request,当然也可以用于在其他层获取参数。
获取指定Cookie的值
使用@CookieValue可以获得指定Cookie的值。
@CookieValue注解的属性如下:
value:指定cookie的名称required:是否必须携带此cookie
示例代码:
1 2 3 4 5 6 7 8 9 10 11 12 13 14 15 16 package com.kakawanyifan.controller;import org.springframework.stereotype.Controller;import org.springframework.web.bind.annotation.CookieValue;import org.springframework.web.bind.annotation.RequestMapping;import org.springframework.web.bind.annotation.ResponseBody;@Controller public class UserController @RequestMapping ("/save" ) @ResponseBody public String save (@CookieValue(value = "JSESSIONID" ,required = false ) String jsessionId) System.out.println(jsessionId); return "{\"module\":\"springmvc\"}" ; } }
获取Servlet相关
SpringMVC支持使用原始ServletAPI对象作为控制器方法的参数进行注入。示例代码:
1 2 3 4 5 6 7 8 9 10 11 12 13 14 15 16 17 18 19 20 21 package com.kakawanyifan.controller;import org.springframework.stereotype.Controller;import org.springframework.web.bind.annotation.RequestMapping;import org.springframework.web.bind.annotation.ResponseBody;import javax.servlet.http.HttpServletRequest;import javax.servlet.http.HttpServletResponse;import javax.servlet.http.HttpSession;@Controller public class UserController @RequestMapping ("/save" ) @ResponseBody public String save (HttpServletRequest request, HttpServletResponse response, HttpSession session) System.out.println(request); System.out.println(response); System.out.println(session); return "{\"module\":\"springmvc\"}" ; } }
Converter接口
SpringMVC的类型转换器
通过上文的讨论,我们发现有很多的自动的类型转换。例如,前端传递的是字符串,后端能转成Date。
那么,是谁在做这个类型转换?
SpringMVC是如何实现类型转换的?
在SpringMVC中,有这么一个接口
1 2 3 4 5 6 7 8 9 10 11 12 13 14 15 16 17 18 19 20 21 22 23 24 25 26 27 28 29 30 31 32 33 34 35 36 37 38 39 40 41 42 43 44 45 46 47 48 49 50 51 package org.springframework.core.convert.converter;import org.springframework.lang.Nullable;import org.springframework.util.Assert;@FunctionalInterface public interface Converter <S , T > @Nullable T convert (S source) ; default <U> Converter<S, U> andThen (Converter<? super T, ? extends U> after) { Assert.notNull(after, "After Converter must not be null" ); return (S s) -> { T initialResult = convert(s); return (initialResult != null ? after.convert(initialResult) : null ); }; } }
SpringMVC提供了这个接口的诸多的实现类,用来实现不同数据类型之间的转换。
自定义类型转换器
场景
假设,现在存在某实体类,如下:
1 2 3 4 5 6 7 8 9 10 11 12 13 14 15 16 17 18 19 20 21 package com.kakawanyifan.entity;import java.io.Serializable;public class Per implements Serializable String name = "" ; String clz = "" ; public Per (String name, String clz) this .name = name; this .clz = clz; } @Override public String toString () return "Per{" + "name='" + name + '\'' + ", clz='" + clz + '\'' + '}' ; } }
Controller层如下:
1
2
3
4
5
6
7
8
9
10
11
12
13
14
15
16
17
18
19
package com.kakawanyifan.controller;import com.kakawanyifan.entity.Per;import org.springframework.stereotype.Controller;import org.springframework.web.bind.annotation.RequestMapping;import org.springframework.web.bind.annotation.ResponseBody;import java.util.Date;@Controller public class UserController @RequestMapping ("/save" ) @ResponseBody public String save (Per per, Date d) System.out.println(per); System.out.println(d); return "{\"module\":\"springmvc\"}" ; } }
我们传入方式如下
1 http://localhost:8080/mvc/save?per=张三丰-武当&d=2022/12/12
要求,其中per自动转换,-前的为"name",-后的为"clz"。
定义转换器类实现Converter接口
1 2 3 4 5 6 7 8 9 10 11 12 13 package com.kakawanyifan.converter;import com.kakawanyifan.entity.Per;import org.springframework.core.convert.converter.Converter;public class PerConverter implements Converter <String , Per > @Override public Per convert (String source) String[] ar = source.split("-" ); Per per = new Per(ar[0 ],ar[1 ]); return per; } }
在配置类中加载
1 2 3 4 5 6 7 8 9 10 11 12 13 14 15 16 17 18 19 20 21 22 23 24 25 26 27 28 29 package com.kakawanyifan.config;import com.kakawanyifan.converter.PerConverter;import org.springframework.beans.factory.annotation.Autowired;import org.springframework.context.annotation.Bean;import org.springframework.context.annotation.ComponentScan;import org.springframework.context.annotation.Configuration;import org.springframework.context.support.ConversionServiceFactoryBean;import org.springframework.core.convert.converter.Converter;import java.util.HashSet;import java.util.Set;@Configuration @ComponentScan ({"com.kakawanyifan.controller" ,"com.kakawanyifan.converter" })public class SpringMvcConfig @Autowired PerConverter perConverter; @Bean public ConversionServiceFactoryBean conversionServiceFactoryBean (PerConverter perConverter) ConversionServiceFactoryBean conversionServiceFactoryBean = new ConversionServiceFactoryBean(); Set<Converter> converters = new HashSet<>(); converters.add(perConverter); conversionServiceFactoryBean.setConverters(converters); return conversionServiceFactoryBean; } }
SpringMvcConfig实现WebMvcConfigurer接口,重写addFormatters方法。这样更简洁,示例代码:
1 2 3 4 5 6 7 8 9 10 11 12 13 14 15 16 17 18 19 20 21 package com.kakawanyifan.config;import com.kakawanyifan.converter.PerConverter;import org.springframework.beans.factory.annotation.Autowired;import org.springframework.context.annotation.ComponentScan;import org.springframework.context.annotation.Configuration;import org.springframework.format.FormatterRegistry;import org.springframework.web.servlet.config.annotation.WebMvcConfigurer;@Configuration @ComponentScan ({"com.kakawanyifan.controller" ,"com.kakawanyifan.converter" })public class SpringMvcConfig implements WebMvcConfigurer @Autowired PerConverter perConverter; @Override public void addFormatters (FormatterRegistry registry) registry.addConverter(perConverter); } }
XML方式
在配置文件中声明转换器
在<annotation-driven>标签中引用转换器
spring-mvc.xml:
1 2 3 4 5 6 7 8 9 10 11 12 13 14 15 16 17 18 19 20 21 22 23 24 25 26 27 28 <?xml version="1.0" encoding="UTF-8"?> <beans xmlns ="http://www.springframework.org/schema/beans" xmlns:xsi ="http://www.w3.org/2001/XMLSchema-instance" xmlns:mvc ="http://www.springframework.org/schema/mvc" xmlns:context ="http://www.springframework.org/schema/context" xsi:schemaLocation ="http://www.springframework.org/schema/beans http://www.springframework.org/schema/beans/spring-beans.xsd http://www.springframework.org/schema/mvc http://www.springframework.org/schema/mvc/spring-mvc.xsd http://www.springframework.org/schema/context http://www.springframework.org/schema/context/spring-context.xsd" > <context:component-scan base-package ="com.kakawanyifan" /> <mvc:annotation-driven conversion-service ="conversionService" /> <bean id ="conversionService" class ="org.springframework.context.support.ConversionServiceFactoryBean" > <property name ="converters" > <list > <bean class ="com.kakawanyifan.converter.PerConverter" > </bean > </list > </property > </bean > </beans >
返回响应
响应主要分为如下几种:
响应页面
对于响应页面,在实际中可能应用并不多。我们不做太多讨论。简单举一个例子。
在webapp下创建page.jsp
1 2 3 4 5 6 7 8 9 10 11 12 13 14 15 16 <%-- Created by IntelliJ IDEA. User: kaka Date: 2022 /12 /7 Time: 19:29 To change this template use File | Settings | File Templates. -- %><%@ page contentType ="text/html;charset=UTF-8" language ="java" %> <html > <head > <title > Title</title > </head > <body > </body > </html >
UserController
1 2 3 4 5 6 7 8 9 10 11 12 13 package com.kakawanyifan.controller;import org.springframework.stereotype.Controller;import org.springframework.web.bind.annotation.RequestMapping;@Controller public class UserController @RequestMapping ("/res" ) public String res () return "page.jsp" ; } }
注意:
这时候不能添加@ResponseBody,如果加了该注解,会直接将"page.jsp"当字符串返回前端。
方法的返回类型为String
如果在UserController上添加了@RequestMapping("/user"),则会有如下的报错。JSP file [/user/page.jsp] not found,会定位到/user/page.jsp,但是又没有该文件。
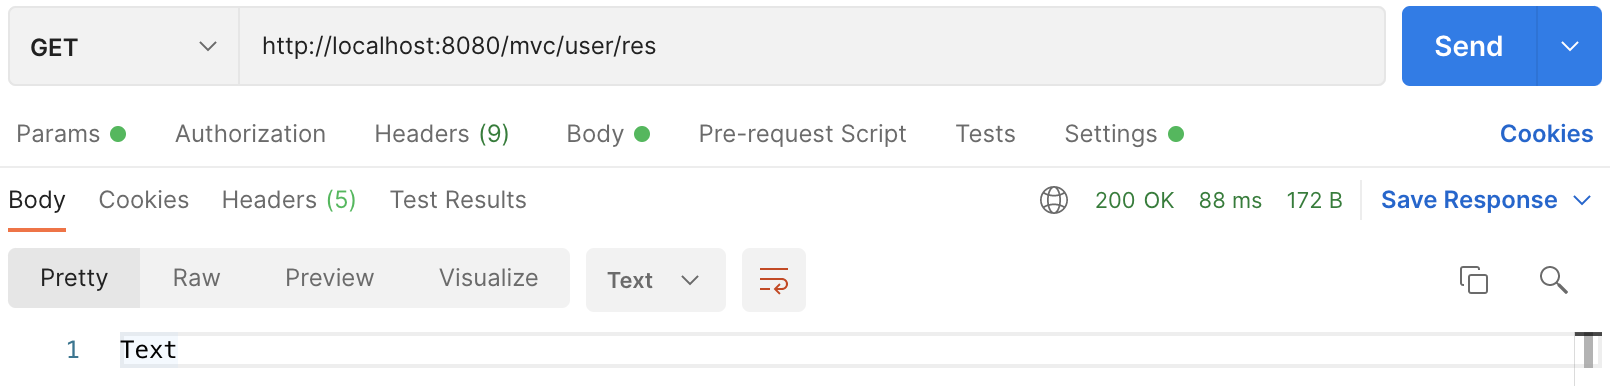
响应文本数据
示例代码:
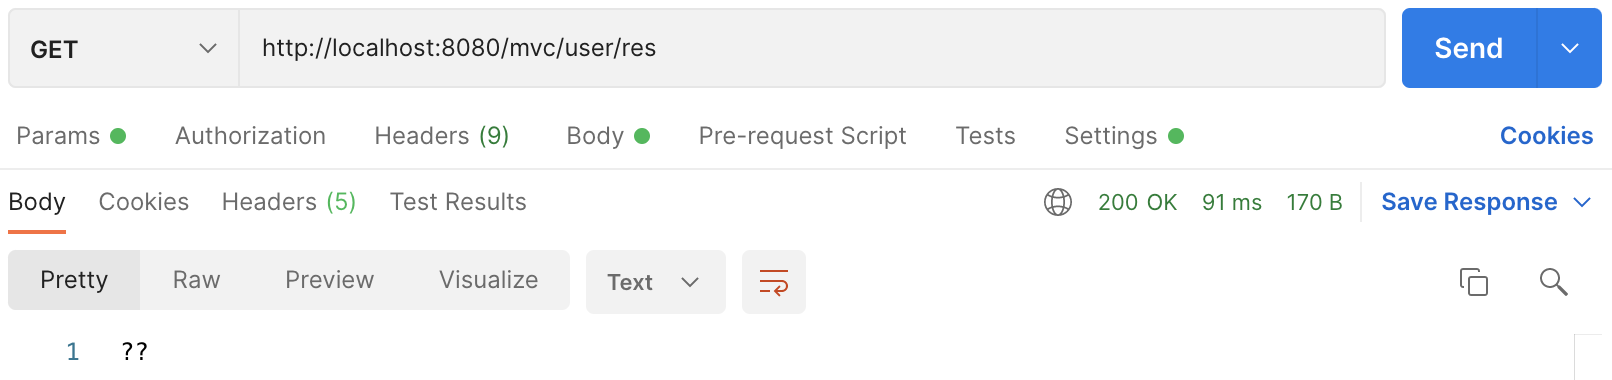
1 2 3 4 5 6 7 8 9 10 11 12 13 14 15 16 package com.kakawanyifan.controller;import org.springframework.stereotype.Controller;import org.springframework.web.bind.annotation.RequestMapping;import org.springframework.web.bind.annotation.ResponseBody;@Controller @RequestMapping ("/user" )public class UserController @RequestMapping ("/res" ) @ResponseBody public String res () return "Text" ; } }
如果是中文呢?
示例代码:
1 2 3 4 5 6 7 8 9 10 11 12 13 14 15 16 package com.kakawanyifan.controller;import org.springframework.stereotype.Controller;import org.springframework.web.bind.annotation.RequestMapping;import org.springframework.web.bind.annotation.ResponseBody;@Controller @RequestMapping ("/user" )public class UserController @RequestMapping ("/res" ) @ResponseBody public String res () return "中文" ; } }
为什么会是??
我们来看上文提到的Converter接口一个实现类StringHttpMessageConverter的源码。
1 2 3 4 5 6 7 8 9 10 11 12 13 14 15 16 17 18 19 20 21 22 23 24 25 26 27 28 29 30 31 32 33 34 35 36 37 38 39 40 41 42 43 44 45 46 47 48 49 50 51 52 53 54 55 56 57 58 59 60 61 62 63 64 65 66 67 68 69 70 71 72 73 74 75 76 77 78 79 80 81 82 83 84 85 86 87 88 89 90 91 92 93 94 95 96 97 98 99 100 101 102 103 104 105 106 107 108 109 110 111 112 113 114 115 116 117 118 119 120 121 122 123 124 125 126 127 128 129 130 131 132 133 134 135 136 137 138 139 140 141 142 143 144 145 146 package org.springframework.http.converter;import java.io.IOException;import java.nio.charset.Charset;import java.nio.charset.StandardCharsets;import java.util.ArrayList;import java.util.List;import org.springframework.http.HttpHeaders;import org.springframework.http.HttpInputMessage;import org.springframework.http.HttpOutputMessage;import org.springframework.http.MediaType;import org.springframework.lang.Nullable;import org.springframework.util.Assert;import org.springframework.util.StreamUtils;public class StringHttpMessageConverter extends AbstractHttpMessageConverter <String > private static final MediaType APPLICATION_PLUS_JSON = new MediaType("application" , "*+json" ); public static final Charset DEFAULT_CHARSET = StandardCharsets.ISO_8859_1; @Nullable private volatile List<Charset> availableCharsets; private boolean writeAcceptCharset = false ; public StringHttpMessageConverter () this (DEFAULT_CHARSET); } public StringHttpMessageConverter (Charset defaultCharset) super (defaultCharset, MediaType.TEXT_PLAIN, MediaType.ALL); } public void setWriteAcceptCharset (boolean writeAcceptCharset) this .writeAcceptCharset = writeAcceptCharset; } @Override public boolean supports (Class<?> clazz) return String.class == clazz; } @Override protected String readInternal (Class<? extends String> clazz, HttpInputMessage inputMessage) throws IOException Charset charset = getContentTypeCharset(inputMessage.getHeaders().getContentType()); return StreamUtils.copyToString(inputMessage.getBody(), charset); } @Override protected Long getContentLength (String str, @Nullable MediaType contentType) Charset charset = getContentTypeCharset(contentType); return (long ) str.getBytes(charset).length; } @Override protected void addDefaultHeaders (HttpHeaders headers, String s, @Nullable MediaType type) throws IOException if (headers.getContentType() == null ) { if (type != null && type.isConcrete() && (type.isCompatibleWith(MediaType.APPLICATION_JSON) || type.isCompatibleWith(APPLICATION_PLUS_JSON))) { headers.setContentType(type); } } super .addDefaultHeaders(headers, s, type); } @Override protected void writeInternal (String str, HttpOutputMessage outputMessage) throws IOException HttpHeaders headers = outputMessage.getHeaders(); if (this .writeAcceptCharset && headers.get(HttpHeaders.ACCEPT_CHARSET) == null ) { headers.setAcceptCharset(getAcceptedCharsets()); } Charset charset = getContentTypeCharset(headers.getContentType()); StreamUtils.copy(str, charset, outputMessage.getBody()); } protected List<Charset> getAcceptedCharsets () List<Charset> charsets = this .availableCharsets; if (charsets == null ) { charsets = new ArrayList<>(Charset.availableCharsets().values()); this .availableCharsets = charsets; } return charsets; } private Charset getContentTypeCharset (@Nullable MediaType contentType) if (contentType != null ) { Charset charset = contentType.getCharset(); if (charset != null ) { return charset; } else if (contentType.isCompatibleWith(MediaType.APPLICATION_JSON) || contentType.isCompatibleWith(APPLICATION_PLUS_JSON)) { return StandardCharsets.UTF_8; } } Charset charset = getDefaultCharset(); Assert.state(charset != null , "No default charset" ); return charset; } }
分析如下:
在protected void writeInternal(String str, HttpOutputMessage outputMessage)方法写入响应的。
1 2 Charset charset = getContentTypeCharset(headers.getContentType()); StreamUtils.copy(str, charset, outputMessage.getBody());
写入的字符集来自getContentTypeCharset(headers.getContentType());
1 2 3 4 5 6 7 8 9 10 11 12 13 14 15 16 private Charset getContentTypeCharset (@Nullable MediaType contentType) if (contentType != null ) { Charset charset = contentType.getCharset(); if (charset != null ) { return charset; } else if (contentType.isCompatibleWith(MediaType.APPLICATION_JSON) || contentType.isCompatibleWith(APPLICATION_PLUS_JSON)) { return StandardCharsets.APPLICATION_PLUS_JSON; } } Charset charset = getDefaultCharset(); Assert.state(charset != null , "No default charset" ); return charset; }
在这个方法中,如果没有contType,会用默认的字符集。
1 public static final Charset DEFAULT_CHARSET = StandardCharsets.ISO_8859_1;
默认的字符集是ISO-8859-1。
解决方法添加
1 @RequestMapping (value = "/res" ,produces = {"text/plain;charset=UTF-8;" })
示例代码:
1 2 3 4 5 6 7 8 9 10 11 12 13 14 15 16 package com.kakawanyifan.controller;import org.springframework.stereotype.Controller;import org.springframework.web.bind.annotation.RequestMapping;import org.springframework.web.bind.annotation.ResponseBody;@Controller @RequestMapping ("/user" )public class UserController @RequestMapping (value = "/res" ,produces = {"text/plain;charset=UTF-8;" }) @ResponseBody public String res () return "中文" ; } }
响应JSON
名称
@ResponseBody
类型
方法\类注解
位置
SpringMVC控制器方法定义上方和控制类上
作用
设置当前控制器返回值作为响应体,
相关属性
pattern:指定日期时间格式字符串
该注解可以写在类上或者方法上,写在类上就是该类下的所有方法都有@ReponseBody功能。
方法的返回值为字符串,会将其作为文本内容直接响应给前端
方法的返回值为对象,会将对象转换成JSON响应给前端
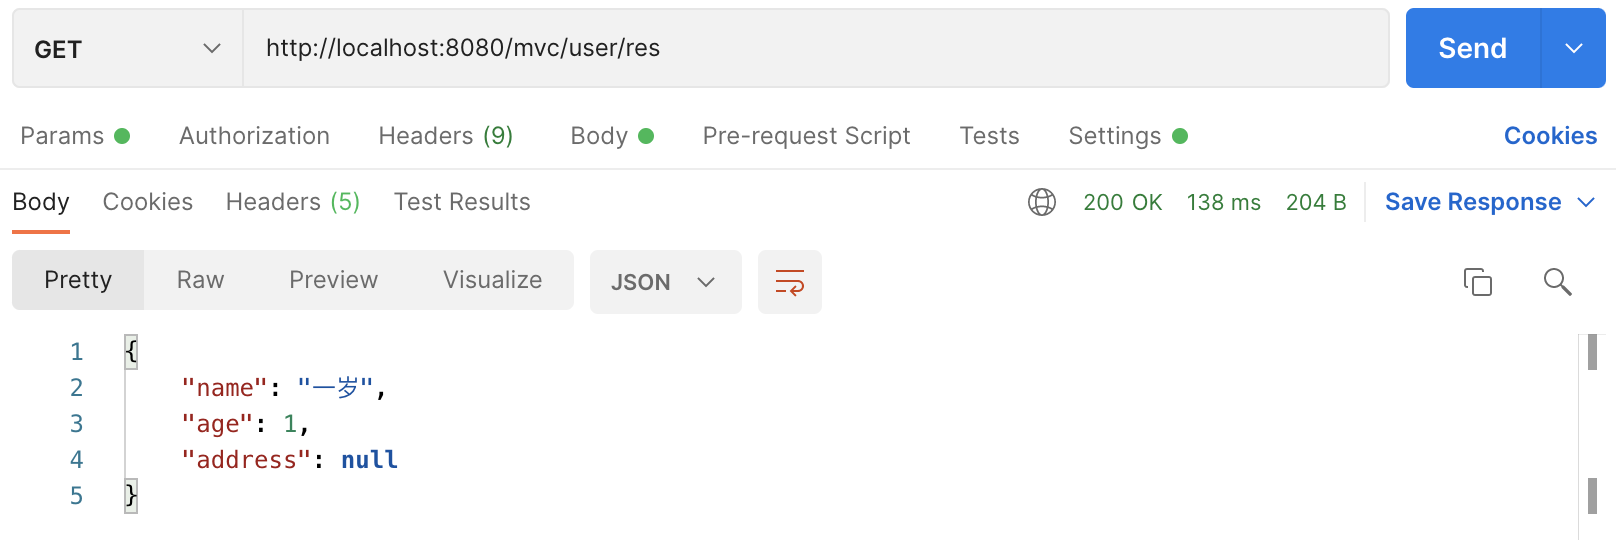
响应POJO
1 2 3 4 5 6 7 8 9 10 11 12 13 14 15 16 17 18 19 20 package com.kakawanyifan.controller;import com.kakawanyifan.pojo.User;import org.springframework.stereotype.Controller;import org.springframework.web.bind.annotation.RequestMapping;import org.springframework.web.bind.annotation.ResponseBody;@Controller @RequestMapping ("/user" )public class UserController @RequestMapping (value = "/res" ) @ResponseBody public User res () User user = new User(); user.setAge(1 ); user.setName("一岁" ); return user; } }
注意:需要依赖@ResponseBody注解和@EnableWebMvc注解。
响应POJO集合
示例代码:
1 2 3 4 5 6 7 8 9 10 11 12 13 14 15 16 17 18 19 20 21 22 23 24 25 26 27 28 29 30 31 32 package com.kakawanyifan.controller;import com.kakawanyifan.pojo.User;import org.springframework.stereotype.Controller;import org.springframework.web.bind.annotation.RequestMapping;import org.springframework.web.bind.annotation.ResponseBody;import java.util.ArrayList;import java.util.List;@Controller @RequestMapping ("/user" )public class UserController @RequestMapping (value = "/res" ) @ResponseBody public List<User> res () List<User> userList = new ArrayList<>(); User user1 = new User(); user1.setAge(1 ); user1.setName("一岁" ); userList.add(user1); User user2 = new User(); user2.setAge(2 ); user2.setName("二二" ); userList.add(user2); return userList; } }
REST风格
简介
REST,Representational State Transfer,表现形式状态转换,一种软件架构风格。
当我们想表示一个网络资源的时候,可以使用两种方式:
传统风格资源描述形式http://localhost/user/getById?id=1:查询id为1的用户信息http://localhost/user/saveUser:保存用户信息
REST风格描述形式
http://localhost/user/1http://localhost/user
传统方式一般是一个请求url对应一种操作。而REST风格一个相同的url地址可以是新增也可以是修改或者查询,按照访问资源时使用"行为动作"区分对资源进行了何种操作。
GET:查询POST:新增PUT:修改DELETE:删除
上述行为是约定方式,约定不是规范,可以打破,所以称REST风格,而不是REST规范。所以你完全可以在GET请求上执行删除操作,只是这样写的代码可读性不强。
还有一个常见的概念是RESTful,根据REST风格对资源进行访问称为RESTful。
有些资料说,REST更安全,因为对于传统风格,很容易通过地址判断这个接口的作用,但是REST无法根据地址判断接口作用。
入门案例
名称
@PathVariable
类型
形参注解
位置
SpringMVC控制器方法形参定义前面
作用
绑定路径参数与处理器方法形参间的关系,要求路径参数名与形参名一一对应
关于接收参数,我们学过三个注解@RequestBody、@RequestParam、@PathVariable。区别如下:
@RequestParam用于接收url地址传参或表单传参
@RequestBody用于接收请求体的数据(JSON)
@PathVariable用于接收路径参数,使用{参数名称}描述路径参数
示例代码:
1 2 3 4 5 6 7 8 9 10 11 12 13 14 15 16 17 18 19 20 21 22 23 24 25 26 27 28 29 30 31 32 33 34 35 36 37 38 39 40 41 42 43 44 package com.kakawanyifan.controller;import com.kakawanyifan.pojo.Book;import org.springframework.stereotype.Controller;import org.springframework.web.bind.annotation.*;@Controller public class BookController @RequestMapping (value = "/books" ,method = RequestMethod.POST) @ResponseBody public String save (@RequestBody Book book) System.out.println("book save..." + book); return "{\"module\":\"book save\"}" ; } @RequestMapping (value = "/books/{id}" ,method = RequestMethod.DELETE) @ResponseBody public String delete (@PathVariable Integer id) System.out.println("book delete..." + id); return "{\"module\":\"book delete\"}" ; } @RequestMapping (value = "/books" ,method = RequestMethod.PUT) @ResponseBody public String update (@RequestBody Book book) System.out.println("book update..." + book); return "{\"module\":\"book update\"}" ; } @RequestMapping (value = "/books/{id}" ,method = RequestMethod.GET) @ResponseBody public String getById (@PathVariable Integer id) System.out.println("book getById..." + id); return "{\"module\":\"book getById\"}" ; } @RequestMapping (value = "/books" ,method = RequestMethod.GET) @ResponseBody public String getAll () System.out.println("book getAll..." ); return "{\"module\"':\"book getAll\"}" ; } }
快速开发
名称
@RestController
类型
类注解
位置
基于SpringMVC的RESTful开发控制器类定义上方
作用
设置当前控制器类为RESTful风格,
示例代码:
1 2 3 4 5 6 7 8 9 10 11 12 13 14 15 16 17 18 19 20 21 22 23 24 25 26 27 28 29 30 31 32 33 34 35 36 37 38 39 40 package com.kakawanyifan.controller;import com.kakawanyifan.pojo.Book;import org.springframework.web.bind.annotation.*;@RestController @RequestMapping ("/books" )public class BookController @PostMapping public String save (@RequestBody Book book) System.out.println("book save..." + book); return "{\"module\":\"book save\"}" ; } @DeleteMapping ("/{id}" ) public String delete (@PathVariable Integer id) System.out.println("book delete..." + id); return "{\"module\":\"book delete\"}" ; } @PutMapping public String update (@RequestBody Book book) System.out.println("book update..." + book); return "{\"module\":\"book update\"}" ; } @GetMapping ("/{id}" ) public String getById (@PathVariable Integer id) System.out.println("book getById..." + id); return "{\"module\":\"book getById\"}" ; } @GetMapping public String getAll () System.out.println("book getAll..." ); return "{\"module\"':\"book getAll\"}" ; } }
关于@GetMapping、@PostMapping、@PutMapping和@DeleteMapping,我们在上文讨论设置请求的时候提到过。
拦截器
拦截器概念
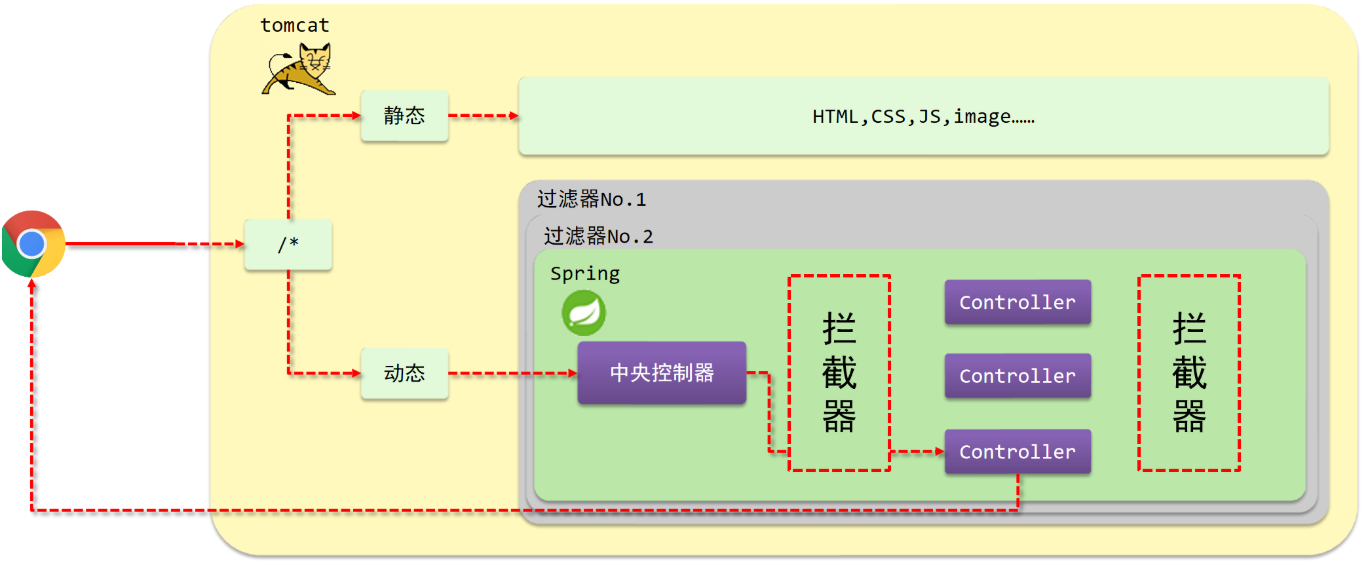
首先,我们通过一张图,看拦截器的一次请求处理中的位置。
浏览器发送一个请求会先到Tomcat的web服务器
Tomcat服务器接收到请求以后,会去根据我们配置的/*,判断应该交给哪一方进行处理。
一般如果发现是静态资源,会直接到Tomcat的项目部署目录下去直接访问
如果是动态资源,就需要交给项目的后台代码进行处理
在进入Spring之前,我们还可以去配置多个过滤器。
进入Spring之后,在Spring的中央处理器和具体的Controller之间,我们还可以配置多个拦截器。
拦截器,Interceptor,是一种动态拦截方法调用的机制,在SpringMVC中动态拦截控制器方法的执行。
做增强?
归属不同:
拦截内容不同:
入门案例
创建拦截器类
实现HandlerInterceptor接口,重写接口中的三个方法。
示例代码:
1 2 3 4 5 6 7 8 9 10 11 12 13 14 15 16 17 18 19 20 21 22 23 24 25 26 27 28 29 30 package com.kakawanyifan.interceptor;import org.springframework.stereotype.Component;import org.springframework.web.servlet.HandlerInterceptor;import org.springframework.web.servlet.ModelAndView;import javax.servlet.http.HttpServletRequest;import javax.servlet.http.HttpServletResponse;@Component public class ProjectInterceptor implements HandlerInterceptor @Override public boolean preHandle (HttpServletRequest request, HttpServletResponse response, Object handler) throws Exception System.out.println("preHandle..." ); return true ; } @Override public void postHandle (HttpServletRequest request, HttpServletResponse response, Object handler, ModelAndView modelAndView) throws Exception System.out.println("postHandle..." ); } @Override public void afterCompletion (HttpServletRequest request, HttpServletResponse response, Object handler, Exception ex) throws Exception System.out.println("afterCompletion..." ); } }
1 2 3 4 5 6 7 8 9 10 11 12 package com.kakawanyifan.config;import org.springframework.context.annotation.ComponentScan;import org.springframework.context.annotation.Configuration;import org.springframework.web.servlet.config.annotation.EnableWebMvc;@Configuration @ComponentScan (value = {"com.kakawanyifan.controller" ,"com.kakawanyifan.interceptor" })@EnableWebMvc public class SpringMvcConfig }
注意,拦截器需要被SpringMVC容器扫描到。@Component;所以在SpringMvcConfig的配置类的ComponentScan添加了"com.kakawanyifan.interceptor"。
配置拦截器类
1 2 3 4 5 6 7 8 9 10 11 12 13 14 15 16 17 18 19 package com.kakawanyifan.config;import com.kakawanyifan.interceptor.ProjectInterceptor;import org.springframework.beans.factory.annotation.Autowired;import org.springframework.context.annotation.Configuration;import org.springframework.web.servlet.config.annotation.InterceptorRegistry;import org.springframework.web.servlet.config.annotation.WebMvcConfigurationSupport;@Configuration public class SpringMvcSupport extends WebMvcConfigurationSupport @Autowired private ProjectInterceptor projectInterceptor; @Override protected void addInterceptors (InterceptorRegistry registry) registry.addInterceptor(projectInterceptor).addPathPatterns("/books" ); } }
示例代码:
1
2
3
4
5
6
7
8
9
10
11
12
package com.kakawanyifan.config;import org.springframework.context.annotation.ComponentScan;import org.springframework.context.annotation.Configuration;import org.springframework.web.servlet.config.annotation.EnableWebMvc;@Configuration @ComponentScan (value = {"com.kakawanyifan.controller" ,"com.kakawanyifan.interceptor" ,"com.kakawanyifan.config" })@EnableWebMvc public class SpringMvcConfig }
在SpringMvcConfig的配置类的ComponentScan添加了"com.kakawanyifan.config",表示这个SpringMvcSupport也要被加载上。
测试
然后我们请求http://localhost:8080/mvc/books。
运行结果:
1 2 3 4 preHandle... book getAll... postHandle... afterCompletion...
但是如果我们请求/books/1,会发现拦截器没有被执行。addInterceptors方法中,addPathPatterns配置的拦截路径是/books,我们现在发送的是/books/1,所以没有匹配上,因此没有拦截,拦截器就不会执行。
改成如下的形式,即可。
1 registry.addInterceptor(projectInterceptor).addPathPatterns("/books" ,"/books/*" );
简化开发
SpringMvcConfig实现WebMvcConfigurer的接口,重写addInterceptors方法。SpringMvcSupport类了。
1 2 3 4 5 6 7 8 9 10 11 12 13 14 15 16 17 18 19 20 21 22 23 package com.kakawanyifan.config;import com.kakawanyifan.interceptor.ProjectInterceptor;import org.springframework.beans.factory.annotation.Autowired;import org.springframework.context.annotation.ComponentScan;import org.springframework.context.annotation.Configuration;import org.springframework.web.servlet.config.annotation.EnableWebMvc;import org.springframework.web.servlet.config.annotation.InterceptorRegistry;import org.springframework.web.servlet.config.annotation.WebMvcConfigurer;@Configuration @ComponentScan (value = {"com.kakawanyifan.controller" ,"com.kakawanyifan.interceptor" })@EnableWebMvc public class SpringMvcConfig implements WebMvcConfigurer @Autowired private ProjectInterceptor projectInterceptor; @Override public void addInterceptors (InterceptorRegistry registry) registry.addInterceptor(projectInterceptor).addPathPatterns("/books" ,"/books/*" ); } }
拦截器方法
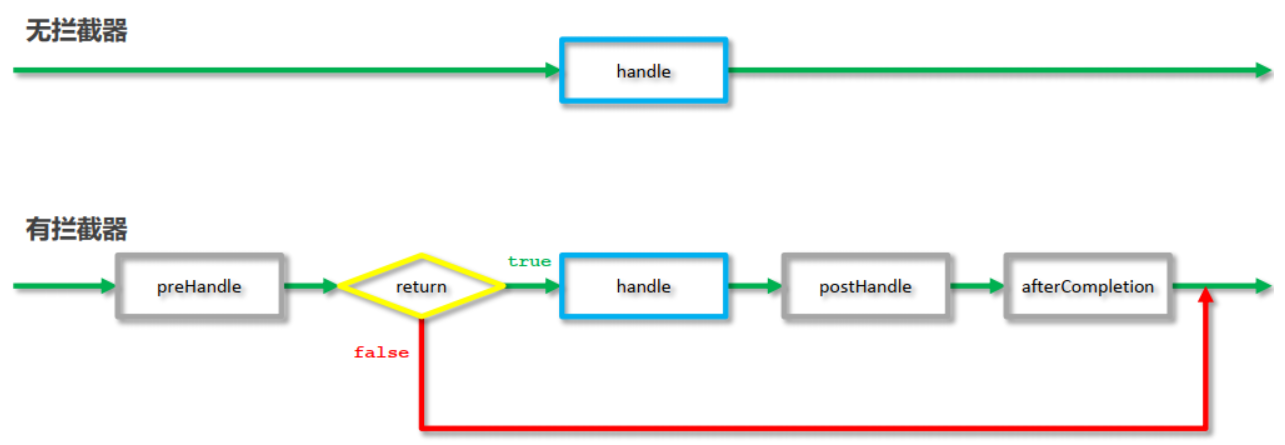
在上文的拦截器类中,有三个方法。
前置处理方法
前置处理方法,即preHandle方法。
preHandle方法方法如下,有三个参数。
1 2 3 4 5 6 public boolean preHandle (HttpServletRequest request, HttpServletResponse response, Object handler) throws Exception System.out.println("preHandle" ); return true ; }
request:请求对象
response:响应对象
handler:被调用的处理器对象,本质上是一个方法对象,对反射中的Method对象进行了再包装
使用handler参数,可以获取方法的相关信息
1 2 3 4 5 6 7 8 9 public boolean preHandle (HttpServletRequest request, HttpServletResponse response, Object handler) throws Exception System.out.println("preHandle..." ); HandlerMethod hm = (HandlerMethod)handler; String methodName = hm.getMethod().getName(); System.out.println(methodName); return true ; }
运行结果
如果preHandle方法返回true,则放行。会继续执行后面方法。
如果preHandle方法返回false,则直接跳过后面方法的执行。
所以,一个常见应用场景是判断用户登录。
示例代码:
1 2 3 4 5 6 7 8 9 10 11 12 13 14 15 16 17 18 19 20 21 22 23 24 25 26 27 28 29 30 31 package com.kakawanyifan.interceptor;import com.kakawanyifan.pojo.User;import org.springframework.stereotype.Component;import org.springframework.web.servlet.HandlerInterceptor;import org.springframework.web.servlet.ModelAndView;import javax.servlet.http.HttpServletRequest;import javax.servlet.http.HttpServletResponse;@Component public class ProjectInterceptor implements HandlerInterceptor @Override public boolean preHandle (HttpServletRequest request, HttpServletResponse response, Object handler) throws Exception System.out.println("preHandle..." ); User user = null ; if (null != request.getAttribute("user" )){ user = (User) request.getAttribute("user" ); }else { response.sendRedirect(request.getContextPath() + "/login" ); } return true ; } 【部分代码略】 }
后置处理方法
1 2 3 4 5 6 public void postHandle (HttpServletRequest request, HttpServletResponse response, Object handler, ModelAndView modelAndView) throws Exception System.out.println("postHandle" ); }
前三个参数和上面的是一致的。modelAndView:如果处理器执行完成具有返回结果,可以读取到对应数据与页面信息,并进行调整。在现在前后端分离的设计中,已经不常用。
完成处理方法
有些资料说,不论前置处理方法返回true或者false,该方法一定会执行。false,该方法不会被执行。
1 2 3 4 5 6 public void afterCompletion (HttpServletRequest request, HttpServletResponse response, Object handler, Exception ex) throws Exception System.out.println("afterCompletion" ); }
第四个参数,ex,如果处理器执行过程中出现异常对象,可以针对异常情况进行单独处理。《18.SSM》 会进行讨论。
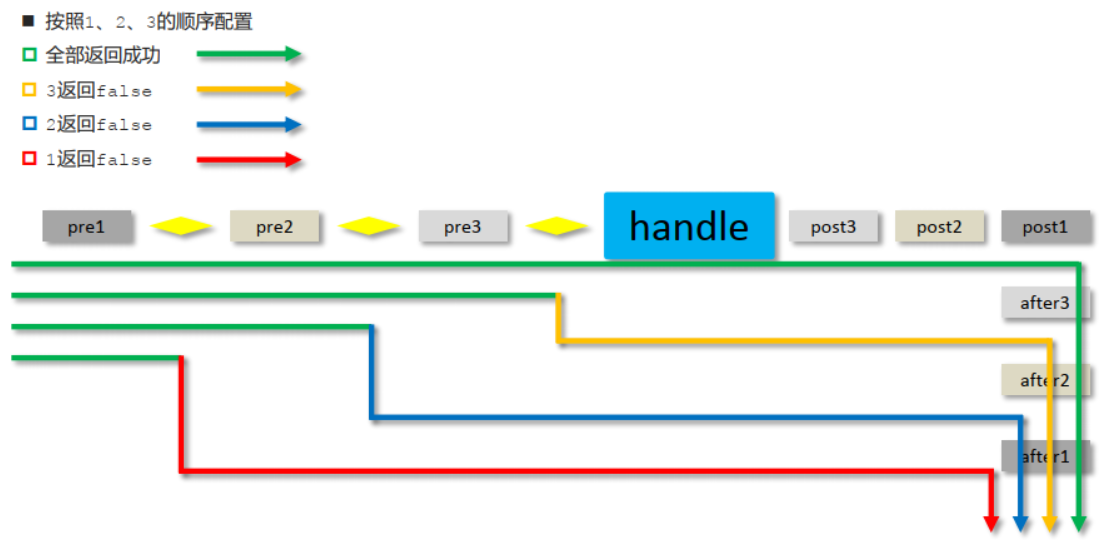
拦截器链
目前,我们在项目中只添加了一个拦截器,如果有多个,该怎么配置?addInterceptors方法中,依次写多个就够了。
1 2 3 4 5 protected void addInterceptors (InterceptorRegistry registry) registry.addInterceptor(pre1).addPathPatterns("/books" ,"/books/*" ); registry.addInterceptor(pre2).addPathPatterns("/books" ,"/books/*" ); registry.addInterceptor(pre3).addPathPatterns("/books" ,"/books/*" ); }
执行顺序是什么?
XML方式
spring-mvc.xml:
1 2 3 4 5 6 7 8 9 10 11 12 13 14 15 16 17 18 19 20 21 22 23 24 25 <?xml version="1.0" encoding="UTF-8"?> <beans xmlns ="http://www.springframework.org/schema/beans" xmlns:xsi ="http://www.w3.org/2001/XMLSchema-instance" xmlns:mvc ="http://www.springframework.org/schema/mvc" xmlns:context ="http://www.springframework.org/schema/context" xsi:schemaLocation ="http://www.springframework.org/schema/beans http://www.springframework.org/schema/beans/spring-beans.xsd http://www.springframework.org/schema/mvc http://www.springframework.org/schema/mvc/spring-mvc.xsd http://www.springframework.org/schema/context http://www.springframework.org/schema/context/spring-context.xsd" >【部分代码略】 <mvc:interceptors > <mvc:interceptor > <mvc:mapping path ="/books" /> <bean class ="com.kakawanyifan.interceptor.ProjectInterceptor" /> </mvc:interceptor > </mvc:interceptors > </beans >
如果我们有多个拦截器呢?
1 2 3 4 5 6 7 8 9 10 11 12 13 <mvc:interceptors > <mvc:interceptor > <mvc:mapping path ="/**" /> <bean class ="com.kakawanyifan.interceptor.MyInterceptor2" /> </mvc:interceptor > <mvc:interceptor > <mvc:mapping path ="/**" /> <bean class ="com.kakawanyifan.interceptor.MyInterceptor1" /> </mvc:interceptor > </mvc:interceptors >
整合Spring
不需要引入spring-context
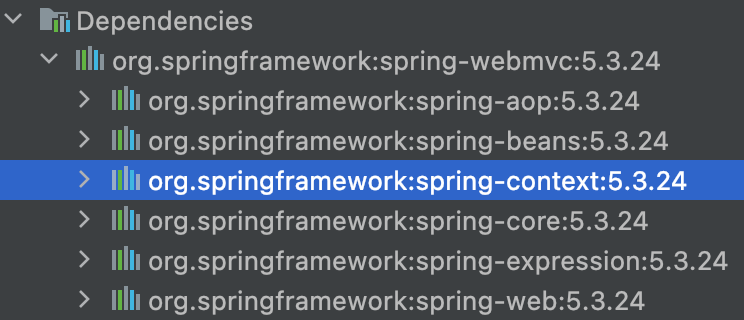
整合Spring,那么,来吧,第一步我们引入spring-context。
这个不需要。
我们可以通过IDEA工具右侧的Maven部分看到。
Bean加载控制
原因
如果我们把Bean全放在Spring中。
如果我们把Bean全部放到springMVC中。
拓展性不强。
因为事务管理器是在Spring中的,这么做可能会导致事务管理器失效。
所以SpringMVC管理controller,Spring管理controller之外的。
方法
两种方法:
对Spring加载的Bean,进行指定,指定service层和dao层等,不指定controller层。
对Spring加载的Bean,排除Controller
名称
@ComponentScan
类型
类注解
位置
类定义上方
作用
设置spring配置类扫描路径,用于加载使用注解格式定义的bean
相关属性
excludeFilters:排除扫描路径中加载的bean,需要指定类别(type)和具体项(classes)
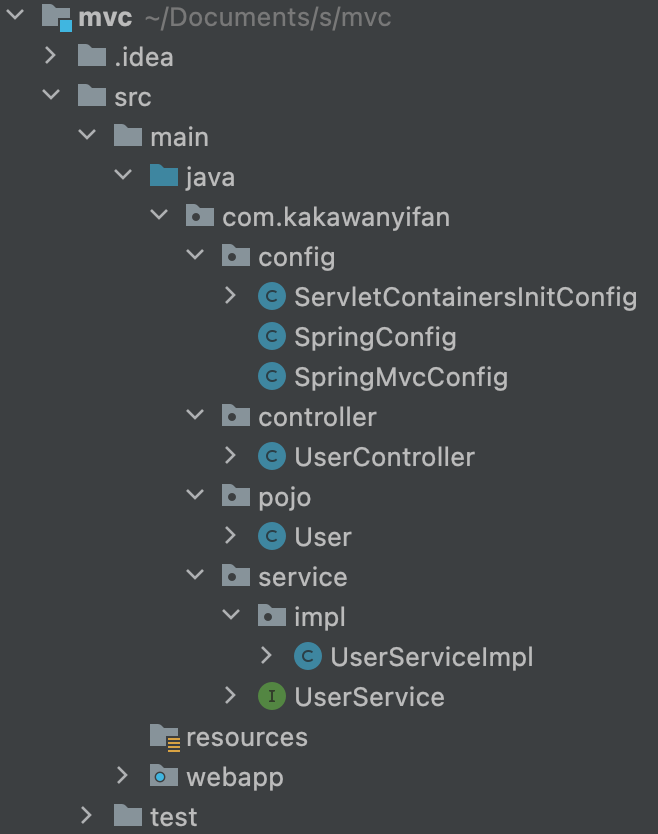
假设,现在存在一个项目,结构如下
对Spring加载的Bean,进行指定,指定service层和dao层等,不指定controller层。
示例代码:
1 2 3 4 5 6 7 8 9 10 package com.kakawanyifan.config;import org.springframework.context.annotation.ComponentScan;import org.springframework.context.annotation.Configuration;@Configuration @ComponentScan ({"com.kakawanyifan.service" })public class SpringConfig }
对Spring加载的Bean,排除Controller
1 2 3 4 5 6 7 8 9 10 11 12 13 14 15 16 package com.kakawanyifan.config;import org.springframework.context.annotation.ComponentScan;import org.springframework.context.annotation.Configuration;import org.springframework.context.annotation.FilterType;import org.springframework.stereotype.Controller;@Configuration @ComponentScan (value = "com.kakawanyifan" ,excludeFilters = @ComponentScan .Filter( type = FilterType.ANNOTATION, classes = Controller.class )) public class SpringConfig }
为什么还能加载上
现在,就比如第二种方法,我们来试一下。示例代码:
1 2 3 4 5 6 7 8 9 10 11 12 package com.kakawanyifan;import com.kakawanyifan.config.SpringConfig;import com.kakawanyifan.controller.UserController;import org.springframework.context.annotation.AnnotationConfigApplicationContext;public class App public static void main (String[] args) AnnotationConfigApplicationContext ctx = new AnnotationConfigApplicationContext(SpringConfig.class ) ; System.out.println(ctx.getBean(UserController.class )) ; } }
运行结果:
1 com.kakawanyifan.controller.UserController@8909f18
加载上了?SpringMvcConfig的@Configuration去掉,就不会有了。SpringMvcConfig上有@Configuration,所以会被扫描。然后其指定的@ComponentScan的也会被加载。
配置Spring容器
然后我们来启动一下服务,运行结果:
1 2 3 4 5 6 7 8 9 10 11 12 13 14 15 16 17 18 19 20 【部分运行结果略】 10-Dec-2022 17:44:53.427 SEVERE [RMI TCP Connection(2)-127.0.0.1] org.springframework.web.servlet.FrameworkServlet.initServletBean Context initialization failed org.springframework.beans.factory.UnsatisfiedDependencyException: Error creating bean with name 'userController': Unsatisfied dependency expressed through field 'userService'; nested exception is org.springframework.beans.factory.NoSuchBeanDefinitionException: No qualifying bean of type 'com.kakawanyifan.service.UserService' available: expected at least 1 bean which qualifies as autowire candidate. Dependency annotations: {@org.springframework.beans.factory.annotation.Autowired(required=true)} at org.springframework.beans.factory.annotation.AutowiredAnnotationBeanPostProcessor$AutowiredFieldElement.resolveFieldValue(AutowiredAnnotationBeanPostProcessor.java:660) at org.springframework.beans.factory.annotation.AutowiredAnnotationBeanPostProcessor$AutowiredFieldElement.inject(AutowiredAnnotationBeanPostProcessor.java:640) at org.springframework.beans.factory.annotation.InjectionMetadata.inject(InjectionMetadata.java:119) at org.springframework.beans.factory.annotation.AutowiredAnnotationBeanPostProcessor.postProcessProperties(AutowiredAnnotationBeanPostProcessor.java:399) 【部分运行结果略】 Caused by: org.springframework.beans.factory.NoSuchBeanDefinitionException: No qualifying bean of type 'com.kakawanyifan.service.UserService' available: expected at least 1 bean which qualifies as autowire candidate. Dependency annotations: {@org.springframework.beans.factory.annotation.Autowired(required=true)} at org.springframework.beans.factory.support.DefaultListableBeanFactory.raiseNoMatchingBeanFound(DefaultListableBeanFactory.java:1801) at org.springframework.beans.factory.support.DefaultListableBeanFactory.doResolveDependency(DefaultListableBeanFactory.java:1357) at org.springframework.beans.factory.support.DefaultListableBeanFactory.resolveDependency(DefaultListableBeanFactory.java:1311) at org.springframework.beans.factory.annotation.AutowiredAnnotationBeanPostProcessor$AutowiredFieldElement.resolveFieldValue(AutowiredAnnotationBeanPostProcessor.java:657) ... 67 more 【部分运行结果略】
有了Spring的配置类,要想在Tomcat服务器启动将其加载,我们需要修改ServletContainersInitConfig
示例代码:
1
2
3
4
5
6
7
8
9
10
11
12
13
14
15
16
17
18
19
20
21
package com.kakawanyifan.config;import org.springframework.web.servlet.support.AbstractAnnotationConfigDispatcherServletInitializer;public class ServletContainersInitConfig extends AbstractAnnotationConfigDispatcherServletInitializer @Override protected Class<?>[] getRootConfigClasses() { return new Class[]{SpringConfig.class } ; } @Override protected Class<?>[] getServletConfigClasses() { return new Class[]{SpringMvcConfig.class } ; } @Override protected String[] getServletMappings() { return new String[]{"/" }; } }
XML方式
web.xml:
1 2 3 4 5 6 7 8 9 10 11 12 13 14 15 16 17 18 19 20 21 22 23 24 25 26 27 28 29 30 <?xml version="1.0" encoding="UTF-8"?> <web-app xmlns ="http://xmlns.jcp.org/xml/ns/javaee" xmlns:xsi ="http://www.w3.org/2001/XMLSchema-instance" xsi:schemaLocation ="http://xmlns.jcp.org/xml/ns/javaee http://xmlns.jcp.org/xml/ns/javaee/web-app_4_0.xsd" version ="4.0" > <context-param > <param-name > contextConfigLocation</param-name > <param-value > classpath:applicationContext.xml</param-value > </context-param > <listener > <listener-class > org.springframework.web.context.ContextLoaderListener</listener-class > </listener > <servlet > <servlet-name > DispatcherServlet</servlet-name > <servlet-class > org.springframework.web.servlet.DispatcherServlet</servlet-class > <init-param > <param-name > contextConfigLocation</param-name > <param-value > classpath:spring-mvc.xml</param-value > </init-param > <load-on-startup > 1</load-on-startup > </servlet > <servlet-mapping > <servlet-name > DispatcherServlet</servlet-name > <url-pattern > /</url-pattern > </servlet-mapping > </web-app >
spring-mvc.xml:
1 2 3 4 5 6 7 8 9 10 11 12 13 14 15 16 17 18 <?xml version="1.0" encoding="UTF-8"?> <beans xmlns ="http://www.springframework.org/schema/beans" xmlns:xsi ="http://www.w3.org/2001/XMLSchema-instance" xmlns:mvc ="http://www.springframework.org/schema/mvc" xmlns:context ="http://www.springframework.org/schema/context" xsi:schemaLocation ="http://www.springframework.org/schema/beans http://www.springframework.org/schema/beans/spring-beans.xsd http://www.springframework.org/schema/mvc http://www.springframework.org/schema/mvc/spring-mvc.xsd http://www.springframework.org/schema/context http://www.springframework.org/schema/context/spring-context.xsd" > <context:component-scan base-package ="com.kakawanyifan.controller" /> 【部分代码略】 </beans >
applicationContext.xml:
1 2 3 4 5 6 7 8 9 10 11 12 13 14 15 <?xml version="1.0" encoding="UTF-8"?> <beans xmlns ="http://www.springframework.org/schema/beans" xmlns:xsi ="http://www.w3.org/2001/XMLSchema-instance" xmlns:context ="http://www.springframework.org/schema/context" xsi:schemaLocation ="http://www.springframework.org/schema/beans http://www.springframework.org/schema/beans/spring-beans.xsd http://www.springframework.org/schema/context http://www.springframework.org/schema/context/spring-context.xsd" > <context:component-scan base-package ="com.kakawanyifan" > <context:exclude-filter type ="annotation" expression ="org.springframework.stereotype.Controller" /> </context:component-scan > </beans >