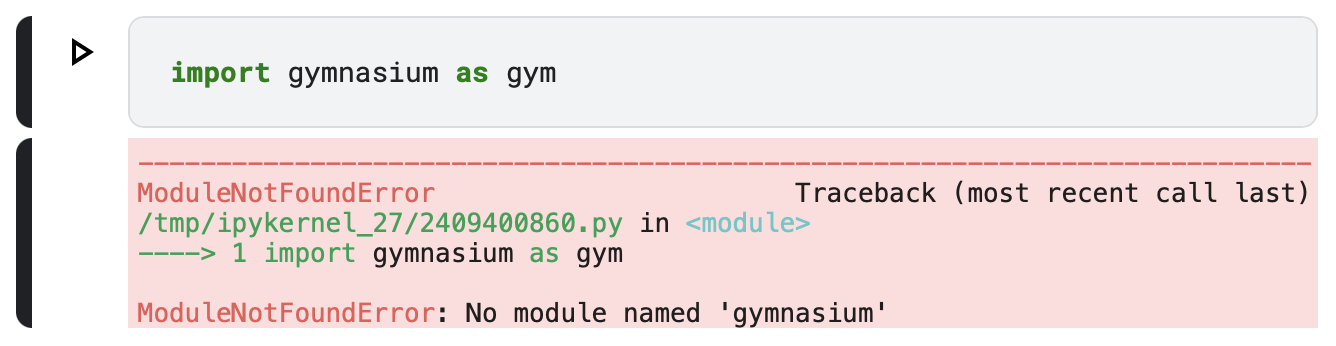
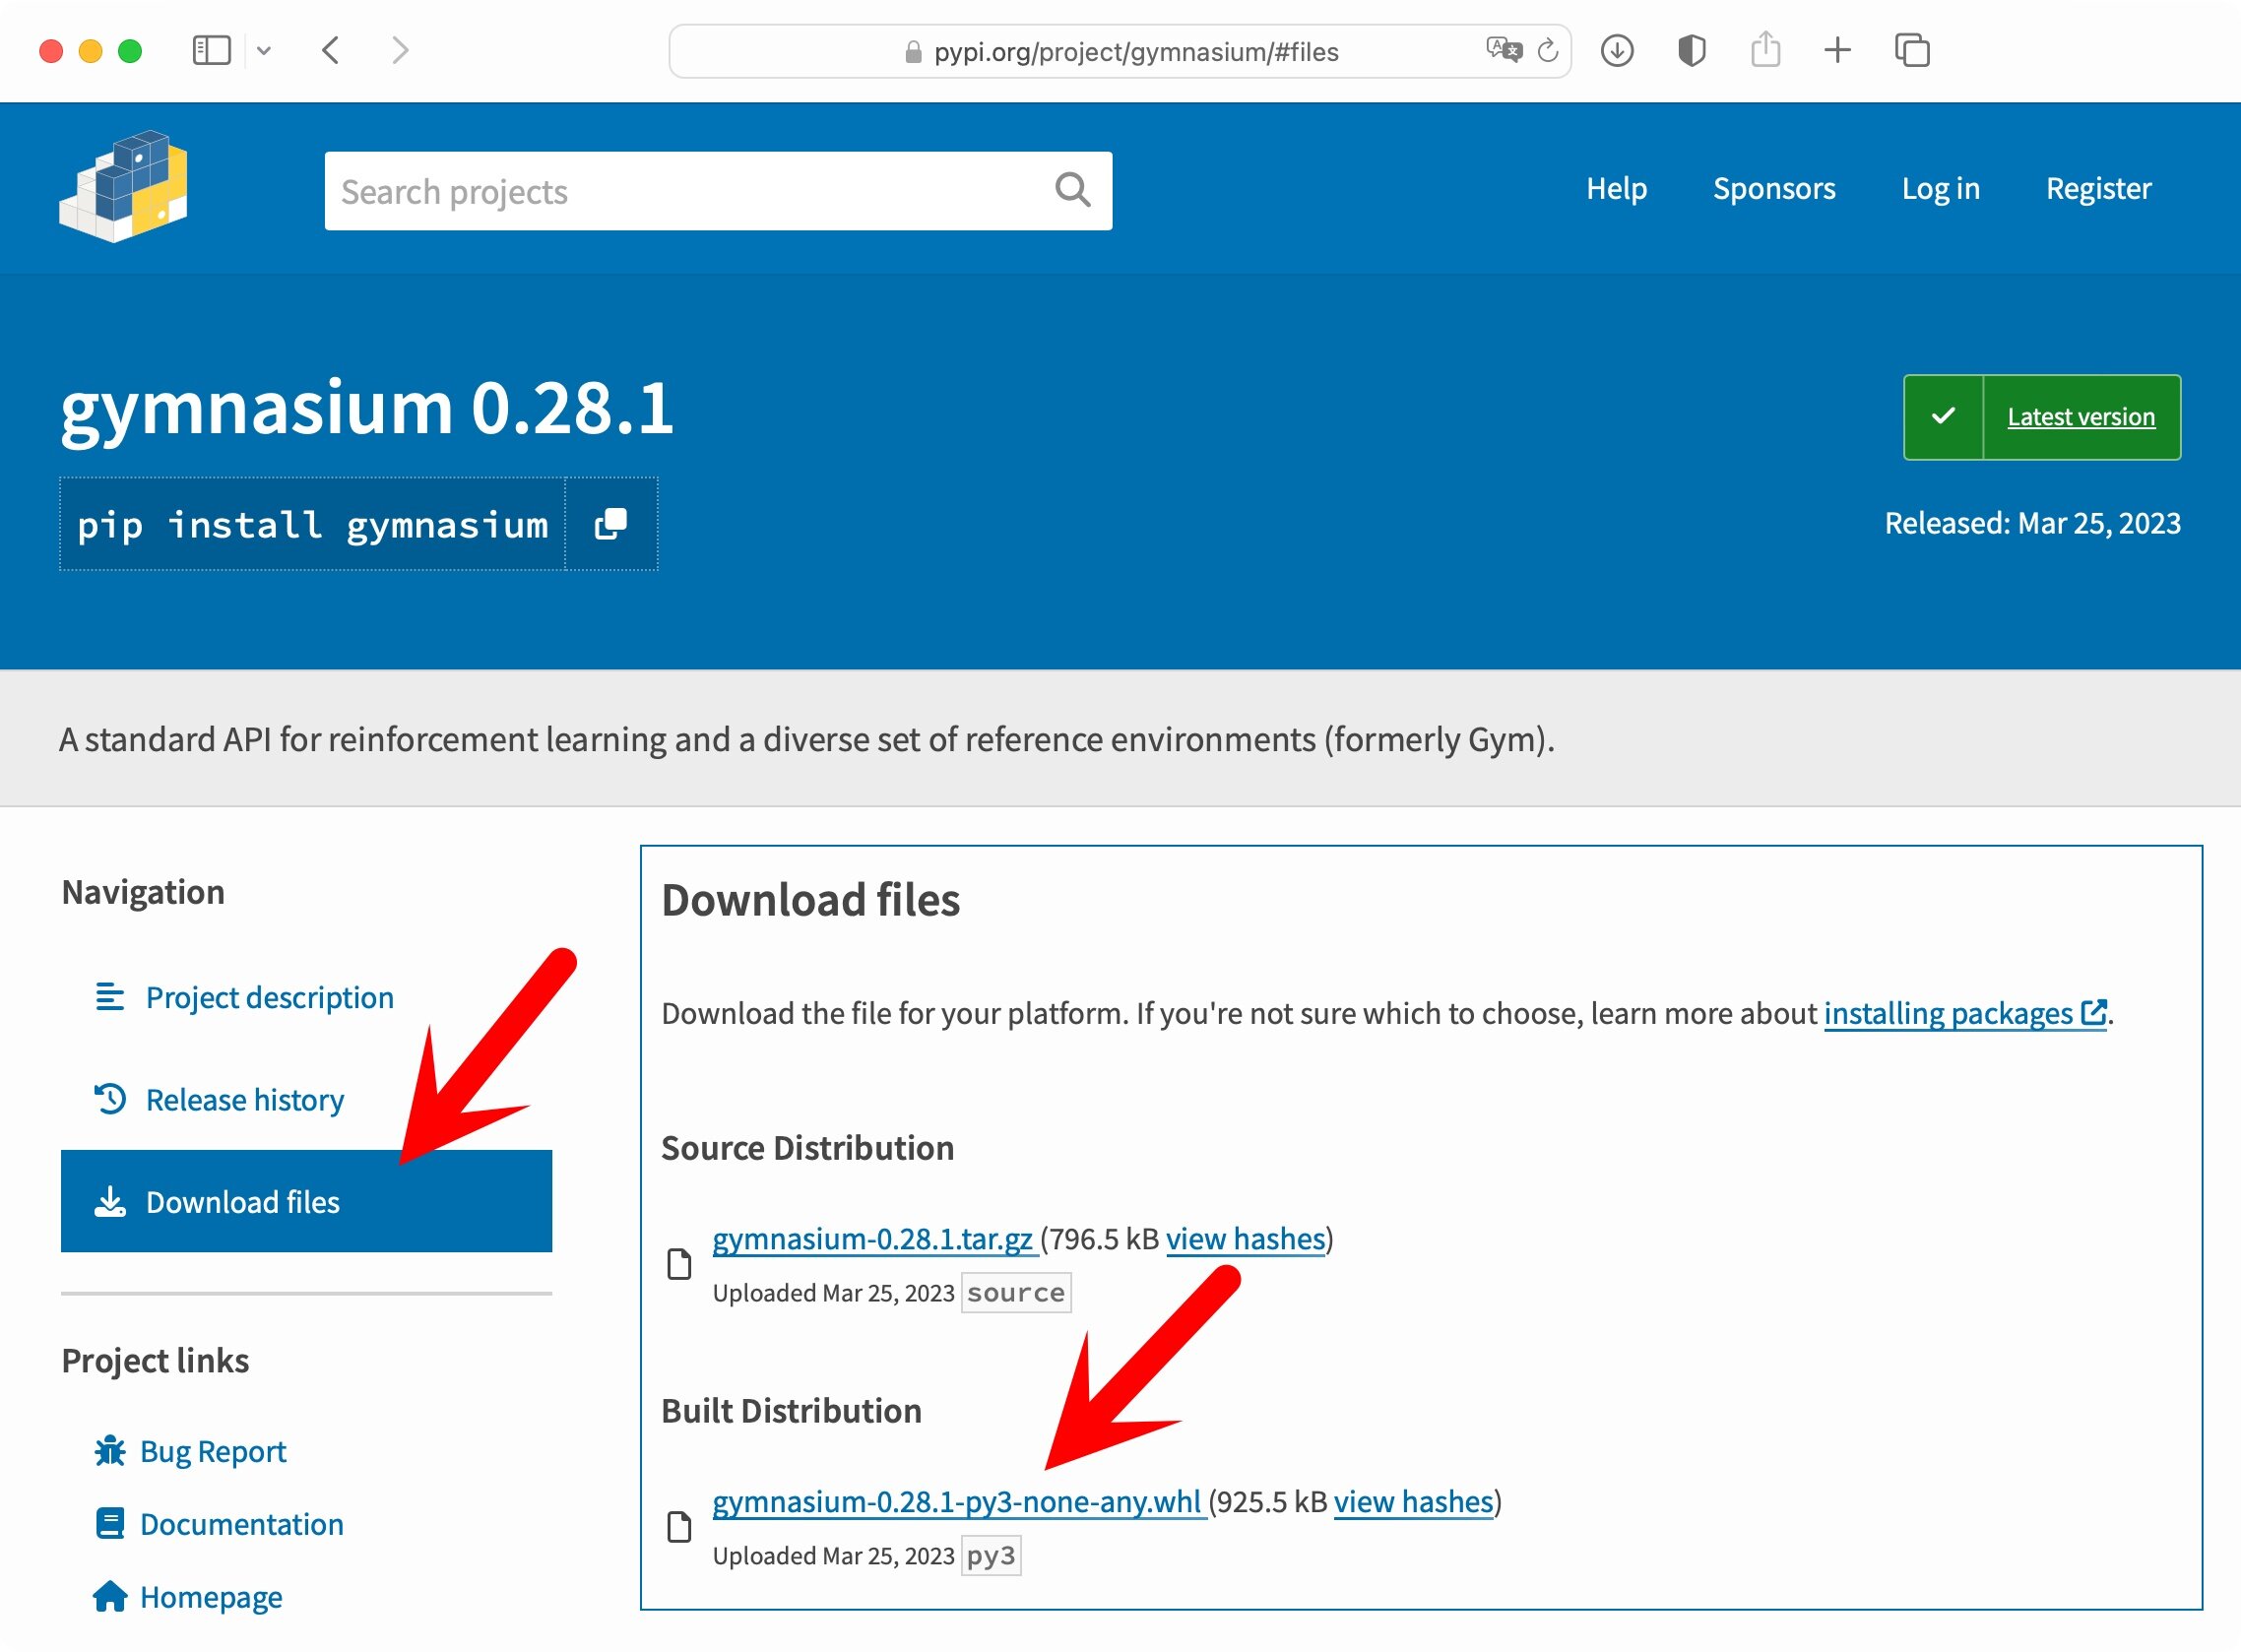
Processing /kaggle/input/package/jax_jumpy-1.0.0-py3-none-any.whl
Requirement already satisfied: numpy>=1.18.0 in /opt/conda/lib/python3.7/site-packages (from jax-jumpy==1.0.0) (1.21.6)
Installing collected packages: jax-jumpy
Successfully installed jax-jumpy-1.0.0
WARNING: Running pip as the 'root' user can result in broken permissions and conflicting behaviour with the system package manager. It is recommended to use a virtual environment instead: https://pip.pypa.io/warnings/venv class="ansi-yellow-fg">
WARNING: There was an error checking the latest version of pip.
Processing /kaggle/input/package/Farama_Notifications-0.0.4-py3-none-any.whl
Installing collected packages: Farama-Notifications
Successfully installed Farama-Notifications-0.0.4
WARNING: Running pip as the 'root' user can result in broken permissions and conflicting behaviour with the system package manager. It is recommended to use a virtual environment instead: https://pip.pypa.io/warnings/venv class="ansi-yellow-fg">
WARNING: There was an error checking the latest version of pip.
Processing /kaggle/input/package/gymnasium-0.28.1-py3-none-any.whl
Requirement already satisfied: importlib-metadata>=4.8.0 in /opt/conda/lib/python3.7/site-packages (from gymnasium==0.28.1) (4.11.4)
Requirement already satisfied: cloudpickle>=1.2.0 in /opt/conda/lib/python3.7/site-packages (from gymnasium==0.28.1) (2.2.1)
Requirement already satisfied: numpy>=1.21.0 in /opt/conda/lib/python3.7/site-packages (from gymnasium==0.28.1) (1.21.6)
Requirement already satisfied: typing-extensions>=4.3.0 in /opt/conda/lib/python3.7/site-packages (from gymnasium==0.28.1) (4.4.0)
Requirement already satisfied: farama-notifications>=0.0.1 in /opt/conda/lib/python3.7/site-packages (from gymnasium==0.28.1) (0.0.4)
Requirement already satisfied: jax-jumpy>=1.0.0 in /opt/conda/lib/python3.7/site-packages (from gymnasium==0.28.1) (1.0.0)
Requirement already satisfied: zipp>=0.5 in /opt/conda/lib/python3.7/site-packages (from importlib-metadata>=4.8.0->gymnasium==0.28.1) (3.11.0)
Installing collected packages: gymnasium
Successfully installed gymnasium-0.28.1
WARNING: Running pip as the 'root' user can result in broken permissions and conflicting behaviour with the system package manager. It is recommended to use a virtual environment instead: https://pip.pypa.io/warnings/venv class="ansi-yellow-fg">
WARNING: There was an error checking the latest version of pip.
观察空间 = Discrete(16)
动作空间 = Discrete(4)
Requirement already satisfied: gym in /opt/conda/lib/python3.7/site-packages (0.23.1)
Requirement already satisfied: gym-notices>=0.0.4 in /opt/conda/lib/python3.7/site-packages (from gym) (0.0.8)
Requirement already satisfied: cloudpickle>=1.2.0 in /opt/conda/lib/python3.7/site-packages (from gym) (2.2.1)
Requirement already satisfied: importlib-metadata>=4.10.0 in /opt/conda/lib/python3.7/site-packages (from gym) (4.11.4)
Requirement already satisfied: numpy>=1.18.0 in /opt/conda/lib/python3.7/site-packages (from gym) (1.21.6)
Requirement already satisfied: zipp>=0.5 in /opt/conda/lib/python3.7/site-packages (from importlib-metadata>=4.10.0->gym) (3.11.0)
Requirement already satisfied: typing-extensions>=3.6.4 in /opt/conda/lib/python3.7/site-packages (from importlib-metadata>=4.10.0->gym) (4.4.0)
WARNING: Running pip as the 'root' user can result in broken permissions and conflicting behaviour with the system package manager. It is recommended to use a virtual environment instead: https://pip.pypa.io/warnings/venv class="ansi-yellow-fg">
/kaggle/working/gym-0.26.2
make: *** No targets specified and no makefile found.  Stop.
make: *** No rule to make target 'install'.  Stop.
running install
/opt/conda/lib/python3.7/site-packages/setuptools/command/install.py:37: SetuptoolsDeprecationWarning: setup.py install is deprecated. Use build and pip and other standards-based tools.
  setuptools.SetuptoolsDeprecationWarning,
/opt/conda/lib/python3.7/site-packages/setuptools/command/easy_install.py:159: EasyInstallDeprecationWarning: easy_install command is deprecated. Use build and pip and other standards-based tools.
  EasyInstallDeprecationWarning,
running bdist_egg
running egg_info
writing gym.egg-info/PKG-INFO

【部分运行结果略】

Using /opt/conda/lib/python3.7/site-packages
Searching for zipp==3.11.0
Best match: zipp 3.11.0
Adding zipp 3.11.0 to easy-install.pth file

Using /opt/conda/lib/python3.7/site-packages
Finished processing dependencies for gym==0.26.2
/kaggle/input/gym-0262targz/gym-0.26.2
make: *** No targets specified and no makefile found.  Stop.
make: *** No rule to make target 'install'.  Stop.
running install
/opt/conda/lib/python3.7/site-packages/setuptools/command/install.py:37: SetuptoolsDeprecationWarning: setup.py install is deprecated. Use build and pip and other standards-based tools.
  setuptools.SetuptoolsDeprecationWarning,
/opt/conda/lib/python3.7/site-packages/setuptools/command/easy_install.py:159: EasyInstallDeprecationWarning: easy_install command is deprecated. Use build and pip and other standards-based tools.
  EasyInstallDeprecationWarning,
running bdist_egg
running egg_info
error: [Errno 30] Read-only file system
num = 10 start = time.time() for i in range(num): my_fun(i)
end = time.time()
print('{:.4f} s'.format(end - start))
start = time.time() # n_jobs is the number of parallel jobs Parallel(n_jobs=2)(delayed(my_fun)(i) for i in range(num)) end = time.time() print('{:.4f} s'.format(end-start))
运行结果:
1
2
10.0361 s 5.5562 s
我们看到,顺序执行的时候,耗时大概10秒钟,但是并发执行的话,只需要5秒钟。
注意!Parallel(n_jobs=2)和(delayed(my_fun)(i) for i in range(num))只能写成一行,不能写成两行。
1
2
Parallel(n_jobs=2)
(delayed(my_fun)(i) for i in range(num))
参数解释
我们重点关注这一行
1
Parallel(n_jobs=2)(delayed(my_fun)(i) for i in range(num))
# Memory saving function credit to https://www.kaggle.com/gemartin/load-data-reduce-memory-usage defreduce_mem_usage(df): """ iterate through all the columns of a dataframe and modify the data type to reduce memory usage. """ #start_mem = df.memory_usage().sum() / 1024**2 #print('Memory usage of dataframe is {:.2f} MB'.format(start_mem))
for col in df.columns: col_type = df[col].dtype
if col_type != object: c_min = df[col].min() c_max = df[col].max() if str(col_type)[:3] == 'int': if c_min > np.iinfo(np.int8).min and c_max < np.iinfo(np.int8).max: df[col] = df[col].astype(np.int8) elif c_min > np.iinfo(np.int16).min and c_max < np.iinfo(np.int16).max: df[col] = df[col].astype(np.int16) elif c_min > np.iinfo(np.int32).min and c_max < np.iinfo(np.int32).max: df[col] = df[col].astype(np.int32) elif c_min > np.iinfo(np.int64).min and c_max < np.iinfo(np.int64).max: df[col] = df[col].astype(np.int64) else: if c_min > np.finfo(np.float16).min and c_max < np.finfo(np.float16).max: df[col] = df[col].astype(np.float16) elif c_min > np.finfo(np.float32).min and c_max < np.finfo(np.float32).max: df[col] = df[col].astype(np.float32) else: df[col] = df[col].astype(np.float64)
#end_mem = df.memory_usage().sum() / 1024**2 #print('Memory usage after optimization is: {:.2f} MB'.format(end_mem)) #print('Decreased by {:.1f}%'.format(100 * (start_mem - end_mem) / start_mem))