背景
我想对Hexo的一些文章上锁,不对外开放。
这个需求,自然会想到hexo-blog-encrypt。
但是,hexo-blog-encrypt的密码都是静态密码,我想要动态密码。
所以,考虑hexo-readmore这个插件。
hexo-readmore
hexo-readmore:https://github.com/rqh656418510/hexo-readmore
关于hexo-readmore的使用方法,参考其官方文档。
本文主要论述一些关于hexo-readmore破解和反破解。
修改标签属性
破解
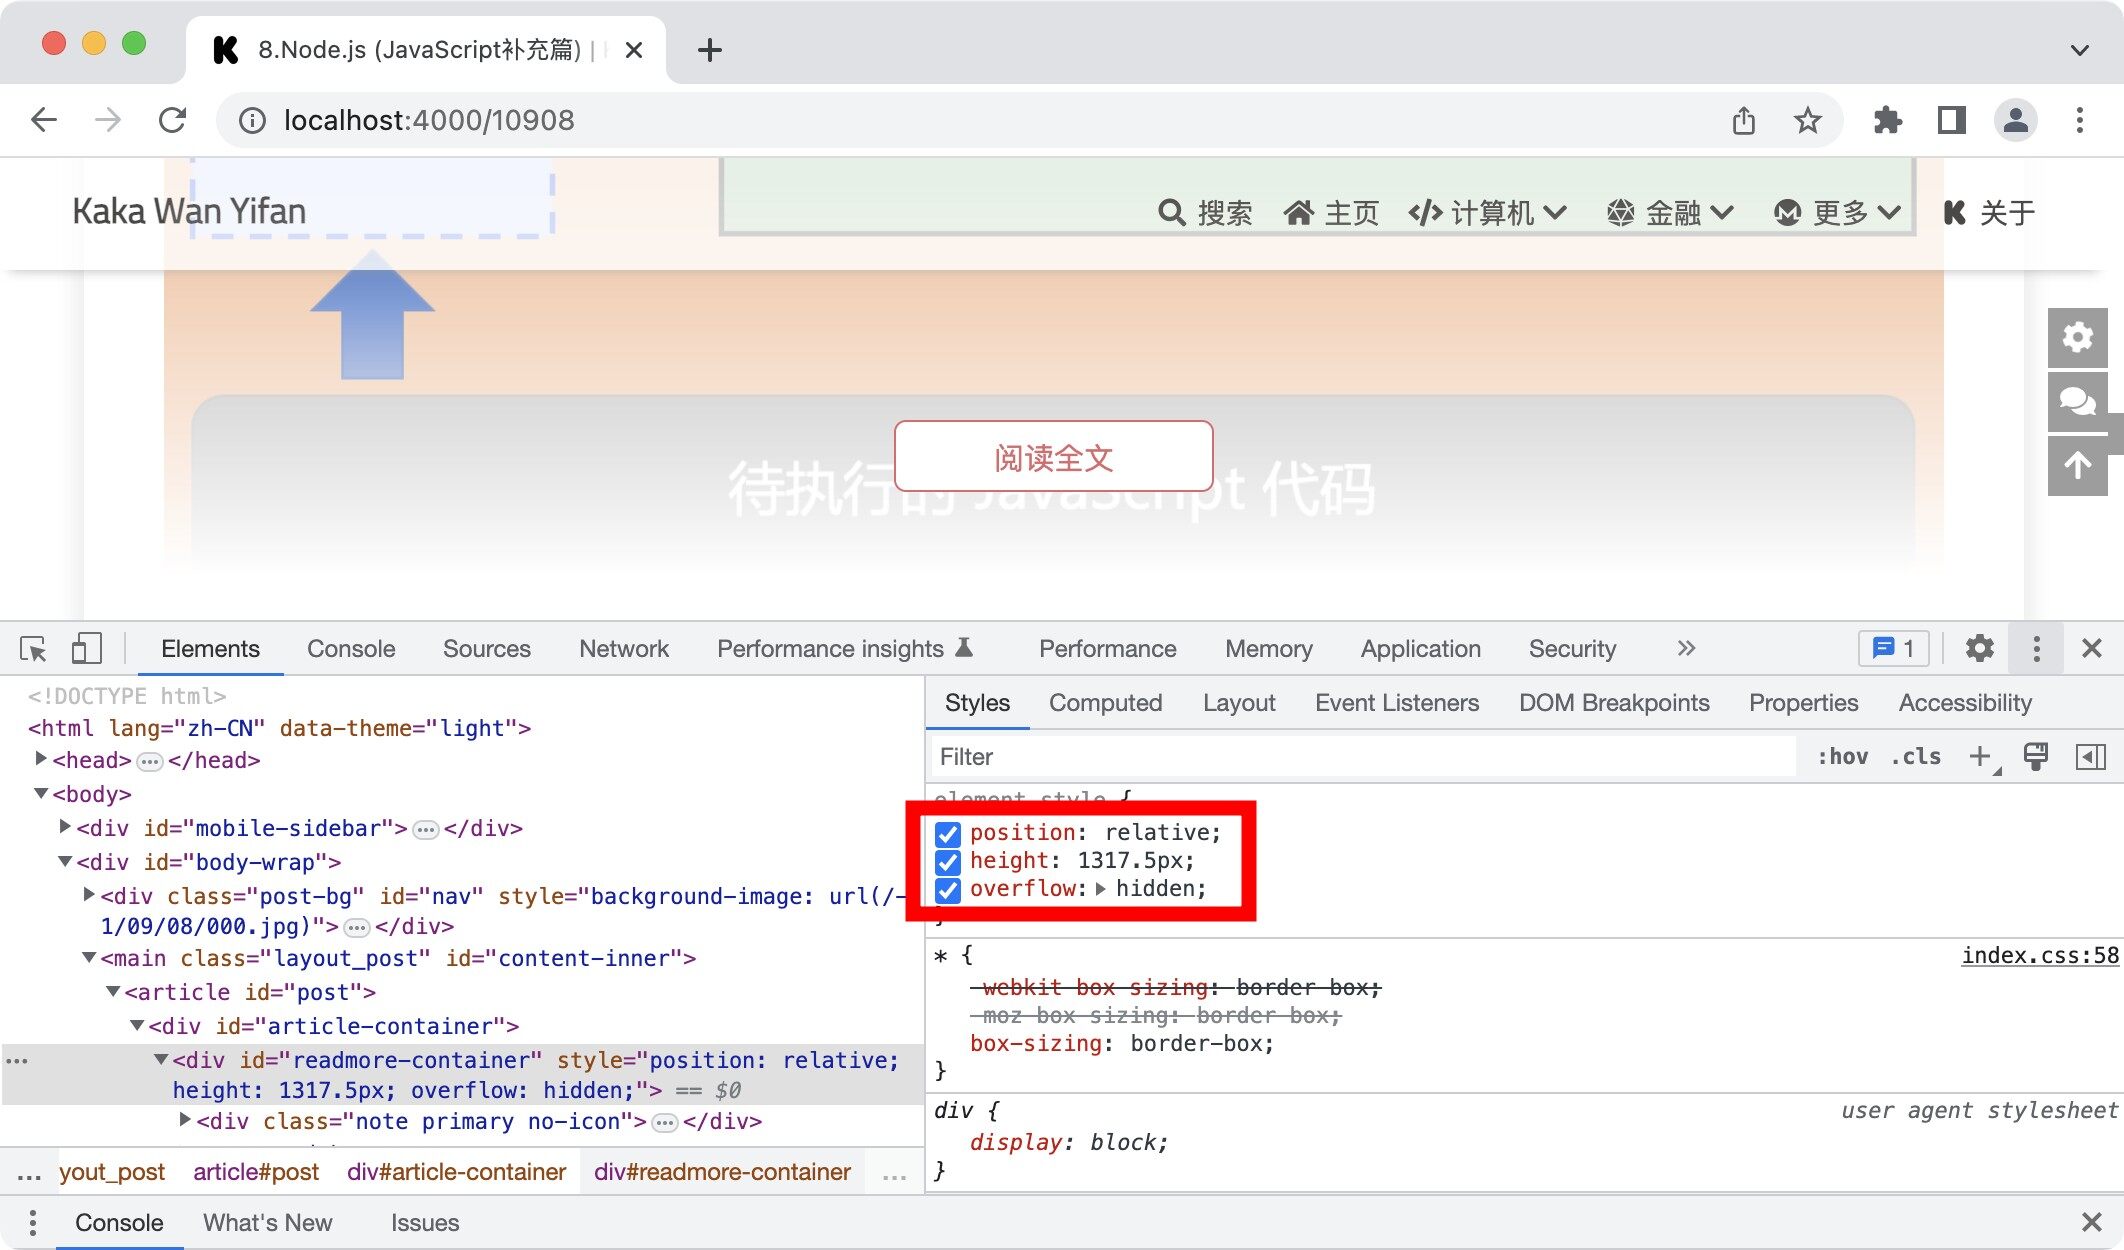
hexo-readmore的实现原理,其实只是一个遮罩层,如果我们直接修改遮罩层的属性,例如,直接去掉属性height,就可以阅读全文了。
反破解
在技术层面,我们没法阻止这个属性被修改,但是我们可以监测这个属性是否被"非法"修改了。
如果是正常输入验证码阅读全文的话,在浏览器的Cookie中会有Token的记录。
可以利用JavaScript中的观察者。当属性被修改了,触发观察者的回调函数,在回调函数中,根据Cookie中是否有Token,判断属性是否被"非法"修改。
如果发现是非法修改,可以直接跳转到主页,或者其他操作。
关于JavaScript中的观察者,可以参考《基于JavaScript的前端开发入门:3.DOM和BOM》的"观察者"部分。
拼接验证码地址
破解
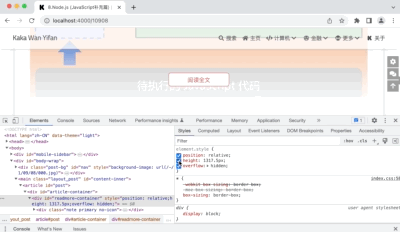
第二种破解方法,找到网页代码中的blogId的值。
然后可以拼接出获取验证码的地址:
https://open.techgrow.cn/#/readmore/captcha/generate?blogId=【blogId】
反破解
思路
上文的那段代码,是插件hexo-readmore注入的。
hexo-readmore的注入相关的代码,位于hexo-readmore/index.js。
1 | const script = ` |
混淆
我们对注入的方法进行修改,在注入之前进行混淆,这样就不容易找到blogId了,以此做到反破解。
可以利用javascript-obfuscator这个包进行混淆。
javascript-obfuscator:https://github.com/javascript-obfuscator/javascript-obfuscator
使用方法参考官网介绍,有几个参数可以提一下:
disableConsoleOutput:"禁用"浏览器的Console功能。debugProtection:"禁用"浏览器的Debug功能。domainLock:限制域名。如果在其他域名下运行了该脚本,默认会跳转到about:blank。
直接解析HTML
破解
上述的那些方法,其实都没有太大的帮助。
不管怎么样,文章是在HTML文件中的。
我禁用浏览器的JS;或者我用某些浏览器的阅读模式;在要么,我直接解析HTML文件。都可以破解。
反破解
思路
参考hexo-blog-encrypt这个插件,先对文章内容进行加密,然后再对文章内容进行解密。
在实践过程中,为了保留hexo-readmore的"阅读全文"的特效,对于文章内容的前面的部分不加密。
加密
示例代码:
1 | // cheerio 用于解析HTML |
cheerio,用于解析文章。官网:https://github.com/cheeriojs/cheerio
解密
判断浏览器的Cookie中是否有相关的Token,有的话就进行解密。
如果没有的话,就监听Cookie。
示例代码:
1 | // 有些不加密的文章,或者文章太短没有加密内容的文章,没有 rmce,所以进行判断。 |
伪造Token
破解
上文的很多方法,其实都依赖浏览器的Cookie中有没有Token。
如果我伪造一个Token,直接注入到Cookie中呢?
反破解
我对Token进行了解析,发现了解析后的内容,有些是我们在hexo-readmore的控制台配置的。
hexo-readmore中的Token是JWT格式的。
关于"JWT",可以参考《基于JavaScript的前端开发入门:4.Node.js》的"express"的"身份验证"部分。
解析Token的方式如下:
1 | let jwtArr = jwt.split("."); |
我们能解析出iat(Token生效时间)和exp(Token失效时间)两个属性,其差值是有效期,这个是我们在hexo-readmore的控制台配置的。
所以,我们可以比较这两个时间的差值,判断Token的真伪。
当然,避免被逆向工程,上述所有注入到HTML的代码,都是混淆之后再注入的。
网络方法
获取blogId
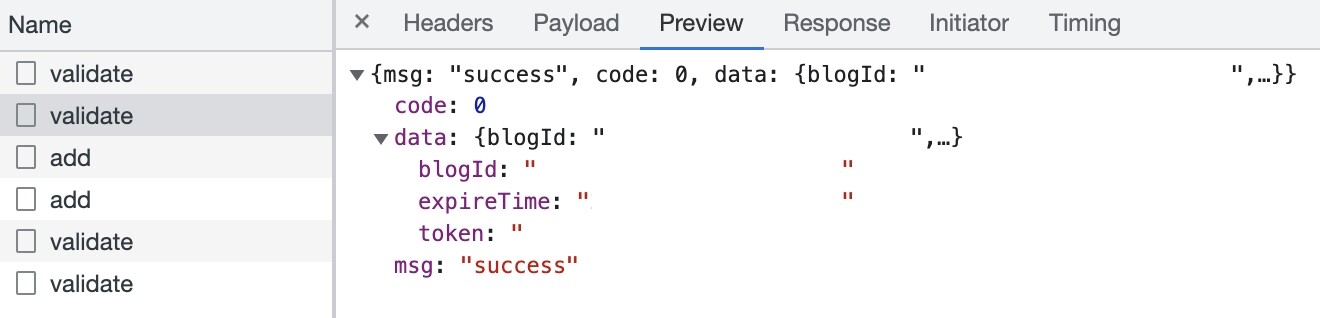
hexo-readmore的validate这个接口,其blogId是以明文的形式进行传输的。

上文讨论"拼接验证码地址"的反破解方法"混淆"的时候,提到了"禁用"浏览器的Debug功能。这个能防止直接通过浏览器的F12获取blogId。
但效果有限。
完全可以通过抓包的方法获取blogId。
争议:修改响应
有些资料还提供了一种方法,通过网络工具,直接修改validate接口的响应。
我个人对这个方法存疑,还是涉及到Token验证的问题。
反破解
反破解方法,blogId以密文的形式进行传输的。
修复冲突
因为对文章内容进行了加密,发现了和hexo-wordcount、目录等的冲突。记录一下冲突的修复。
总字数统计
在hexo-readmore的加密之前,将加密前的内容赋值给data.origin。示例代码:
1 | data.origin = data.content |
在hexo-wordcount/index.js的统计字数的方法中,由原本的len = counter(post.content)改为len = counter(post.origin)。
每篇文章的字数
每篇文章的字数,是由主题进行统计的,位于layout/includes/header/post-info.pug
1 | span= _p('post.wordcount') + ':' |
也是将content改为origin
目录
目录是由主题控制的。修改方式是把.content改成.origin,一共有三处。
layout/includes/head/config_site.pug:
1 | script. |
layout/includes/rightside.pug:
1 | if is_post() && page.toc !== false && theme.toc.enable && (toc(page.origin) !== '' || page.encrypt == true ) |
layout/includes/sidebar.pug:
1 | if (page.encrypt == true) |
搜索
因为对文章内容进行了加密,所以会和hexo-generator-search这个插件冲突,导致有些内容搜索不到。
解决冲突的方法为修改templates/search.xml,修改posts下的content的post.content,改为post.origin。
1 | {% if posts %} |
这个插件的会生成search.xml,位于博客的根目录。
所以,暴露了一个漏洞,可以直接读取博客根目录的search.xml,一样可以获取文章内容。
hexo-blog-encrypt
hexo-blog-encrypt:https://github.com/D0n9X1n/hexo-blog-encrypt
动态密钥
一般情况下,hexo-blog-encrypt的密钥是静态的。
但是,如果:
- 设计一个和时间相关的生成密钥的函数。
- 修改
hexo-blog-encrypt/index.js中password参数的获取方式,按照第一步的函数,生成密钥。 - 利用Github-Action的定时任务,定时重新部署博客,并更新CDN缓存。
因为CDN缓存的原因,密钥可能更新不及时,所以定时任务在重新部署博客后,还需要更新CDN缓存。
关于Github-Action,可以参考《关于弹幕视频网站的例子:基于Serverless的弹幕视频网站实现方案》的"数据更新"的"跑批业务"部分。
基于上述三个步骤,我们就可以实现hexo-blog-encrypt的动态密钥。
个性化修改
为了实现类似hexo-readmore的效果,我修改了hexo-blog-encrypt,改为仅对部分加密,实现方法和上文的"直接解析HTML"的"反破解"基本类似,只摘取部分加入hexo-blog-encrypt的加密。
此外,为了修复目录不能滚动的BUG,修改了layout/includes/sidebar.pug。
从
1 | if (page.encrypt == true) |
改为:
1 | if (page.encrypt == true) |
加密原理
最后一个话题,hexo-blog-encrypt的加密原理。
hexo-blog-encrypt没有将密钥保存在本地。
那么,是怎么判断密码是否正确的呢?
采用了一个很巧妙的办法,
在hexo-blog-encrypt/index.js的加密方法中,会对要加密的内容在头部拼接上一个特殊的字符串,<hbe-prefix></hbe-prefix>。
解密的时候,无论输入任何密钥,都进行解密运算,然后判断解密后的内容的头部是否有这个特殊的字符串。
以此判断解密是否成功。