类和对象
面向对象。《基于Java的后端开发入门:2.面向对象》 有过专门的讨论。
什么是类
类是对一类具有共同属性 和行为 的具体对象(事物)的抽象。
属性:对象(事物)的特征。 行为:对象(事物)能执行的操作。
类和对象的关系:类是对象的抽象,对象是类的实体。
(在Python相关的资料中,更多的时候,称对象为实例)
定义类
Python中的类有两种:
新式类
经典类
新式类
1
2
3
class MoXiaoBei () : def wash (self) : print('嫂子,我能帮你洗衣服了。' )
经典类
不由任意内置类型派生出的类,称之为经典类。
创建对象
创建对象,即实例化。
示例代码:
1 2 3 xiaoBei = MoXiaoBei() print(xiaoBei) xiaoBei.wash()
运行结果:
1 2 <__main__.MoXiaoBei object at 0x7f7b21a86700> 嫂子,我能帮你洗衣服了。
解释说明:print(xiaoBei)的内容是内存地址。
self
self指的是调用该函数的对象。this)
示例代码:
1 2 3 4 5 6 7 8 9 10 11 12 13 14 15 class MoXiaoBei () : def wash (self) : print('嫂子,我能帮你洗衣服了。' ) print(self) x1 = MoXiaoBei() print(x1) x1.wash() print() x2 = MoXiaoBei() print(x2) x2.wash()
运行结果:
1 2 3 4 5 6 7 <__main__.MoXiaoBei object at 0x0000020FCA121C10> 嫂子,我能帮你洗衣服了。 <__main__.MoXiaoBei object at 0x0000020FCA121C10> <__main__.MoXiaoBei object at 0x0000020FCA1D96A0> 嫂子,我能帮你洗衣服了。 <__main__.MoXiaoBei object at 0x0000020FCA1D96A0>
注意:print(实例)和print(self)的结果是一样的。
属性
Python中的属性可以分为类属性和实例属性。
类属性
类属性:在类里面添加的属性。
方法如下:
示例代码:
1 2 3 4 5 6 7 8 class MoXiaoBei () : def write (self) : self.article = '孔贼' print(self.article) xiaoBei = MoXiaoBei() xiaoBei.write()
运行结果:
实例属性
实例属性,在类外面添加的属性。
示例代码:
1 2 3 4 5 6 7 8 9 class MoXiaoBei () : def wash (self) : print('嫂子,我能帮你洗衣服了。' ) print(self) xiaoBei = MoXiaoBei() xiaoBei.article = '孔贼' print(xiaoBei.article)
运行结果:
注意,MoXiaoBei这个类中,没有article这个属性!但是我们可以通过实例名.属性名 = 值的方法,直接添加。
类属性和实例属性比较
类属性
实例属性
访问
可以通过类 或实例 访问
只能通过实例 访问
修改
可以通过类 修改,不能通过实例 修改
只能通过实例 修改
内存位置
为所有的类 和实例 共享,同一份内存
实例 独有
示例代码:
1 2 3 4 5 6 7 8 9 10 11 12 13 14 15 16 17 18 19 20 21 22 23 24 25 26 27 28 29 30 31 32 33 34 35 36 37 38 39 40 41 42 43 44 45 46 47 48 49 50 51 52 53 54 55 56 class XiaoHong (object) : weiba = '红毛' hong = XiaoHong() hei = XiaoHong() print('通过类或实例访问' ) print(XiaoHong.weiba) print(hong.weiba) print(hei.weiba) print() print('类属性、为所有的类和实例共享,同一份内存' ) print(id(XiaoHong.weiba)) print(id(hong.weiba)) print(id(hei.weiba)) print() print('只能通过类修改' ) XiaoHong.weiba = '小红毛' print(XiaoHong.weiba) print(hong.weiba) print(hei.weiba) print(id(XiaoHong.weiba)) print(id(hong.weiba)) print(id(hei.weiba)) print() print('通过实例修改"类属性",是创建了一个实例属性' ) hei.weiba = '黑毛' print(XiaoHong.weiba) print(hong.weiba) print(hei.weiba) print(id(XiaoHong.weiba)) print(id(hong.weiba)) print(id(hei.weiba)) print() print('实例属性只能通过实例修改' ) XiaoHong.weiba = '小小红红' print(XiaoHong.weiba) print(hong.weiba) print(hei.weiba) print(id(XiaoHong.weiba)) print(id(hong.weiba)) print(id(hei.weiba)) print()
运行结果:
1 2 3 4 5 6 7 8 9 10 11 12 13 14 15 16 17 18 19 20 21 22 23 24 25 26 27 28 29 30 31 32 33 通过类或实例访问 红毛 红毛 红毛 类属性、为所有的类和实例共享,同一份内存 2050043935984 2050043935984 2050043935984 只能通过类修改 小红毛 小红毛 小红毛 2050048672752 2050048672752 2050048672752 通过实例修改"类属性",是创建了一个实例属性 小红毛 小红毛 黑毛 2050048672752 2050048672752 2050840166288 实例属性只能通过实例修改 小小红红 小小红红 黑毛 2050840166192 2050840166192 2050840166288
魔法方法
类似于__xx__()这样的函数,都是具有特殊功能的函数,被称为"魔法方法"。
常见的魔法方法有:
__init__()__str__()__del__()
初始化方法
__init__(),初始化方法,也被称为构造方法。
无参的__init__()
示例代码:
1 2 3 4 5 6 7 8 9 10 11 12 13 class MoXiaoBei () : def __init__ (self) : self.article = '孔贼' def write (self) : print(self.article) xiaoBei = MoXiaoBei() xiaoBei.write()
运行结果:
有参的__init__()
示例代码:
1 2 3 4 5 6 7 8 9 10 11 12 13 class MoXiaoBei () : def __init__ (self, article) : self.article = article def write (self) : print(self.article) xiaoBei = MoXiaoBei(article='孔贼' ) xiaoBei.write()
运行结果:
str方法
当使用print打印对象的时候,默认打印对象的内存地址。如果类定义了__str__方法,那么就会打印从在这个方法中返回的数据。toString())
示例代码:
1 2 3 4 5 6 7 class MoXiaoBei () : def __str__ (self) : return '我来啦...啦...啦...' xiaoBei = MoXiaoBei() print(xiaoBei)
运行结果:
del方法
当删除对象时,Python解释器会默认调用__del__()方法,也被称为是析构方法。
示例代码:
1 2 3 4 5 6 7 8 class MoXiaoBei () : def __del__ (self) : print('我还有事儿咱们再联络啊' ) xiaoBei = MoXiaoBei() del (xiaoBei)print(xiaoBei)
运行结果:
1 2 我还有事儿咱们再联络啊 NameError: name 'xiaoBei' is not defined
比较方法
用于比较的魔法方法有:__lt__(小于)、__gt__(大于)、__le__(小于等于)、__ge__(大于等于)、__eq__(等于)。
不实现__eq__方法,对象之间可以比较,但是是比较内存地址,也就是说,不同对象==比较一定是False结果。
实现了__eq__方法,就可以按照自己的想法来决定2个对象是否相等了。
不可以直接对2个对象进行大于或小于的比较,但是在类中实现__lt__方法,即可同时完成:小于符号和大于符号。
示例代码:
1 2 3 4 5 6 7 8 9 10 11 12 class T : def __init__ (self, name, age) : self.name = name self.age = age ta = T('a' , '1' ) tb = T('b' , '2' ) print(ta == tb) print(ta > tb)
运行结果:
1 2 3 4 5 Traceback (most recent call last): File "/Users/kaka/Documents/auto-work/1.py", line 12, in <module> print(ta > tb) TypeError: '>' not supported between instances of 'T' and 'T' False
示例代码:
1 2 3 4 5 6 7 8 9 10 11 12 13 14 15 16 17 18 class T : def __init__ (self, name, age) : self.name = name self.age = age def __lt__ (self, other) : return self.age < other.age def __eq__ (self, other) : return self.age == other.age ta = T('a' , '1' ) tb = T('b' , '2' ) print(ta == tb) print(ta > tb)
运行结果:
比较方法的应用,Set集合
示例代码:
1 2 3 4 5 6 7 8 9 10 11 12 13 14 15 16 17 18 19 20 class T : def __init__ (self, name, age) : self.name = name self.age = age def __hash__ (self) : return hash(self.name) + hash(self.age) def __str__ (self) : return self.name + '-' + self.age ta = T('a' , '1' ) tb = T('a' , '1' ) s = {ta, tb} print(len(s)) print(s.pop()) print(s.pop())
运行结果:
如果我们想起到去重的效果,需要__eq__方法。
示例代码:
1 2 3 4 5 6 7 8 9 10 11 12 13 14 15 16 17 18 19 20 21 22 23 class T : def __init__ (self, name, age) : self.name = name self.age = age def __hash__ (self) : return hash(self.name) + hash(self.age) def __eq__ (self, other) : return self.name == other.name and self.age == other.age def __str__ (self) : return self.name + '-' + self.age ta = T('a' , '1' ) tb = T('a' , '1' ) s = {ta, tb} print(len(s)) print(s.pop()) print(s.pop())
运行结果:
1 2 3 4 5 6 Traceback (most recent call last): File "/Users/kaka/Documents/auto-work/1.py", line 23, in <module> print(s.pop()) KeyError: 'pop from an empty set' 1 a-1
实例方法
Python中的方法可以分为实例方法、类方法和静态方法。MoXiaoBei的wash方法,其实都属于实例方法。
示例代码:
1 2 3 4 5 6 7 8 9 10 11 12 13 14 15 16 17 18 19 20 21 22 23 24 class MoXiaoBei (object) : def __init__ (self, article) : self.article = article def san_zi_jin (self) : print(self.article) print(self) m1 = MoXiaoBei('人之初' ) print(m1) m1.san_zi_jin() print() m2 = MoXiaoBei('这是人,这是之,这是初。' ) print(m2) m2.san_zi_jin() print() m2.article = '三字经' print(m2) m2.san_zi_jin()
运行结果:
1 2 3 4 5 6 7 8 9 10 11 <__main__.MoXiaoBei object at 0x000001BEB21D1C10> 人之初 <__main__.MoXiaoBei object at 0x000001BEB21D1C10> <__main__.MoXiaoBei object at 0x000001BEB21DD610> 这是人,这是之,这是初。 <__main__.MoXiaoBei object at 0x000001BEB21DD610> <__main__.MoXiaoBei object at 0x000001BEB21DD610> 三字经 <__main__.MoXiaoBei object at 0x000001BEB21DD610>
解释说明:san_zi_jin为一个实例方法。实例方法第一个参数为self,当使用m1.san_zi_jin()调用实例方法时,实例m1会传递给self参数,这样self参数就可以引用当前正在调用实例方法的实例。利用实例方法的这个特性,上述代码正确输出了两个实例的成员数据。
类方法
类方法,需要采用装饰器@classmethod来定义,其特点为第一个参数为类。
我们来看具体的例子。
示例代码:
1 2 3 4 5 6 7 8 9 10 11 12 13 14 15 16 class MoXiaoBei (object) : num_inst = 0 def __init__ (self) : MoXiaoBei.num_inst = MoXiaoBei.num_inst + 1 @classmethod def get_no_of_instance (cls) : return cls.num_inst m1 = MoXiaoBei() print(m1.get_no_of_instance()) m2 = MoXiaoBei() print(m2.get_no_of_instance())
运行结果:
解释说明:在上述例子中,我们需要统计类MoXiaoBei实例的个数,因此定义了一个类变量num_inst来存放实例个数。通过装饰器@classmethod的使用,方法get_no_of_instance被定义成一个类方法。在调用类方法时,会将类传递给cls,这样在get_no_of_instance内部就可以引用类变量num_inst。
静态方法
还有一些方法,既不传递类,也不传递实例。我们称之为静态方法。@staticmethod来定义。
示例代码:
1 2 3 4 5 6 7 8 9 10 11 12 13 14 15 16 17 18 19 20 21 22 23 IND = 'ON' class MoXiaoBei (object) : def __init__ (self, article) : self.article = article @staticmethod def checkind () : return IND == 'ON' def funcA (self) : if self.checkind(): print('funcA : %s' % self.article) def funcB (self) : if self.checkind(): print('funcB : %s' % self.article) m = MoXiaoBei('三字经' ) m.funcA() m.funcB()
运行结果:
实例方法、类方法和静态方法的比较
比较
实例方法
第一个参数必须是实例本身,一般使用self表示。
在实例方法中,可以通过self来操作实例属性,通过"类名"来操作类属性。
实例方法只能通过实例对象去调用,尽管也可以通过类名间接调用类名.方法名(self, ...),但此时仍然需要传入self对象。
类方法
使用@classmethod修饰函数,且第一个参数必须是类本身,一般使用cls表示。
在类方法中,可以使用cls=类名来操作类属性,但是不能操作实例属性(self对象中存储的变量)。
类方法可以通过实例对象或者类对象调用。
静态方法
使用@staticmethod修饰函数,不需要使用任何参数表示。与普通函数一样,只是将该方法放到了类中实现而已。
使用方式与类方法类似。
案例
案例一
示例代码:
1 2 3 4 5 6 7 8 9 10 11 12 13 14 15 16 17 18 19 20 21 22 23 24 25 26 27 28 29 30 31 32 33 34 35 36 37 38 39 40 41 42 43 44 45 46 47 48 49 50 51 52 53 class Foo (object) : """ 类三种方法语法形式 """ count = 0 class_method_count = 0 def __init__ (self, name) : self.name = name Foo.count += 1 def instance_method (self) : print("是类{}的实例方法,只能被实例对象调用" .format(Foo)) print("产生了一个<{}>实例,共有<{}>个实例对象" .format(self.name, Foo.count)) @classmethod def class_method (cls) : print("是类{}的类方法,可以被实例对象、类对象调用" .format(cls)) cls.__static_method_test() cls.class_method_count += 1 @staticmethod def static_method () : print("是类{}的静态方法,可以被实例对象、类对象调用" .format(Foo)) print("以下内容为类方法class_method()的运行结果:" ) Foo.class_method() @staticmethod def __static_method_test () : print("调用了静态方法 static_method_test()" ) print("--" * 10 + "实例方法测试" + "--" * 10 ) obj1 = Foo("dog" ) obj1.instance_method() Foo.instance_method(obj1) print("--" * 10 + "类方法测试" + "--" * 10 ) obj1.class_method() print("--" * 20 ) Foo.class_method() print("--" * 10 + "静态方法测试" + "--" * 10 ) obj1.static_method() print("--" * 20 ) Foo.static_method()
运行结果:
1 2 3 4 5 6 7 8 9 10 11 12 13 14 15 16 17 18 19 20 21 --------------------实例方法测试-------------------- 是类<class '__main__.Foo'>的实例方法,只能被实例对象调用 产生了一个<dog>实例,共有<1>个实例对象 是类<class '__main__.Foo'>的实例方法,只能被实例对象调用 产生了一个<dog>实例,共有<1>个实例对象 --------------------类方法测试-------------------- 是类<class '__main__.Foo'>的类方法,可以被实例对象、类对象调用 调用了静态方法 static_method_test() ---------------------------------------- 是类<class '__main__.Foo'>的类方法,可以被实例对象、类对象调用 调用了静态方法 static_method_test() --------------------静态方法测试-------------------- 是类<class '__main__.Foo'>的静态方法,可以被实例对象、类对象调用 以下内容为类方法class_method()的运行结果: 是类<class '__main__.Foo'>的类方法,可以被实例对象、类对象调用 调用了静态方法 static_method_test() ---------------------------------------- 是类<class '__main__.Foo'>的静态方法,可以被实例对象、类对象调用 以下内容为类方法class_method()的运行结果: 是类<class '__main__.Foo'>的类方法,可以被实例对象、类对象调用 调用了静态方法 static_method_test()
案例二
示例代码:
1 2 3 4 5 6 7 8 9 10 11 12 13 14 15 16 17 18 19 20 21 22 23 24 25 26 27 28 29 30 31 32 33 34 35 36 class Foo (object) : X = 1 Y = 14 @staticmethod def average (*mixes) : print("父类中的静态方法 average(*mixes)" ) print("*****" , mixes) return sum(mixes) / len(mixes) @staticmethod def static_method () : print("父类中的静态方法 static_method()" ) return Foo.average(Foo.X, Foo.Y) @classmethod def class_method (cls) : print("父类中的类方法 class_method(cls)" ) return cls.average(cls.X, cls.Y) class Son (Foo) : @staticmethod def average (*mixes) : print("子类中重载了父类的静态方法 average(*mixes)" ) print("*****" , mixes) return sum(mixes) / len(mixes) print(Son.average(1 , 2 , 3 ), "\n" + "---" * 20 ) print(Son.class_method(), "\n" + "---" * 20 ) print(Son.static_method(), "\n" + "---" * 20 )
运行结果:
1 2 3 4 5 6 7 8 9 10 11 12 13 14 子类中重载了父类的静态方法 average(*mixes) ***** (1, 2, 3) 2.0 ------------------------------------------------------------ 父类中的类方法 class_method(cls) 子类中重载了父类的静态方法 average(*mixes) ***** (1, 14) 7.5 ------------------------------------------------------------ 父类中的静态方法 static_method() 父类中的静态方法 average(*mixes) ***** (1, 14) 7.5 ------------------------------------------------------------
在案例二的基础上,做多态,示例代码:
1 2 3 4 5 6 7 8 9 10 11 12 13 14 15 16 17 18 19 20 21 22 23 24 25 26 27 28 29 30 31 32 33 34 35 36 37 38 39 40 41 42 43 44 45 46 47 48 49 class Foo (object) : X = 1 Y = 14 @staticmethod def average (*mixes) : print("父类中的静态方法 average(*mixes)" ) print("*****" , mixes) return sum(mixes) / len(mixes) @staticmethod def static_method () : print("父类中的静态方法 static_method()" ) return Foo.average(Foo.X, Foo.Y) @classmethod def class_method (cls) : print("父类中的类方法 class_method(cls)" ) return cls.average(cls.X, cls.Y) class Son (Foo) : @staticmethod def average (*mixes) : print("子类中重载了父类的静态方法 average(*mixes)" ) print("*****" , mixes) return sum(mixes) / len(mixes) def test_polymorphic (foo) : """ 多态测试 :param foo: 父类对象 :return: None """ print(f.average(1 , 2 , 3 )) f = Foo() test_polymorphic(f) print("----" * 10 ) f = Son() test_polymorphic(f)
运行结果:
1 2 3 4 5 6 7 父类中的静态方法 average(*mixes) ***** (1, 2, 3) 2.0 ---------------------------------------- 子类中重载了父类的静态方法 average(*mixes) ***** (1, 2, 3) 2.0
继续做多态测试,示例代码:
1 2 3 4 5 6 7 8 9 10 11 12 13 14 15 16 17 18 19 20 21 22 23 24 25 26 27 28 29 30 31 32 33 34 35 36 37 38 39 40 41 42 43 44 45 46 47 48 49 class Foo (object) : X = 1 Y = 14 @staticmethod def average (*mixes) : print("父类中的静态方法 average(*mixes)" ) print("*****" , mixes) return sum(mixes) / len(mixes) @staticmethod def static_method () : print("父类中的静态方法 static_method()" ) return Foo.average(Foo.X, Foo.Y) @classmethod def class_method (cls) : print("父类中的类方法 class_method(cls)" ) return cls.average(cls.X, cls.Y) class Son (Foo) : @staticmethod def average (*mixes) : print("子类中重载了父类的静态方法 average(*mixes)" ) print("*****" , mixes) return sum(mixes) / len(mixes) def test_polymorphic (foo) : """ 多态测试 :param foo: 父类对象 :return: None """ print(f.class_method()) f = Foo() test_polymorphic(f) print("----" * 10 ) f = Son() test_polymorphic(f)
运行结果:
1 2 3 4 5 6 7 8 9 父类中的类方法 class_method(cls) 父类中的静态方法 average(*mixes) ***** (1, 14) 7.5 ---------------------------------------- 父类中的类方法 class_method(cls) 子类中重载了父类的静态方法 average(*mixes) ***** (1, 14) 7.5
封装
面向对象三大特性
面向对象三大特性:
封装
继承
多态
定义私有成员
定义私有成员的方式:
私有成员变量:变量名以__(2个下划线)开头。
私有成员方法:方法名以__(2个下划线)开头。
示例代码:
1 2 3 4 5 6 7 8 9 10 class T : p = None __ps = None def f (self) : print('f' ) def __fs (self) : print('fs' )
使用私有成员
私有方法无法直接被类对象使用。
示例代码:
运行结果:
1 2 3 4 5 Traceback (most recent call last): File "/Users/kaka/Documents/auto-work/1.py", line 15, in <module> t.__fs() AttributeError: 'T' object has no attribute '__fs' f
私有变量无法赋值,也无法获取值。
示例代码:
1 2 3 4 5 t = T() t.p = 'p' print(t.p) print(t.__ps)
运行结果:
1 2 3 4 5 Traceback (most recent call last): File "/Users/kaka/Documents/auto-work/1.py", line 17, in <module> print(t.__ps) AttributeError: 'T' object has no attribute '__ps' p
我们来试一下变量赋值,示例代码:
1 2 3 4 5 6 t = T() t.p = 'p' t.__ps = 'ps' print(t.p) print(t.__ps)
运行结果:
这看起来赋值成功了啊,这里的t.__ps = 'ps',其实是给是例属性赋值了。
私有成员无法被类对象使用,但是可以被其它的成员使用。
示例代码:
1 2 3 4 5 6 7 8 9 10 11 12 13 14 15 16 17 18 19 20 21 22 23 24 class T : p = None __ps = None def f (self) : print('f' ) def __fs (self) : print('fs' ) def func (self) : print(self.p) print(self.__ps) t = T() t.p = 'p' t.__ps = 'ps' print(t.p) print(t.__ps) t.func()
运行结果:
小结: :
类对象无法访问私有成员。 类中的其它成员可以访问私有成员。
继承
什么是继承
继承指的是多个类之间的所属关系,即子类继承父类的属性和方法。新式类 都默认继承object类。
示例代码:
1 2 3 4 5 6 7 8 9 10 11 12 13 14 15 16 class MoTaiChong (object) : def __init__ (self) : self.clz = '衡山派' def ping_sha_luo_yan (self) : print('平沙落雁' ) class MoXiaoBei (MoTaiChong) : pass xiaoBei = MoXiaoBei() print(xiaoBei.clz) xiaoBei.ping_sha_luo_yan()
运行结果:
解释说明:MoXiaoBei继承了MoTaiChong的clz属性和ping_sha_luo_yan方法。
单继承
上述的例子,就是单继承,一个子类有且自有一个父类。
多继承
多继承意思就是一个类同时继承了多个父类。
示例代码:
1 2 3 4 5 6 7 8 9 10 11 12 13 14 15 16 17 18 19 20 21 22 23 class MoTaiChong (object) : def __init__ (self) : self.clz = '衡山派' def ping_sha_luo_yan (self) : print('平沙落雁' ) class ZhuXianSheng (object) : def __init__ (self) : self.clz = '白马书院' def san_zi_jing (self) : print('人之初' ) class MoXiaoBei (MoTaiChong,ZhuXianSheng) : pass xiaoBei = MoXiaoBei() print(xiaoBei.clz) xiaoBei.ping_sha_luo_yan() xiaoBei.san_zi_jing()
运行结果:
解释说明:MoXiaoBei类继承了MoTaiChong类以及ZhuXianSheng类。
那么,现在就有问题了!MoTaiChong的clz是衡山派,ZhuXianSheng的clz是白马书院,那么MoXiaoBei的clz到底是衡山派?还是白马书院呢?
当一个类有多个父类的时候,默认使用第一个父类的同名属性和方法。
所以,MoXiaoBei的clz是衡山派。
题外话: 在《基于Java的后端开发入门:2.面向对象》 ,我们讨论过,在Java中,只有单继承,一个类一次只能继承一个父类。
多层继承
示例代码:
1 2 3 4 5 6 7 8 9 10 11 12 13 14 15 16 17 class HuaHuaLaoTou (object) : def ping_sha_luo_yan (self) : print('平沙落雁' ) class MoTaiChong (HuaHuaLaoTou) : def __init__ (self) : self.clz = '衡山派' class MoXiaoBei (MoTaiChong) : pass xiaoBei = MoXiaoBei() print(xiaoBei.clz) xiaoBei.ping_sha_luo_yan()
运行结果:
解释说明:MoXiaoBei继承了MoTaiChong,MoTaiChong又继承了HuaHuaLaoTou。
子类重写父类同名方法和属性
子类和父类具有同名属性和方法,默认使用子类的同名属性和方法。
示例代码:
1 2 3 4 5 6 7 8 9 10 11 12 13 14 15 class ZhuXianSheng (object) : def __init__ (self) : self.clz = '白马书院' def san_zi_jing (self) : print('人之初' ) class MoXiaoBei (ZhuXianSheng) : def san_zi_jing (self) : print('这是人,这是之,这是初' ) xiaoBei = MoXiaoBei() xiaoBei.san_zi_jing()
运行结果:
解释说明:MoXiaoBei继承了ZhuXianSheng,且重写了san_zi_jing方法。
子类调用父类的同名方法和属性
现在,MoXiaoBei继承了ZhuXianSheng,并且重写了san_zi_jing方法。但,如果一定要调用父类ZhuXianSheng的san_zi_jing方法,怎么办?
即:子类如何调用父类的同名方法和属性?
有三种方法:
冗余方法
super(当前类名, self)super()
冗余方法
示例代码:
1
2
3
4
5
6
7
8
9
10
11
12
13
14
15
16
17
18
19
20
21
22
23
class ZhuXianSheng (object) : def __init__ (self) : self.clz = '白马书院' def san_zi_jing (self) : print('人之初' ) class MoXiaoBei (ZhuXianSheng) : def san_zi_jing (self) : self.__init__() print('这是人,这是之,这是初' ) def san_zi_jing_zhu (self) : ZhuXianSheng.__init__(self) ZhuXianSheng.san_zi_jing(self) xiaoBei = MoXiaoBei() xiaoBei.san_zi_jing() xiaoBei.san_zi_jing_zhu()
运行结果:
这个方法的缺陷了,如果⽗类的类名被修改了,子类的相关代码也需要修改。self.__init__()。
super(当前类名, self)
示例代码:
1 2 3 4 5 6 7 8 9 10 11 12 13 14 15 16 17 18 19 20 class ZhuXianSheng (object) : def __init__ (self) : self.clz = '白马书院' def san_zi_jing (self) : print('人之初' ) class MoXiaoBei (ZhuXianSheng) : def san_zi_jing (self) : print('这是人,这是之,这是初' ) def san_zi_jing_zhu (self) : super(MoXiaoBei, self).__init__() super(MoXiaoBei, self).san_zi_jing() xiaoBei = MoXiaoBei() xiaoBei.san_zi_jing() xiaoBei.san_zi_jing_zhu()
运行结果:
super()
示例代码:
1 2 3 4 5 6 7 8 9 10 11 12 13 14 15 16 17 18 19 20 class ZhuXianSheng (object) : def __init__ (self) : self.clz = '白马书院' def san_zi_jing (self) : print('人之初' ) class MoXiaoBei (ZhuXianSheng) : def san_zi_jing (self) : print('这是人,这是之,这是初' ) def san_zi_jing_zhu (self) : super().__init__() super().san_zi_jing() xiaoBei = MoXiaoBei() xiaoBei.san_zi_jing() xiaoBei.san_zi_jing_zhu()
运行结果:
私有权限
定义私有属性和方法
对于私有的属性和方法,不会继承给子类。__。
示例代码:
1 2 3 4 5 6 7 8 9 10 11 12 13 14 15 16 17 18 19 20 21 22 23 24 25 26 27 28 29 30 31 32 33 34 class HuaHuaLaoTou (object) : def __init__ (self) : self.__food = '没走油的走油肉' def __draw (self) : print('画上它两张' ) def ping_sha_luo_yan (self) : print('平沙落雁' ) class MoTaiChong (HuaHuaLaoTou) : def __init__ (self) : self.clz = '衡山派' class MoXiaoBei (MoTaiChong) : pass xiaoBei = MoXiaoBei() xiaoBei.ping_sha_luo_yan() print(xiaoBei.clz) hua = HuaHuaLaoTou()
运行结果:
解释说明:HuaHuaLaoTou的私有方法__draw并没有继承给MoTaiChong、MoXiaoBei。
但是!我们发现对于私有的属性和方法,HuaHuaLaoTou的实例hua也无法访问。私有属性和私有方法只能在类里面访问和修改。
获取和修改私有属性值
那么,对于私有的属性,我们想在外部读取和修改的话,怎么操作?get_xx用来获取私有属性,定义set_xx用来修改私有属性值。
示例代码:
1 2 3 4 5 6 7 8 9 10 11 12 13 14 15 16 17 18 19 20 21 22 23 class HuaHuaLaoTou (object) : def __init__ (self) : self.__food = '没走油的走油肉' def __draw (self) : print('画上它两张' ) def ping_sha_luo_yan (self) : print('平沙落雁' ) def get_food (self) : return self.__food def set_food (self, food) : self.__food = food hua = HuaHuaLaoTou() print(hua.get_food()) hua.set_food('酱肘子、火爆腰花' ) print(hua.get_food())
运行结果:
多态
什么是多态
多态是一种使用对象的方式,子类重写父类方法,调用不同子类对象的相同父类方法,可以产生不同的结果。
实现步骤:
定义父类,并提供公共方法
定义子类,并重写父类方法
传递子类对象给调用者,可以看到不同子类执行效果不同
示例代码:
1 2 3 4 5 6 7 8 9 10 11 12 13 14 15 16 17 18 19 20 21 22 23 24 25 26 27 28 29 30 31 class HengShanDiZi (object) : def heng_shan_jian_fa (self) : print('衡山剑法' ) class ZhouDunRu (HengShanDiZi) : def heng_shan_jian_fa (self) : print('平沙落雁' ) class ZhuXiaoYun (HengShanDiZi) : def heng_shan_jian_fa (self) : print('连一招平沙落雁都不会使' ) class Test (object) : def heng_shan (self, d) : d.heng_shan_jian_fa() dizi = HengShanDiZi() zhou = ZhouDunRu() zhu = ZhuXiaoYun() dizi = HengShanDiZi() test = Test() test.heng_shan(dizi) test.heng_shan(zhou) test.heng_shan(zhu)
运行结果:
抽象类(接口)
我们再举一个例子,示例代码:
1 2 3 4 5 6 7 8 9 10 11 12 13 14 15 16 17 18 19 20 21 22 23 24 class Animal : def speak (self) : pass class Cat (Animal) : def speak (self) : print('喵' ) class Dog (Animal) : def speak (self) : print("汪" ) def make_noise (animal) : animal.speak() cat = Cat() dog = Dog() make_noise(cat) make_noise(dog)
运行结果:
注意,父类Animal的speak方法,是空实现。
而这里的父类,就是抽象类,也被称为接口。
抽象类:含有抽象方法的类称之为抽象类。
抽象方法:方法体是空实现的(pass)称之为抽象方法。
异常
什么是异常
当检测到一个错误时,解释器就无法继续执行了,反而出现了一些错误的提示,这就是所谓的"异常"。r方式打开一个不存在的文件。
1 open('test2nd.txt' , 'r' )
运行结果:
1 FileNotFoundError: [Errno 2] No such file or directory: 'test2nd.txt'
异常的处理
try-except
1 2 3 4 try : 可能发生错误的代码 except : 如果出现异常执行的代码
示例代码:
1 2 3 4 try : f = open('test.txt' , 'r' ) except : f = open('test.txt' , 'w' )
捕获指定异常
1 2 3 4 try : 可能发生错误的代码 except 异常类型: 如果捕获到该异常类型执行的代码
示例代码:
1 2 3 4 try : f = open('test2nd.txt' , 'r' ) except FileNotFoundError: print('不存在的文件或文件夹' )
运行结果:
捕获多个指定异常
当捕获多个异常时,可以把要捕获的异常类型的名字,放到except后,并使用元组的方式进行书写。
示例代码:
1 2 3 4 5 try : print(1 / 0 ) except (NameError, ZeroDivisionError): print('有错误' )
运行结果:
捕获异常描述信息
示例代码:
1 2 3 4 5 try : print(1 / 0 ) except (NameError, ZeroDivisionError) as result: print(result)
运行结果:
捕获所有异常
Exception是所有程序异常类的父类。
示例代码:
1 2 3 4 5 try : print(1 / 0 ) except Exception as result: print(result)
运行结果:
异常的else
else表示的是如果没有异常要执行的代码。
示例代码:
1 2 3 4 5 6 try : print(1 ) except Exception as result: print(result) else : print('没有异常,执行这个。' )
运行结果:
异常的finally
finally表示的是无论是否异常都要执行的代码,例如关闭文件。
示例代码:
1 2 3 4 5 6 7 8 9 10 try : f = open('test2nd.txt' , 'r' ) except Exception as result: print('捕捉到了异常' ) f = open('test.txt' , 'r' ) else : print('没有异常,真开心' ) finally : print('关闭' ) f.close()
运行结果:
异常的raise
示例代码:
1 2 3 x = 10 if x > 5 : raise Exception('x不能大于5,x的值为{}' .format(x))
运行结果:
1 Exception: x不能大于5,x的值为10
模块
Python模块(Module),是一个Python文件,以.py结尾,包含了Python对象定义和Python语句。
导入模块
import 模块名
1 2 import mathprint(math.sqrt(9 ))
from 模块名 import 功能名
1 2 from math import sqrtprint(sqrt(9 ))
from 模块名 import *
1 2 from math import *print(sqrt(9 ))
import 模块名 as 别名
1 2 import math as sprint(s.sqrt(9 ))
from 模块名 import 功能名 as 别名
1 2 from math import sqrt as sprint(s(9 ))
创建模块
在Python中,每个Python文件都可以作为一个模块,模块的名字就是文件的名字。
定义模块
新建一个Python文件,命名为module.py,并定义test函数。
示例代码:
1 2 3 4 def test (a, b) : print(a + b) test (1 ,1 )
运行结果:
解释说明:test (1,1)是我们为该模型设计了的一个测试方法,实际上这么设计测试方法有误,稍后我们就会看到错哪了。
调用模块
示例代码:
1 2 3 import modulemodule.test(1 ,2 )
运行结果:
好像不对啊!怎么还打印了2?
测试模块
在上文的例子中,无论是当前文件,还是其他已经导入了该模块的文件,在运行的时候都会执行test函数的调用。
解决办法为,让该方法不会被调用。
示例代码:
1 2 3 4 5 6 7 def test (a, b) : print(a + b) if __name__ == '__main__' : test(1 , 1 )
运行结果:
这样就OK了。
示例代码:
1 2 3 import modulemodule.test(1 ,2 )
运行结果:
指定元素
如果一个模块文件中有__all__变量,当使用from xxx import *导入时,只能导入这个列表中的元素。
示例代码:
module.py
1 2 3 4 5 6 7 8 9 __all__ = ['testA' ] def testA () : print('testA' ) def testB () : print('testB' )
1 2 3 4 from module import *testA() testB()
运行结果:
1 2 testA NameError: name 'testB' is not defined
重名怎么办
如果导入多个模块,且模块内有同名功能。当调用这个同名功能的时候,调用到的是后面导入的模块的功能。
示例代码:
module.py
1 2 3 4 5 def test (a, b) : print(a + b) if __name__ == '__main__' : test(1 , 1 )
module2nd.py
1 2 3 4 5 def test (a, b) : print(a - b) if __name__ == '__main__' : test(1 , 1 )
1 2 3 4 from module import testfrom module2nd import *test(1 ,2 )
运行结果:
模块定位顺序
从近到远
当导入一个模块,Python解析器对模块位置的搜索顺序是:
当前目录
如果不在当前目录,搜索环境路径。
如果不在环境目录,搜索安装路径。
所以,自己的文件名不要和已有模块名重复,否则导致模块功能无法使用。
包
包将有联系的模块组织在一起,即放到同一个文件夹下,并且在这个文件夹创建一个名字为__init__.py 文件,那么这个文件夹就称之为包。
创建包
在PyCharm依次点击:New、Python Package、输入包名、然后新建模块。__init__.py文件,这个文件控制着包的导入行为)
示例代码:test_package\module.py
1 2 def info_print () : print('module.py' )
test_package\module2nd.py
1 2 def info_print () : print('module2nd.py' )
导入包
import 包名.模块名
1 2 3 import 包名.模块名包名.模块名.目标
示例代码:
1 2 3 import test_package.moduletest_package.module.info_print()
运行结果:
from 包名 import *
注意:必须在__init__.py文件中添加__all__ = [],控制允许导入的模块列表。
(在模块中,没有__all__,默认所有。但是在包中,没有__all__,不导入任何模块)
示例代码:test_package\__init__.py
1 2 from test_package import *module.info_print()
运行结果:
镜像源
pypi
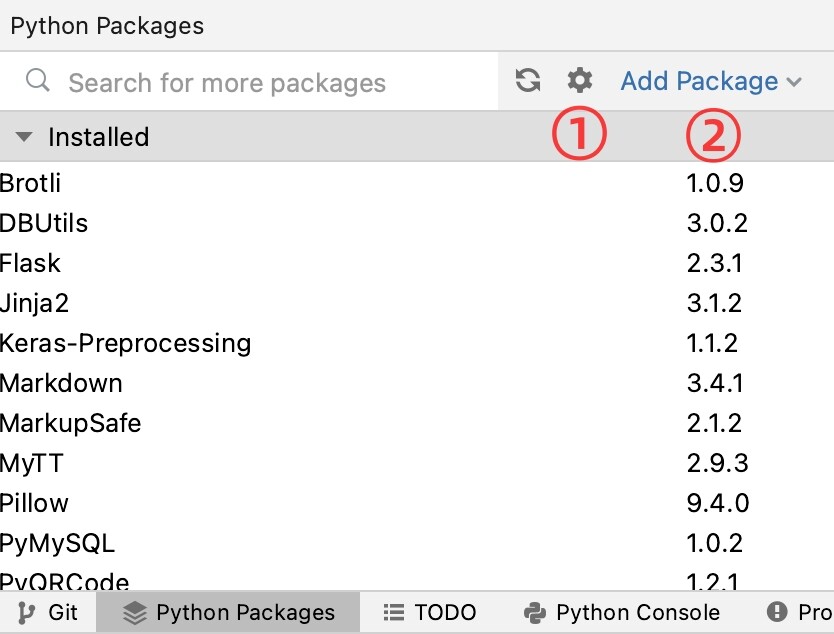
在PyCharm中配置镜像源,点击如图的①:
有些第三方的包,在镜像源可能没有。可以通过如下的网站下载过来,然后点击②进行安装。
anaconda
添加镜像的命令:
1 conda config --add channels <URLS>
在国内使用anaconda,最好删除一下~/.condarc的defaults频道。~/.condarc,删掉即可。
conda镜像站点:
特别的,如果某些包在Conda镜像没有,或者我们想在Conda离线安装,可以采用类似如下的方式:
1 2 3 4 5 import ospackage = input("Input the package:\n" ) command = "pip install %s -i http://pypi.mirrors.ustc.edu.cn/simple --trusted-host pypi.mirrors.ustc.edu.cn" % package os.system(command)
解释说明:os.system(command),在执行外部的命令。
几个包和模块
Python中常见的包和模块很多,比如numpy、pandas、scikit-learn、tensorflow等,这些包我们都讨论过。
在这里,我们主要讨论几个之前没讨论过,但是应用还蛮广泛的。
time和datetime
获取秒级时间戳与毫秒级时间戳、微秒级时间戳
示例代码:
1 2 3 4 5 6 7 8 9 10 11 12 import timet = time.time() print(t) print(int(t)) print(int(round(t * 1000 ))) print(int(round(t * 1000000 )))
运行结果:
1 2 3 4 1638758298.2370481 1638758298 1638758298237 1638758298237048
获取当前日期时间
示例代码:
1 2 3 4 5 6 7 8 9 10 11 12 13 import datetimed = datetime.datetime.now() print(type(d)) print(d) dt = datetime.datetime.now().strftime('%Y-%m-%d %H:%M:%S' ) print(type(dt)) print(dt) dt_ms = datetime.datetime.now().strftime('%Y-%m-%d %H:%M:%S.%f' ) print(type(dt_ms)) print(dt_ms)
运行结果:
1 2 3 4 5 6 <class 'datetime.datetime'> 2021-12-06 17:00:58.189611 <class 'str'> 2021-12-06 17:00:58 <class 'str'> 2021-12-06 17:00:58.189611
将日期转为秒级时间戳
示例代码:
1 2 3 4 5 import timedt = '2021-11-11 11:11:11' ts = int(time.mktime(time.strptime(dt, "%Y-%m-%d %H:%M:%S" ))) print(ts)
运行结果:
将秒级时间戳转为日期
示例代码:
1 2 3 4 5 import timets = 1600000000 dt = time.strftime("%Y-%m-%d %H:%M:%S" , time.localtime(ts)) print(dt)
运行结果:
时间格式转成另一种时间格式
示例代码:
1 2 3 4 5 import datetimedt = '08/02/2021 12:00' dt_new = datetime.datetime.strptime(dt, '%m/%d/%Y %H:%M' ).strftime('%Y-%m-%d %H:%M:%S' ) print(dt_new)
运行结果:
转结构体时间struct_time
示例代码:
1 2 3 4 5 6 7 8 import timeta_dt = time.strptime("2021-10-25 01:02:03" , '%Y-%m-%d %H:%M:%S' ) ta_ms = time.localtime(1666666666 ) print(ta_dt) print(ta_ms)
运行结果:
1 2 time.struct_time(tm_year=2021, tm_mon=10, tm_mday=25, tm_hour=1, tm_min=2, tm_sec=3, tm_wday=0, tm_yday=298, tm_isdst=-1) time.struct_time(tm_year=2022, tm_mon=10, tm_mday=25, tm_hour=10, tm_min=57, tm_sec=46, tm_wday=1, tm_yday=298, tm_isdst=0)
timedelta
timedelta,时间差。
示例代码:
1 2 3 4 5 from datetime import datetime,timedeltatoday = datetime.now().strftime('%Y%m%d' ) print(today) last_60_day = (datetime.now() - timedelta(days=60 )).strftime('%Y%m%d' ) print(last_60_day)
运行结果:
hashlib
hashlib提供了常见的摘要算法,如MD5,SHA1等。
md5
示例代码:
1 2 3 4 5 import hashlibmd5 = hashlib.md5() md5.update('how to use md5 in python hashlib?' .encode('utf-8' )) print(md5.hexdigest())
运行结果:
1 d26a53750bc40b38b65a520292f69306
示例代码:
1 2 3 4 5 6 import hashlibmd5 = hashlib.md5() md5.update('how to use md5 in ' .encode('utf-8' )) md5.update('python hashlib?' .encode('utf-8' )) print(md5.hexdigest())
运行结果:
1 d26a53750bc40b38b65a520292f69306
SHA1
示例代码:
1 2 3 4 5 6 import hashlibsha1 = hashlib.sha1() sha1.update('how to use sha1 in ' .encode('utf-8' )) sha1.update('python hashlib?' .encode('utf-8' )) print(sha1.hexdigest())
运行结果:
1 2c76b57293ce30acef38d98f6046927161b46a44
XML
XML,可扩展标记语言,eXtensible Markup Language。
Python有两种方法解析XML:SAX和DOM
SAX(simple API for XML)
DOM(Document Object Model)《3.DOM和BOM》 中有过讨论。)
假设存在一个XML文件如下:
1 2 3 4 5 6 7 8 9 10 11 12 13 14 15 16 17 18 19 20 21 22 23 24 25 26 27 28 29 30 31 32 33 34 35 36 37 38 39 40 41 42 43 <?xml version="1.0" encoding="UTF-8"?> <breakfast_menu > <food id ="1" > <name > Belgian Waffles</name > <price > $5.95</price > <description > Two of our famous Belgian Waffles with plenty of real maple syrup </description > <calories > 650</calories > </food > <food id ="2" > <name > Strawberry Belgian Waffles</name > <price > $7.95</price > <description > Light Belgian waffles covered with strawberries and whipped cream </description > <calories > 900</calories > </food > <food id ="3" > <name > Berry-Berry Belgian Waffles</name > <price > $8.95</price > <description > Belgian waffles covered with assorted fresh berries and whipped cream </description > <calories > 900</calories > </food > <food > <name > French Toast</name > <price > $4.50</price > <description > Thick slices made from our homemade sourdough bread </description > <calories > 600</calories > </food > <food > <name > Homestyle Breakfast</name > <price > $6.95</price > <description > Two eggs, bacon or sausage, toast, and our ever-popular hash browns </description > <calories > 950</calories > </food > </breakfast_menu >
示例代码:
1 2 3 4 5 6 7 8 9 10 11 12 13 14 15 16 17 18 19 20 from xml.dom.minidom import parseimport xml.dom.minidomDOMTree = xml.dom.minidom.parse("food.xml" ) collection = DOMTree.documentElement print(collection) foods = collection.getElementsByTagName("food" ) for food in foods: print() if food.hasAttribute("id" ): print("id: %s" % food.getAttribute("id" )) name = food.getElementsByTagName('name' )[0 ] print("name: %s" % name.childNodes[0 ].data) price = food.getElementsByTagName('price' )[0 ] print("price: %s" % price.childNodes[0 ].data)
运行结果:
1 2 3 4 5 6 7 8 9 10 11 12 13 14 15 16 17 18 19 <DOM Element: breakfast_menu at 0x1ecab2dd280> id: 1 name: Belgian Waffles price: $5.95 id: 2 name: Strawberry Belgian Waffles price: $7.95 id: 3 name: Berry-Berry Belgian Waffles price: $8.95 name: French Toast price: $4.50 name: Homestyle Breakfast price: $6.95
JSON
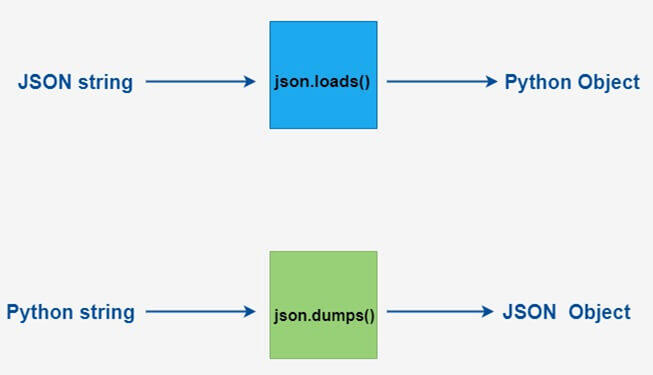
JSON,JavaScript Object Notation,一种轻量级的数据交换格式。json模块来对JSON数据进行编解码。
json.dumps():对数据进行编码。json.loads():对数据进行解码。
Python编码为JSON的类型对应表
Python
JSON
dict
object
list, tuple
array
str
string
int, float
number
True
true
False
false
None
null
JSON解码为Python的类型转换对应表
JSON
Python
object
dict
array
list
string
str
number
int
number
float
true
True
false
False
null
None
示例代码:
1 2 3 4 5 6 7 8 9 10 11 12 13 14 15 16 17 18 19 20 21 22 23 24 25 26 27 28 29 30 31 32 33 34 35 36 37 38 39 40 41 42 43 import jsonprint('字典就是JSON对象' ) d = { 'dict' : {'k1' :'v1' ,'k2' :'v2' }, 'list' : ['l1' ,'l2' ], 'tuple' : ('t1' ,'t2' ), 'str' : 'str' , 'int' : 0 , 'float' : 3.14 , 'True' : True , 'False' : False , 'None' : None } print(type(d)) print(d) print('JSON对象转成JSON-STRING' ) s = json.dumps(d) print(type(s)) print(s) print('JSON-STRING转成JSON对象' ) j = json.loads(s) print(type(j)) print(j) print('-' * 10 ) print(j['dict' ]) print(j['list' ]) print(j['tuple' ]) print(j['str' ]) print(j['int' ]) print(j['float' ]) print(j['True' ]) print(j['False' ]) print(j['None' ])
运行结果:
1 2 3 4 5 6 7 8 9 10 11 12 13 14 15 16 17 18 19 字典就是JSON对象 <class 'dict'> {'dict': {'k1': 'v1', 'k2': 'v2'}, 'list': ['l1', 'l2'], 'tuple': ('t1', 't2'), 'str': 'str', 'int': 0, 'float': 3.14, 'True': True, 'False': False, 'None': None} JSON对象转成JSON-STRING <class 'str'> {"dict": {"k1": "v1", "k2": "v2"}, "list": ["l1", "l2"], "tuple": ["t1", "t2"], "str": "str", "int": 0, "float": 3.14, "True": true, "False": false, "None": null} JSON-STRING转成JSON对象 <class 'dict'> {'dict': {'k1': 'v1', 'k2': 'v2'}, 'list': ['l1', 'l2'], 'tuple': ['t1', 't2'], 'str': 'str', 'int': 0, 'float': 3.14, 'True': True, 'False': False, 'None': None} ---------- {'k1': 'v1', 'k2': 'v2'} ['l1', 'l2'] ['t1', 't2'] str 0 3.14 True False None